In this tutorial we will learn about useReducer in react along with multiple examples
Dead Simple Chat allows you to add chat in minutes to your React Application with the powerful JavaScript Chat SDK and API.
What is a Reducer
With a reducer you can consolidate all the state update logic outside your component in a single function.
When dealing with large states and complex actions you might want to decouple state logic with state updates.
Components with many state updates across many event handlers can become overwhelming
By separating the state management logic from the components the useReducer makes app more maintainable.
Both the useState and useReducer are react hooks that are used to manage state in an application.
Consolidate state logic with a Reducer
As your application grows in size, it can harder to see all the different ways a components state might get updated
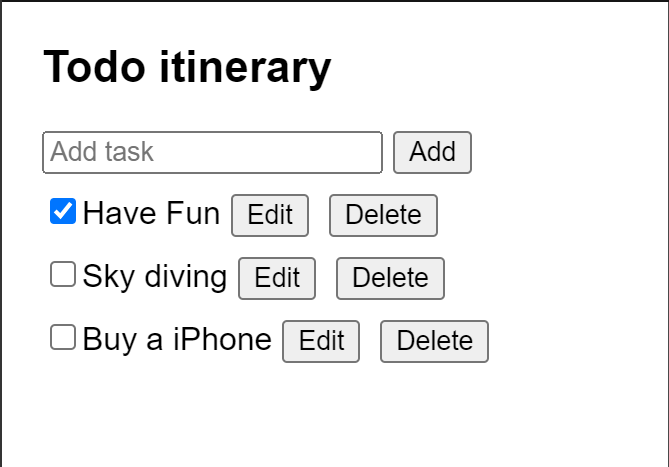
For example: We have a task application below which has 3 different event handlers adding, subtracting and editing various tasks
App.js
import { useImmerReducer } from "use-immer";
import AddTask from "./AddTask.js";
import TaskList from "./TaskList.js";

function tasksReducer(draft, action) {
  switch (action.type) {
    case "added": {
      draft.push({
        id: action.id,
        text: action.text,
        done: false
      });
      break;
    }
    case "changed": {
      const index = draft.findIndex((t) => t.id === action.task.id);
      draft[index] = action.task;
      break;
    }
    case "deleted": {
      return draft.filter((t) => t.id !== action.id);
    }
    default: {
      throw Error("Unknown action: " + action.type);
    }
  }
}

export default function TaskApp() {
  const [tasks, dispatch] = useImmerReducer(tasksReducer, initialTasks);

  function handleAddTask(text) {
    dispatch({
      type: "added",
      id: nextId++,
      text: text
    });
  }

  function handleChangeTask(task) {
    dispatch({
      type: "changed",
      task: task
    });
  }

  function handleDeleteTask(taskId) {
    dispatch({
      type: "deleted",
      id: taskId
    });
  }

  return (
    <>
      <h1>Todo itinerary</h1>
      <AddTask onAddTask={handleAddTask} />
      <TaskList
        tasks={tasks}
        onChangeTask={handleChangeTask}
        onDeleteTask={handleDeleteTask}
      />
    </>
  );
}

let nextId = 3;
const initialTasks = [
  { id: 0, text: "Have Fun", done: true },
  { id: 1, text: "Sky diving", done: false },
  { id: 2, text: "Buy a iPhone", done: false }
];
AddTask.js
import { useState } from 'react';

export default function AddTask({onAddTask}) {
  const [text, setText] = useState('');
  return (
    <>
      <input
        placeholder="Add task"
        value={text}
        onChange={(e) => setText(e.target.value)}
      />
      <button
        onClick={() => {
          setText('');
          onAddTask(text);
        }}>
        Add
      </button>
    </>
  );
}
TaskList.js
import { useState } from 'react';

export default function TaskList({tasks, onChangeTask, onDeleteTask}) {
  return (
    <ul>
      {tasks.map((task) => (
        <li key={task.id}>
          <Task task={task} onChange={onChangeTask} onDelete={onDeleteTask} />
        </li>
      ))}
    </ul>
  );
}

function Task({task, onChange, onDelete}) {
  const [isEditing, setIsEditing] = useState(false);
  let taskContent;
  if (isEditing) {
    taskContent = (
      <>
        <input
          value={task.text}
          onChange={(e) => {
            onChange({
              ...task,
              text: e.target.value,
            });
          }}
        />
        <button onClick={() => setIsEditing(false)}>Save</button>
      </>
    );
  } else {
    taskContent = (
      <>
        {task.text}
        <button onClick={() => setIsEditing(true)}>Edit</button>
      </>
    );
  }
  return (
    <label>
      <input
        type="checkbox"
        checked={task.done}
        onChange={(e) => {
          onChange({
            ...task,
            done: e.target.checked,
          });
        }}
      />
      {taskContent}
      <button onClick={() => onDelete(task.id)}>Delete</button>
    </label>
  );
}
Index.js
import React, { StrictMode } from "react";
import { createRoot } from "react-dom/client";
import "./styles.css";

import App from "./App";

const root = createRoot(document.getElementById("root"));
root.render(
  <StrictMode>
    <App />
  </StrictMode>
);Styles.css
* {
  box-sizing: border-box;
}

body {
  font-family: sans-serif;
  margin: 20px;
  padding: 0;
}

h1 {
  margin-top: 0;
  font-size: 22px;
}

h2 {
  margin-top: 0;
  font-size: 20px;
}

h3 {
  margin-top: 0;
  font-size: 18px;
}

h4 {
  margin-top: 0;
  font-size: 16px;
}

h5 {
  margin-top: 0;
  font-size: 14px;
}

h6 {
  margin-top: 0;
  font-size: 12px;
}

code {
  font-size: 1.2em;
}

ul {
  padding-left: 20px;
}

button {
  margin: 5px;
}
li {
  list-style-type: none;
}
ul,
li {
  margin: 0;
  padding: 0;
}
Package.json
{
  "dependencies": {
    "react": "^18.0.0",
    "react-dom": "^18.0.0",
    "react-scripts": "^5.0.0"
  },
  "main": "/index.js",
  "devDependencies": {}
}
How to refactor useState to useReducer
Dead Simple Chat allows you to add chat in minutes to your React Application with the powerful JavaScript Chat SDK and API.
As the application grows, so does the state logic around it. To reduce complexity and consolidate all the state logic in one place you can refactor the logic in a single function called the reducer
Reducers are another way to handle state and you can refactor useState to useReducer in the following 3 ways
- Move from setting state to dispatching actions.
- Write a reducer function.
- Use the reducer from your component.
Step 1: Move from setting state to dispatching actions
event handlers currently specify what to do by setting state
function handleAddTask(text) {
  setTasks([
    ...tasks,
    {
      id: nextId++,
      text: text,
      done: false,
    },
  ]);
}

function handleChangeTask(task) {
  setTasks(
    tasks.map((t) => {
      if (t.id === task.id) {
        return task;
      } else {
        return t;
      }
    })
  );
}

function handleDeleteTask(taskId) {
  setTasks(tasks.filter((t) => t.id !== taskId));
}Remove all the state setting logic and you are left with three event handlers
handleAddTask(text) is called when the user presses "Add"
When the user presses the save button the HandleChangeTask is called, and
when the user presses the delete button the handleDeleteTask(taskId) is called
When managing the state using reducer, you tell react what the user did (action) by the means of emitting events, rather than what to do directly by setting the state.
So instead of setting the task by setting the state. You are dispatching actions like AddTask,ChangeTask and DeleteTask
This is because the state logic lives elsewere. This is also more description of what the user wants to do
function handleAddTask(text) {
  dispatch({
    type: 'added',
    id: nextId++,
    text: text,
  });
}

function handleChangeTask(task) {
  dispatch({
    type: 'changed',
    task: task,
  });
}

function handleDeleteTask(taskId) {
  dispatch({
    type: 'deleted',
    id: taskId,
  });
}The action is the Object that is passed to the dispatch. With regards to the above example the action are these
//action examples
//example 1
{
    type: 'added',
    id: nextId++,
    text: text,
  }

//example 2
{
    type: 'changed',
    task: task,
  }
//example 3
{
  type: 'deleted',
  id: taskId,
}Action is a regular JavaScript Object that should contain the minimal data about the action or what happened.
You can then add the dispatch function which will process this data. We will add this at a later stage
By convention the action object contains a string that describes what happened but you can give it any shape you like
dispatch({
  // specific to component
  type: 'what_happened',
  // other fields go here
});
Step 2: Write a reducer function
A reducer function is the place where you would write the state logic. It takes two arguments
- the current state
- the action Object
and the reducer function returns the next object
The react will set the state that is return from the reducer
Let us learn more about this using an example
In this example we will move the state setting logic from the state to the reducer function in three steps
- As a first argument declare the current state that is the
tasks - Then declare the action Object, as the second argument
- return the next (updated state) from the reducer function which react will update the current state to
function tasksReducer(tasks, action) {
  if (action.type === 'added') {
    return [
      ...tasks,
      {
        id: action.id,
        text: action.text,
        done: false,
      },
    ];
  } else if (action.type === 'changed') {
    return tasks.map((t) => {
      if (t.id === action.task.id) {
        return action.task;
      } else {
        return t;
      }
    });
  } else if (action.type === 'deleted') {
    return tasks.filter((t) => t.id !== action.id);
  } else {
    throw Error('Unknown action: ' + action.type);
  }
}Reducer function can also be declared outside of the component for better readability. This is possible because it takes tasks as an argument
Step 3: Use the reducer from your component
Now let us hook the tasksReducer to the component.
Import {useReducer} from 'react';Then replace the useState with useReducer like
useState
const [tasks, setTasks] = useState(initialTasks);useReducer
const [tasks, dispatch] = useReducer(tasksReducer, initialTasks);the useReducer hook is like the useState.
You pass it an initial state and it returns an stateful value and a way to set the state (using the dispatch function in case of useReducer)
The useReducer function takes 2 arguments
- A reducer function
- An initial state
and it returns
- A stateful value
- A dispatch function
Now its completed This is what the code looks like
How to write a reducer well
Dead Simple Chat allows you to add chat in minutes to your React Application with the powerful JavaScript Chat SDK and API.
Here are 2 tips on how to write a reducer well
- Reducers must be pure: Meaning same inputs must result in same outputs. This is because reducers run during rendering similar to state updater functions
- Each action should describe a single user interaction. It does not matter how many data points the action is having an impact on, the action should be based on user interaction and not on data points. For example if a form has 5 fields and a reset button and if the user presses the reset button you should build a reset action and not 5 setField actions.
Advantages of useReducer
State updates are predictable: when all the state logic is consolidated at the same place it is easy to manage and understand. Thus the state updates and changes are predictable
Encapsulation of state logic: when you have all the state logic in one place you have cleaner code and more maintainable code
Easier testing: When all the logic is in one place it is easier to test for. As compared to when all the login is all over the place and multiple components have event handlers dictating the logic
Code Size: Genererally with useReducer you will need to write more code as compared to with useState. But if you have a lot of events in your application then consolidating the code to one place reduces the rewriting of code
Readability: useState is very simple when the state updates are simple. But as complexicites increase the useState can bloat your component and can become very difficult to read. In case of useReducer it has all the logic in one place and hence is very easy to read, can you can easily seprate the how of update logic with what happened of event logic in one place
Debugging: When you have bug in useState it is difficult to say where the bug happened and why. With the useReducer you can use a console.log to log every state update and why it happened due to which action and find out if the bug is in action or the reducer logic
Testing: A reducer is a pure function which means that it does not depend on its component and you can easily export it and test it. For complex state logic it can be sensible to test it in a seprate environment to confirm it returns the particular state for a particular initial state and action.
Personal Preference: Some people like to useState other like to useReducers. It is a personal preference. To each his own
We recommend to useReducer if you experiencing more bugs due to incorrect state updates in your component.
You can also introduce more structure to the code with useReducers. You can even useState and useReducer in the same component as well if that is what you prefer
Dead Simple Chat allows you to add chat in minutes to your React Application with the powerful JavaScript Chat SDK and API.
Conclusion
In this article we learnt about the following
- How to dispatch actions from handlers
- Write a reducer function that returns the next state based on initial state and action
- How to replace
useStatewithuseReducer
Thanks for reading this article
Ready to Add Chat to Your Website?
Get started for free. No credit card required.
Start a Free Trial
![Webinar Chat: The Complete Guide to Engaging Your Audience [2026]](/blog/content/images/size/w600/2026/02/article-hero-webinar-chat.svg)
