
In this blog post, we will learn more about the new Server Side components introduced in React 18.
You can use React Server Components with Next.js 13 beta release.
The Server and Client components span allows developers to build rich interactive applications that offer dynamic client-side experiences and performance of server-side rendering.
In this blog post, we will look at the server and client-side components, their difference and how to use them in your application.
If you are looking for a React Native Chat SDK to build in app chat messaging application, you can consider DeadSimpleChat React Native SDK
Server Components
Server Components allow you to leverage server infrastructure to speed up your React applications.
Server Components help reduce bundle size, and try to render the component on the backend as much as possible and send the HTML to the client.
Then the interactivity to the components can be added using the Client Side Components, and the majority of data fetching etc. can remain on the Server Side.
With Server Side components you can directly query your database to fetch the data to render and layout saving round-trips from the client.
In the Server Side components, you cannot use the useState() , onChange(), useReducer() , useEffect() hooks.
Client Components
In Next.JS the Client components are hydrated and sent to the client side, where they are used by React.
Most of the static rendering is done on the server side, but if the client component has some interactivity then the interactive parts are rendered on the client.
By default in Next.js the component is a server-side component, to make the component a client-side component you have to write 'use client'; on top of the component file.
Example:
// 'use client' directive is required to specify the client component. If this directive is not specified then the component is treated as a server component.
'use client';

import { useState } from "react";

export default function Counter() {
    const [count, setCount] = useState(0);

    return (
        <div>
        	<p>Counter {count}</p>
			<button onClick={()=> setCount(count + 1)}>Increment</button>
<button onClick={()=> setCount(count - 1)}>Decrement</button>
		</div>
	);
}
Once 'use client'; is defined all the libraries imported in the Client Component become part of the client bundle.
Any component that does not have a 'use client; directive will be rendered on the server.
The client components are rendered on the Client, but when using Next.JS the client component can be rendered on the server as well and hydrated to the client.
When to use Server / Client Components?
Server Components should be used by default unless you need to use hooks like useState, handle clicks or other events or need to access browser-specific APIs
Here is a quick summary of when server components and client components:
Server Components:
- Fetching Data
- Directly accessing databases
- Directly access sensitive API
Client Components:
- Add interactivity and event listeners like
onClickandonChange - Using state
useState(),useEffect()hooks - If you want to use Context
- Accessing browser-only APIs
- Using React Class Components.
Interleaving Server and Client Components
The Server and Client components can be interleaved with one another.
You can use a Client Component inside a Server Component and you can also use the Server Component inside Client Component but with some restrictions, which will look at.
It is best to keep your client component at the leaves of your component tree.
For e.g, you have a webpage with a logo, sidebar, blog posts and dynamic navigation and search.
Then rather than making the whole page a Client Component you should make the whole page a Server Component and make just the Navbar and Search as client components.
There are some restrictions when importing a Server Component inside of the child component because the Server Component might have some server-side only code, like querying a database.
This will not work ❌
'use client';

import ServerComponent from "./ServerComponent";

export default function ClientComponent() {
    return (
    	<div>
        	<h1>Server Component Below</h1>
        	<ServerComponent />
        </div>
    );
}
Instead, you should pass the Server Component as a child prop to the child component, and wrap both components in another server component.
Do this instead ✅
'use client';


export default function ClientComponent({ children }) {
    return (
    	<div>
        	<h1>Server Component Below</h1>
            { children }
        </div>
    );
}Then wrapping both the components in another Server Component
import ChildComponent from "./ChildComponent";
import ServerComponent from "./ServerComponent";

export default function HomePage() {
	return (
    	<ClientComponent>
        	<ServerComponent />
        </ClientComponet>
        );
}
With the above pattern, React will render the ServerComponent on the backend and then send the generated HTML to the Client Component.
Dead Simple Chat allows you to easily add Chat to any React Application using powerful Javascript Chat SDK.
Data Fetching in Server Components
In the new beta version of Next.js the data fetching has been greatly simplified using the new data fetching system built on top of React.
We will look at how we fetch the data on the server side components and how to use the new fetch() API.
Next.js and React has extended the Javascript fetch() API to add automatic request deduping, caching and cache re-validation.
You can now make the same fetch() request in multiple react components and all the requests deduped, only one request will be made.
The new data fetching system also added async/await in the React Server Side components to greatly simplify data fetching.
Look at the following Server Component:
async function fetchBlogPosts() {
  const res = await fetch("https://jsonplaceholder.typicode.com/posts");

  if (!res.ok) {
    throw new Error("Error occurred when fetching posts");
  }
  return res.json();
}

export default async function Blog() {
  const posts = await fetchBlogPosts();

  return (
    <div className="flex items-center w-full h-full p-10 ">
      <ul className="space-y-10">
        {posts.map((post: any) => (
          <li key={post.id}>
            <h1 className="text-2xl font-bold">{post.title}</h1>
            <p className="text-lg">{post.body}</p>
          </li>
        ))}
      </ul>
    </div>
  );
}
We have created a Blog Server-side component and using async/await in our server-side component to fetch the posts via the API and display then on the page.
Instead of calling the API to fetch the posts, we could also directly query a database to fetch the posts.
Check the example code below, we are directly query the database to fetch the list of blog posts and then rendering them on the page.
import db from "../db";
async function fetchBlogPosts() {
  const { rows } = await db.query("SELECT * FROM blog_posts");
  return rows;
}

export default async function Dashboard() {
  const posts = await fetchBlogPosts();

  return (
    <div className="flex items-center w-full h-full p-10 ">
      <ul className="space-y-10">
        {posts.map((post: any) => (
          <li key={post.id}>
            <h1 className="text-2xl font-bold">{post.title}</h1>
            <p className="text-lg">{post.body}</p>
          </li>
        ))}
      </ul>
    </div>
  );
}
Using React Suspense
To improve the user experience we can use react suspense and render the data as soon as possible.
Consider the following example:
import { Suspense } from "react";
import db from "../db";

async function fetchBlogPosts() {
  const res = await fetch("https://jsonplaceholder.typicode.com/posts");

  if (!res.ok) {
    throw new Error("Error occurred when fetching posts");
  }
  return res.json();
}

async function fetchAuthors() {
  const { rows } = await db.query("SELECT * FROM authors");
  return rows;
}

// @ts-ignore
async function AuthorsComponent({ promise }) {
  const authors = await promise;
  return (
    <div className="flex flex-col items-center w-full h-full p-10 ">
      <div>Authors</div>
      <ul className="space-y-10">
        {authors.map((author: any) => (
          <li key={author.id}>
            <h1 className="text-2xl font-bold">{author.name}</h1>
            <p className="text-lg">{author.email}</p>
          </li>
        ))}
      </ul>
    </div>
  );
}
// @ts-ignore
async function BlogPostsComponent({ promise }) {
  const posts = await promise;
  return (
    <div className="flex flex-col items-center w-full h-full p-10 ">
      <div>Blog Posts</div>
      <ul className="space-y-10">
        {posts.map((post: any) => (
          <li key={post.id}>
            <h1 className="text-2xl font-bold">{post.title}</h1>
            <p className="text-lg">{post.body}</p>
          </li>
        ))}
      </ul>
    </div>
  );
}

// @ts-ignore
export default async function Page() {
  const postsPromise = fetchBlogPosts();
  const authorsPromise = fetchAuthors();

  return (
    <div className="grid grid-cols-2">
      <Suspense fallback={<div>Loading blog posts..</div>}>
        <BlogPostsComponent promise={postsPromise} />
      </Suspense>
      <Suspense fallback={<div>Loading authors..</div>}>
        <AuthorsComponent promise={authorsPromise} />
      </Suspense>
    </div>
  );
}
In the above code, we have created two method fetchBlogPosts() and fetchAuthors().
We are calling the jsonplaceholder mock API to fetch a list of posts, and we are fetching the list of authors from the database.
So, we are mixing the data sources here, the blog posts are coming from an API endpoint and the authors are coming from the database.
We are creating a AuthorsComponent to display the list of authors. The Authors component accepts a promise as a prop and then resolves the promise and displays the data.
The same thing is with the BlogPostsComponent , this component also accepts a promise as a prop, and then resolves the promise to display a list of blog posts.
We are doing this to use React Suspense, React Suspense is updated in React 18 to be used with data fetching.
By wrapping our <AuthorsComponent/> and <BlogPostsComponet/> in the suspense block we can render the page and display the message "Loading Blog posts.." and "Loading authors.." and display them as soon as we get the data.
Dead Simple Chat allows you to easily add Chat to any React Application using powerful Javascript Chat SDK.
Building Sample Blog Application
Let's build a sample application using Next 13.2, Our application will be a blog application, it will display a list of blog posts.
Users can click on the blog post to open the blog post page, which will contain the blog contents and comments.
In the guide, we use all the concepts that we have learned in the blog post and we will build the application from start to finish.
Pre-requisite
First, make sure your you have the following:
- Node.js 16.8 or later
- MacOS, Windows (including WSL) or Linux
Step 1: Scaffold the Next.js beta application
To use the Server Side Components we would have to use the beta app/ directory feature. To Scaffold the application with app/ directory run the following command
npx create-next-app@latest --experimental-appThe command will run and it will ask you some questions, you can select the following options:
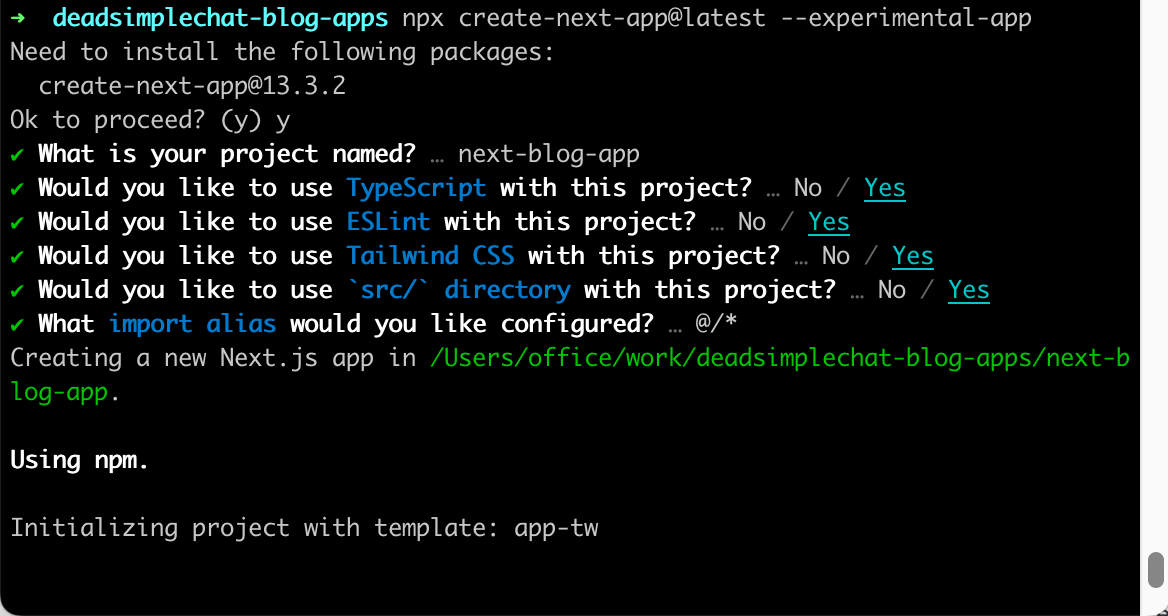
Then cd into the project directory using
cd next-blog-appStep 2: Launch the application
After we cd into the application, we can launch the application by running the command
npm run devOur application will be live at http://localhost:3000
Step 3: Understanding the Directory Structure
All the server-side components are stored in src/app folder. In the src/app folder files with specific names have special meanings.
page.tsx- Thepage.tsxwill be the default component that is rendered when the user visits the homepage.layout.tsx- Here you can define the global layoutloading.tsx- In this file, you can add a loading component which will be displayed when data is being loaded during navigation.error.tsx- In this file, you can define a component to handle errors and display error message to the user.
If you can create another folder insider app and create a page.tsx file then it will become a route.
For E.G if you create a folder named src/app/about and inside the about folder you create a file page.tsx src/app/about/page.tsx then if you go to http://localhost:3000/about then the component src/app/about/page.tsx will be rendered.
Inside the src/app/about folder you can also create all the above files like layout.tsx, loading.tsx etc. and they will apply to all the sub-routes of the about.
Step 4: Building the Home Page
Edit the file src/app/globals.css and remove everything except for the following:
@tailwind base;
@tailwind components;
@tailwind utilities;Open the file src/app/page.tsx and replace it with the following contents:
import Link from "next/link";

async function fetchBlogPosts() {
  const res = await fetch("https://jsonplaceholder.typicode.com/posts");

  if (!res.ok) {
    throw new Error("Error occurred when fetching posts");
  }
  return res.json();
}

export default async function Home() {
  const posts = await fetchBlogPosts();

  return (
    <div className="flex flex-col items-center w-full h-full p-10 ">
      <div className="text-2xl font-bold">Blog Posts</div>
      <div className="my-10 border-2 w-full"></div>
      <ul className="space-y-10">
        {posts.map((post: any) => (
          <li key={post.id}>
            <h1 className="text-xl font-bold hover:text-indigo-500 hover:underline">
              <Link href={"/posts/" + post.id}>{post.title}</Link>
            </h1>
          </li>
        ))}
      </ul>
    </div>
  );
}
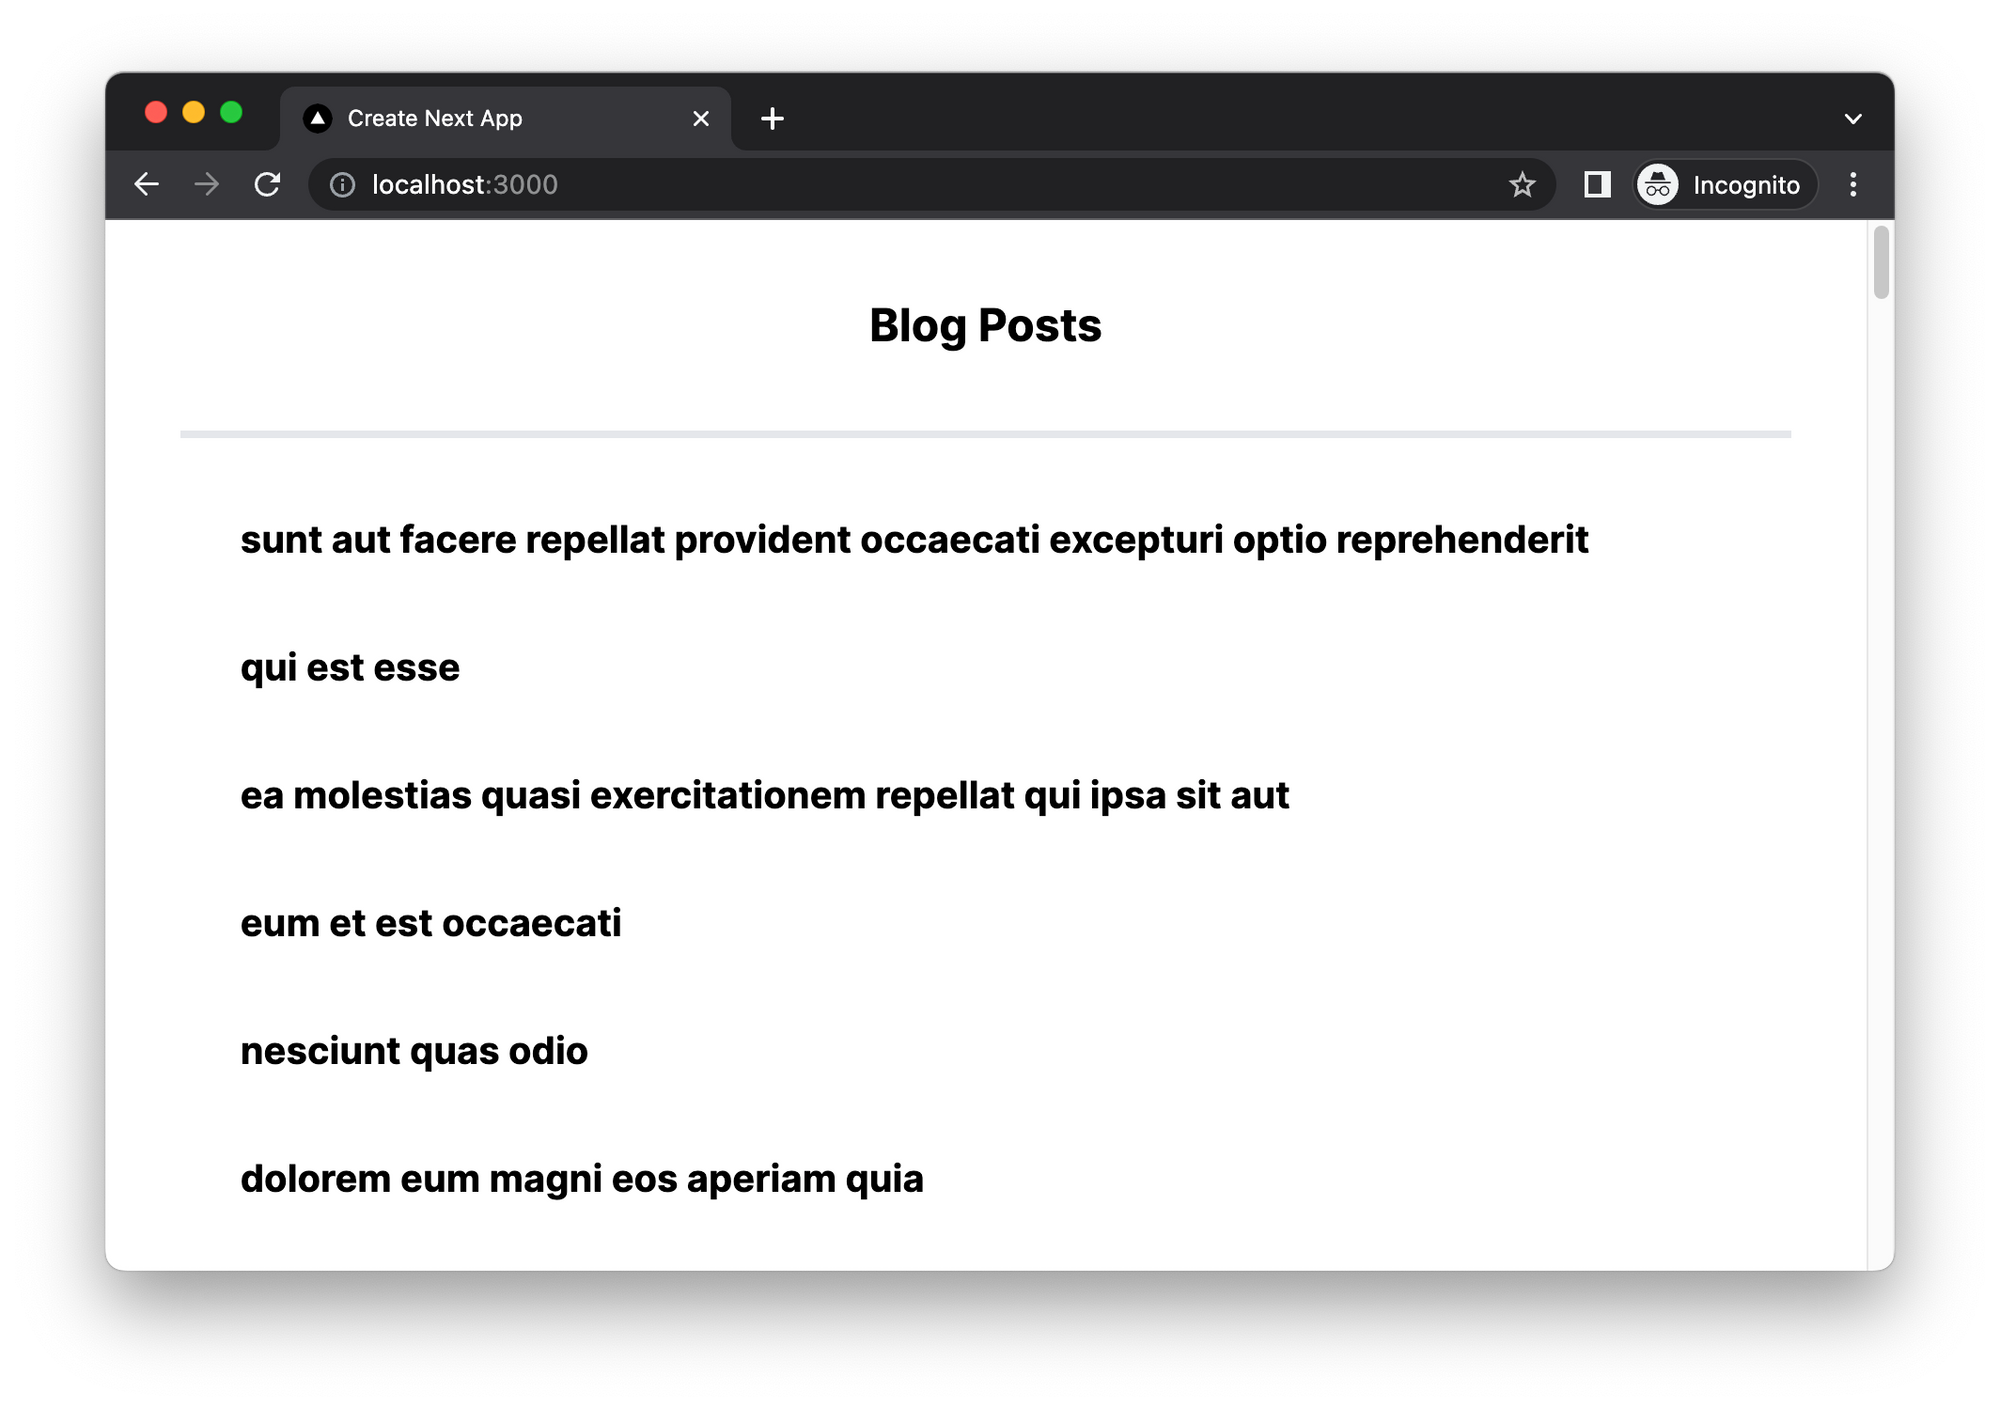
We are fetching a list of blog posts and displaying them on the screen.
We are also adding a link to each post using the <Link component.
When we run this application we can see a list of blog posts displayed
Step 5: Building Blog Post Component
Now let's build the component to display individual blog posts. The URL for each blog post is dynamic.
We have created a link to each post, and the link has the following URL: /posts/id which is /posts/1, /posts/2 and so on.
In Next.JS if we want to create a dynamic route, we wrap the folder name is square brackets e.g: [slug]
So our code to hold the Blog Post Component will be in the folder src/app/posts/[slug]/page.tsx
Here is the code for our Blog Post Page:
import { Suspense } from "react";

async function fetchBlogPost(id: string) {
  const res = await fetch("https://jsonplaceholder.typicode.com/posts");

  if (!res.ok) {
    throw new Error("Error occurred when fetching posts");
  }
  const posts = await res.json();

  for (let post of posts) {
    if (post.id == id) {
      return post;
    }
  }
}

async function fetchComments(id: string) {
  const res = await fetch("https://jsonplaceholder.typicode.com/comments");

  if (!res.ok) {
    throw new Error("Error occurred when fetching comments");
  }
  return res.json();
}

export async function BlogPost({ promise }) {
  const post = await promise;

  return (
    <>
      <h1 className="text-2xl font-bold text-center">{post.title}</h1>
      <p className="text-lg">{post.body}</p>
    </>
  );
}

export async function Comments({ promise }) {
  const comments = await promise;
  return (
    <>
      <ul>
        {comments.map((item: any) => (
          <li key={item.id}>
            <h3>{item.name}</h3>
            <p>{item.email}</p>
            <p>{item.body}</p>
          </li>
        ))}
      </ul>
    </>
  );
}

export default async function Post({ params }) {
  const postPromise = fetchBlogPost(params.slug);
  const commentsPromise = fetchComments(params.slug);

  return (
    <div className="flex flex-col max-w-7xl p-10 space-y-10">
      <BlogPost promise={postPromise} />
      <h2 className="text-xl">Comments</h2>
      <Suspense fallback={<div>Loading Comments..</div>}>
        <Comments promise={commentsPromise} />
      </Suspense>
      <div></div>
    </div>
  );
}
In the above code, we have created two methods, one is to fetchPosts and another one to fetchComments.
We have also created two components, BlogPost component and Comments component, and we have wrapped the Comments component inside Suspense which will cause the "Loading Comments.." message to display on the screen.
Conclusion
I hope this blog post would help you in understanding what React Server Components are and how to use them in Next.JS
Ready to Add Chat to Your Website?
Get started for free. No credit card required.
Start a Free Trial
![Webinar Chat: The Complete Guide to Engaging Your Audience [2026]](/blog/content/images/size/w600/2026/02/article-hero-webinar-chat.svg)
