In this article we are going to learn about Next JS. For this purpose we are assuming that you are familiar with Next Js and we are going to directly go into our topic of links in Next Js
NextJs Router System: Client Side and Server Side routing
In modern web applications a robust router system is very important. Next Js router system is one such system which simplifies both client side and server side navigation
Let us consider both how nextjs handles both these types of routing efficiently
Client Side navigation in Next Js using the Links Component
Next Js has automatic routing based on the file system. You have the pages directory and the files and folders inside of the pages directory automatically becomes routes, making it easy to set up client side navigation
For example: When you create a new file inside the pages direcctory the next js automatically creates a new route for that file. like you created a file with company information inside the pages directory and named it about.js
Next Js will create a new route named /about pointing to that file
// pages/about.js

import React from 'react';

const About = () => (
  <div>
    <h1>About the company</h1>
    <p>Some information about the company whose about page this is.</p>
  </div>
);

export default About;
Creating Client side navigation
For client side navigation we have the built in link component you need to wrap the link component around the <a> tags so as to enable client side navigation without page reload
This cuts down loading time and improves user navigation
// components/Navbar.js

import React from 'react';
import Link from 'next/link';

const Navbar = () => (
  <nav>
    <ul>
      <li>
        <Link href="/">
          <a>Home</a>
        </Link>
      </li>
      <li>
        <Link href="/about">
          <a>About</a>
        </Link>
      </li>
    </ul>
  </nav>
);

export default Navbar;
Pros and Cons Compared to traditional Anchor tags
Pros
- Faster Navigation
- Automatic code splitting
- Integation with Next.Js features
Cons
- Requires JavaScritpt unlike traditional Anchor tags
Server Side Rendering
In server side rendering the content of the webpage is generated on the server instead of the client's browser.
This includes the server fetching the data, rendering the HTML and sending a fully formatted web page to the client
This article is brought to you by DeadSimpleChat Chat API and SDK for your website and app
This offers significant boost in performance, SEO and user experience and most of the CPU and rendering resources are spent on the server and very little work remains for the client to do
In next js we can use getServerSideProps function to implement server side data fetching and optimize page rendering
Let us consider an example to understand this better. Here we are going to fetch and display a user's profile page through server side rendering
// pages/profile.js

import React from 'react';

const Profile = ({ user }) => (
  <div>
    <h1>{user.name}</h1>
    <p>Email: {user.email}</p>
  </div>
);

export default Profile;

export async function getServerSideProps(context) {
  const response = await fetch('https://jsonplaceholder.typicode.com/users/1'); // Fetch user data from API
  const user = await response.json();

  return {
    props: { user }
  };
}
Here we are using the Next Js efficient and built in router system to enhance our development process
useRouter Hook and its Features
useRouter is a custom hook that ir provided by next js. With the help of useRouter hook you can access and manipulate essential routing information like
- Ability to change query parameters
- programmatically navigate the application
Benefits
- Ability to access query parameters
- Conditional rendering and ability to fetch data based on routing
- Ability to programmatically navigate
Example
Creating the application
Create a new next js app using create-next-app
npx create-next-app my-next-app
cd my-next-app
Next create a new file named about.js inside the pages directory
// pages/about.js

import React from 'react';

const About = () => (
  <div>
    <h1>About</h1>
    <p>Information about the company</p>
  </div>
);

export default About;
Now that we have created the about page we need to add a link to the home page
go to your index.js file and add a link to the about page like
// pages/index.js

import React from 'react';
import Link from 'next/link';

const Index = () => (
  <div>
    <h1>Home</h1>
    <p>This is the Home page.</p>
    <Link href="/about">About Page</Link>
  </div>
);

export default Index;Next we start the development server by
npm run dev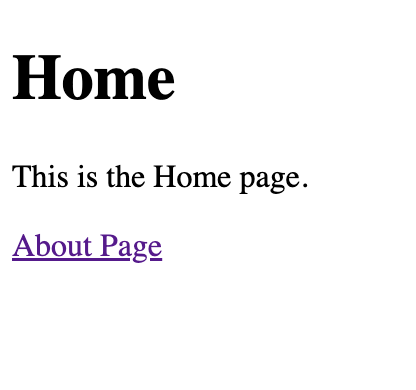
Then the app will run on localhost 3000. you can open it in your browser to look at the app
you can see the live app working here: https://codesandbox.io/p/sandbox/vigorous-wind-6wygcf?file=/pages/index.js:14,22
Link building best Practices and Techniques
Prefetching
It is a technique where the pages are preloaded in the background as soon as they appear in the viewport
This results in better utilization of network and system respources for better user experiences as the pages are ready to be displayed whenever user needs it.
Prefetching with the Link Compoenent
The <link> component by default prefetches the pages. When the app is running in production mode, the nextjs automatically prefetches the pages when they appear in the viewport
If you want to you can disable this behaviour. This could save network resources if the user is on a metered connection
The system downloads the data only when the user scroll to it in the viewport.
You can disable this behaviour by passing the prefetch={false} prop
<Link href="/dashboard" prefetch={false}>
  Dashboard
</Link>
Dynamic Routes segments
These are flexible URLs that are created based on the route parameters.
These allow you to create without multiple static routes, for use-cases where you want to create pages without defining routes
In the Next.js dynamic routes are represented by adding brackets (`[]`) to the filename for example [userId].js and such.
How to use useRouter in nextjs
useRouter is a easy to use tool to access route parameters from dynamic routes.
The useRouter hook gives you a query Object which will contain the parsed parameters
Let us consider a coding example to learn more about this
here we are creating a dynamic route pages/blog/[id]/.js
// pages/blog/[id].js

import React from 'react';
import { useRouter } from 'next/router';

const BlogPost = ({ post }) => {
  // get the id from the router
  const router = useRouter();
  const { id } = router.query;

  // get the blog post data from the id
  // ...

  return (
    <div>
      <h1>{post.title}</h1>
      <p>{post.content}</p>
    </div>
  );
};

export default BlogPost;
Link Wrapping and Customizing Style
With nextjs you can apply custom styles to your <Link> component. If the child component of a <Link> component is a styled component then you must pass the passHref to have proper functionality
import Link from 'next/link';
import styled from 'styled-components';

// This creates a custom styled component
const RedLink = styled.a`
  color: red;
`;
function NavLink({ href, name }) {
  return (
    <Link href={href} passHref>
      <RedLink>{name}</RedLink>
    </Link>
  );
}

export default NavLink;
nextjs also supports scoped css through CSS modules and styled jsx as well
// components/MyLink.module.css

.link {
  color: blue;
  text-decoration: none;
}

// components/MyLink.js

import Link from 'next/link';
import styles from './MyLink.module.css';

const MyLink = ({ href, text }) => (
  <Link href={href}>
    <a className={styles.link}>{text}</a>
  </Link>
);

export default MyLink;
using styled jsx
import Link from 'next/link';

const MyLink = ({ href, text }) => (
  <Link href={href}>
    <a>
      {text}
      <style jsx>{`
        a {
          color: blue;
          text-decoration: none;
        }
      `}</style>
    </a>
  </Link>
);

export default MyLink;
How to handle external links in Nextjs
To handle external links in nextjs you have to use the traditional <a> tags to navigate to external links in nextjs

These links points to external pages that are outside of your nextjs application
example displaying external link use
// pages/index.js

import React from 'react';
import Link from 'next/link';

const Index = () => (
  <div>
    <h1>Home</h1>
    <p>This is the Home page.</p>

    {/* Internal link using the Link component */}
    <Link href="/about">
      <a>About Us</a>
    </Link>

    {/* External link using the plain HTML <a> tag */}
    <a href="https://www.example.com" target="_blank" rel="noopener noreferrer">
      Visit Example.com
    </a>
  </div>
);

export default Index;
In this example we are using the link component for internal usage and using the anchor tag <a> for link that are external from the nextjs app
Fix common linking issues in NextJs
Missing passHref in custom components
You might experience issues with the <link> component not passing down the href to nested components inside custom styling components
This could be because you have forgotton the passHref prop to the Link component, you need to pass it to ensure the proper functionality

Using Dynamic routes incorrectly
using navigation programmatically without useRouter hook enables both access to route parameters and programmatic navigation.
Example
import { useRouter } from 'next/router';

function LoginForm() {
  const router = useRouter();

  const handleSubmit = async (e) => {
    e.preventDefault();

    // Validate and process form data...
    const isSuccess = true;

    // Navigate programmatically if successful
    if (isSuccess) {
      router.push('/dashboard');
    }
  };

  return (
    <form onSubmit={handleSubmit}>
      {/* Your form inputs here */}
      <button type="submit">Submit</button>
    </form>
  );
}

export default LoginForm;
By addressing these common issues in nextjs we can have smooth navigation and user experience
Implementing best practices in our apps will lead to better handling of edge cases and good performance of our application
Integration with React Based libraries
In this section we will learn about different UI libraries that work well with NextJS and how you can install and use them in your projects
step 1 Installation
You can easily install any library with npm. For demo purposes here we will be using Material UI
npm install @mui/material @emotion/react @emotion/styledStep 2 Adding the library in Next Js App
Import and configure the UI components in the NextJs application
For Material UI we need to create a _document.js file in the pages directory. then thre include the required configurations
// pages/_document.js

import React from "react";
import Document, { Html, Head, Main, NextScript } from "next/document";
import { ServerStyleSheets } from "@mui/styles";
import theme from "../src/theme";

class MyDocument extends Document {
  render() {
    return (
      <Html lang="en">
        <Head>
          <meta name="theme-color" content={theme.palette.primary.main} />
          <link
            rel="stylesheet"
            href="https://fonts.googleapis.com/css?family=Roboto:300,400,500,700&display=swap"
          />
        </Head>
        <body>
          <Main />
          <NextScript />
        </body>
      </Html>
    );
  }
}

MyDocument.getInitialProps = async (ctx) => {
  const sheet = new ServerStyleSheets();
  const originalRenderPage = ctx.renderPage;

  ctx.renderPage = () =>
    originalRenderPage({
      enhanceApp: (App) => (props) => sheet.collect(<App {...props} />),
    });

  const initialProps = await Document.getInitialProps(ctx);

  return {
    ...initialProps,
    styles: (
      <>
        {initialProps.styles}
        {sheet.getStyleElement()}
      </>
    ),
  };
};

export default MyDocument;
Cross Referencing the components to and from Next Js to external libraries
Now that you have set up the library, you are ready to use the components in your NextJs

Let us use teh AppBar component from Material UI and integrate it in Next.js <link> component for navigation
Create AppBar
In the components folder of our NextJs project create a new file called AppNavbar.js containing the AppBar Configuration
// components/AppNavbar.js

import React from "react";
import { AppBar, Toolbar, Typography } from "@mui/material";
import Link from "next/link";

const AppNavbar = () => {
  return (
    <AppBar position="static">
      <Toolbar>
        <Link href="/" passHref>
          <Typography variant="h6" component="a">
            Home
          </Typography>
        </Link>
        <Link href="/about" passHref>
          <Typography variant="h6" component="a">
            About
          </Typography>
        </Link>
      </Toolbar>
    </AppBar>
  );
};

export default AppNavbar;
We have used the passHref prop here to because we are using the custom component with the <Link> tag
Optimizing Performance with Third Party libraries
Let us look at how to optimize the performance when integrating third party libraries
- Tree Shaking: Tree Shaking involves only using the components that are needed and discarding other components
- Optimizing Images: the
next/imagecomponent automatically optimizes and resizes the images for faster laoding times - Lazy Loading: lazy loading the data improves performance and results in efficient resource utilization. Only the resource that is needed is loaded. You can use the
React.lazy()inbuilt function in Next.Js to lazy load the apps components
Need Chat API for your website or app
DeadSimpleChat is an Chat API provider
- Add Scalable Chat to your app in minutes
- 10 Million Online Concurrent users
- 99.999% Uptime
- Moderation features
- 1-1 Chat
- Group Chat
- Fully Customizable
- Chat API and SDK
- Pre-Built Chat
You might be interested in some of our other articles
- React Server Components with Next.JS: The Complete Guide
- Data Fetching with getServerSideProps and getStaticProps
- How to build a React app with Vite
- React State Management: A Guide 2023
Conclusion
In this article we learned about Next Js and links in the next js ecosystem
We learned about the <link> component that enables client side navigation.
We also learned about the useRouter hook and we compared them both to the traditional <a>
We also discussed how to navigate to external links from out Next Js application by using the <a> tags
We considered practical examples where ever possible
This article is brought to you by DeadSimpleChat, Chat API for website and app
I hope that you liked the article. Thank you for reading.
Ready to Add Chat to Your Website?
Get started for free. No credit card required.
Start a Free Trial


![Webinar Chat: The Complete Guide to Engaging Your Audience [2026]](/blog/content/images/size/w600/2026/02/article-hero-webinar-chat.svg)
