Dead Simple Chat offers prebuilt Chat that can be added in minutes to any app or website. Can be completely customized and offers powerful API and SDK.
In this article we will to create a complete React Native Chat App.
a. 1-1 chat,
b. Group chat
and Bonus features:
- Adding Users to Chat
- Moderation features and
- customization of the look and feel through code.
Introduction
In this react Native chat app tutorial, we will learn how to create a react native chat app with DeadSimpleChat.
Adding the chat to your react native application is as simple as pasting a single line of code. We will do this in 3 easy steps
Step1: Create a react native application
for now lets scaffolds a new react native application.
npx create-expo-app react-native-chat-application
Once the app is scaffolded, start the app, you can choose where you want to run the app between, Android, iOS and the web.
I have choosen the web but you can choose wherever you want to run the app.
Open the App.Js file:
import { StatusBar } from 'expo-status-bar';
import { StyleSheet, Text, View } from 'react-native';
import { setDisabled } from 'react-native/Libraries/LogBox/Data/LogBoxData';

export default function App() {
  return (
    <View style={styles.container}>
      <Text>Open up App.js to start working on your app!</Text>
      <StatusBar style="auto" />
    </View>
  );
}

const styles = StyleSheet.create({
  container: {
    flex: 1,
    backgroundColor: '#fff',
    alignItems: 'center',
    justifyContent: 'center',
  },
});You will see something like this in the browser

Step 2: Create a DeadSimpleChat Account and Get the Embed Code
go to the website https://deadsimplechat.com and create a free account by clicking on the Get Started button.
Once you have created an account you will land up in the dashboard page.
There click on the create chat room button to create a new chat room. You can name the chat room according to your liking and click on the save button to create a chat room
Then click on the embed button to get the embed code. From there copy the embed code and lets move on to the next step to add the chat room to your ReactJs Application.
Step 3: Add Chat to your React Native Application
Open the App.JS file in your react js application and paste the emebed code where you want to add the chat.
And that's it you have added chat to your reactjs application. This is how the application looks like and the code:
import { StatusBar } from 'expo-status-bar';
import { StyleSheet, Text, View } from 'react-native';

export default function App() {
  return (
    <View style={styles.container}>
      <Text>Open up App.js to start working on your app!</Text>
      <iframe src="https://deadsimplechat.com/CGOC0byXC" width="400px" height="600px"></iframe>
      <StatusBar style="auto" />
    </View>
  );
}

const styles = StyleSheet.create({
  container: {
    flex: 1,
    backgroundColor: '#fff',
    alignItems: 'center',
    justifyContent: 'center',
  },
});
Thus we have created a react Native chat application. I have created this in the web but it will work the prefect fine in Android and iOS as well.
The next sections are bonus section where I explain how you can use API and SDK to use the chat according to your use-case. I will also explain the no code chat functionality
Almost all the features of the chat can be done through no-code as well as through using the code. Its upto you how you want to use the chat.
Bonus:
1. Quick start with Chat SDK and react native
Now, let us start with using the API and the Chat SDK. You can do everything using the chat SDK and API
- Create multiple chat rooms on the fly
- Create and Assign moderators to the chat room
- Ban users
- Ban bad words (upload a list of words that are banned from the chat room)
- Customize the chat room ( You can give the same chat room different look on different pages and have a different look for different types of users the possibilities are endless)
There are all sorts of customizations available, every aspect of the chat can be precision customized to your liking
- Change fonts
- Chat background color
- Change text color
- Hide chat elements
- Write Custom CSS ( Refer to our Custom CSS Class guide)
- Upload your custom fonts
6. Login users using the SSO
7. Send Messages
8. Create Group Chat room with up to 10 Million participants
9. Create 1-1 Chat rooms.
10 translate Chat interface into any language
11. Use Chat using Multiple Languages.
Initializing the chat SDK
Let us start with initializing the chat SDK of the DeadSimpleChat. You can read out quick start guide for more details.
Step a: First let us import the chat sdk to our chat app.
In your root folder create a file named Deadsimplechat.js
then go to https://cdn.deadsimplechat.com/sdk/1.0/dschatsdk.min.js and copy the code by pressing command + A on mac or ctrl + A on windows and right click + copy on mouse.
Paste this code in the Deadsimplechat.js file and save.
Step b:
In your App.js file require the Deadsimplechat.js like:
require("./Deadsimplechat");Connecting the iFrame with the SDK
Now you need to connect the chat iFrame with the SDK. You can do this in three steps like
- Give the chat iframe a unique id. This can be anything but we will give the iframe the id of chat-frame
- We will also need the Chat Room ID
- and we will need the Public API key as well.
The chat room id can be found looking at the iframe url it is after the deadsimplechat.com/chat-roomId also if you go to the dashboard and chat rooms section there you can see the list of chat rooms along with their id.
For our chat room we can find the id in the iframe we embedded that is
<iframe src="https://deadsimplechat.com/CGOC0byXC" width="100%" height="600px"></iframe>CGOC0byXClet us go to our code that we embedded and edit the App.Js file. we need to give the iframe and id of chat-frame
So the new iframe code looks like:
<iframe id="chat-frame" src="https://deadsimplechat.com/CGOC0byXC" width="100%" height="600px"></iframe>The App.js file looks like:
import { StatusBar } from 'expo-status-bar';
import { StyleSheet, Text, View } from 'react-native';

export default function App() {
  return (
    <View style={styles.container}>
      <Text>Open up App.js to start working on your app!</Text>
      <iframe id="chat-frame" src="https://deadsimplechat.com/CGOC0byXC" width="400px" height="600px"></iframe>
      <StatusBar style="auto" />
    </View>
  );
}

const styles = StyleSheet.create({
  container: {
    flex: 1,
    backgroundColor: '#fff',
    alignItems: 'center',
    justifyContent: 'center',
  },
});
Now, we have the chat room id, iframe id and we need the last bit that is the public key
The public key can be found in the Dashboard -> Developer
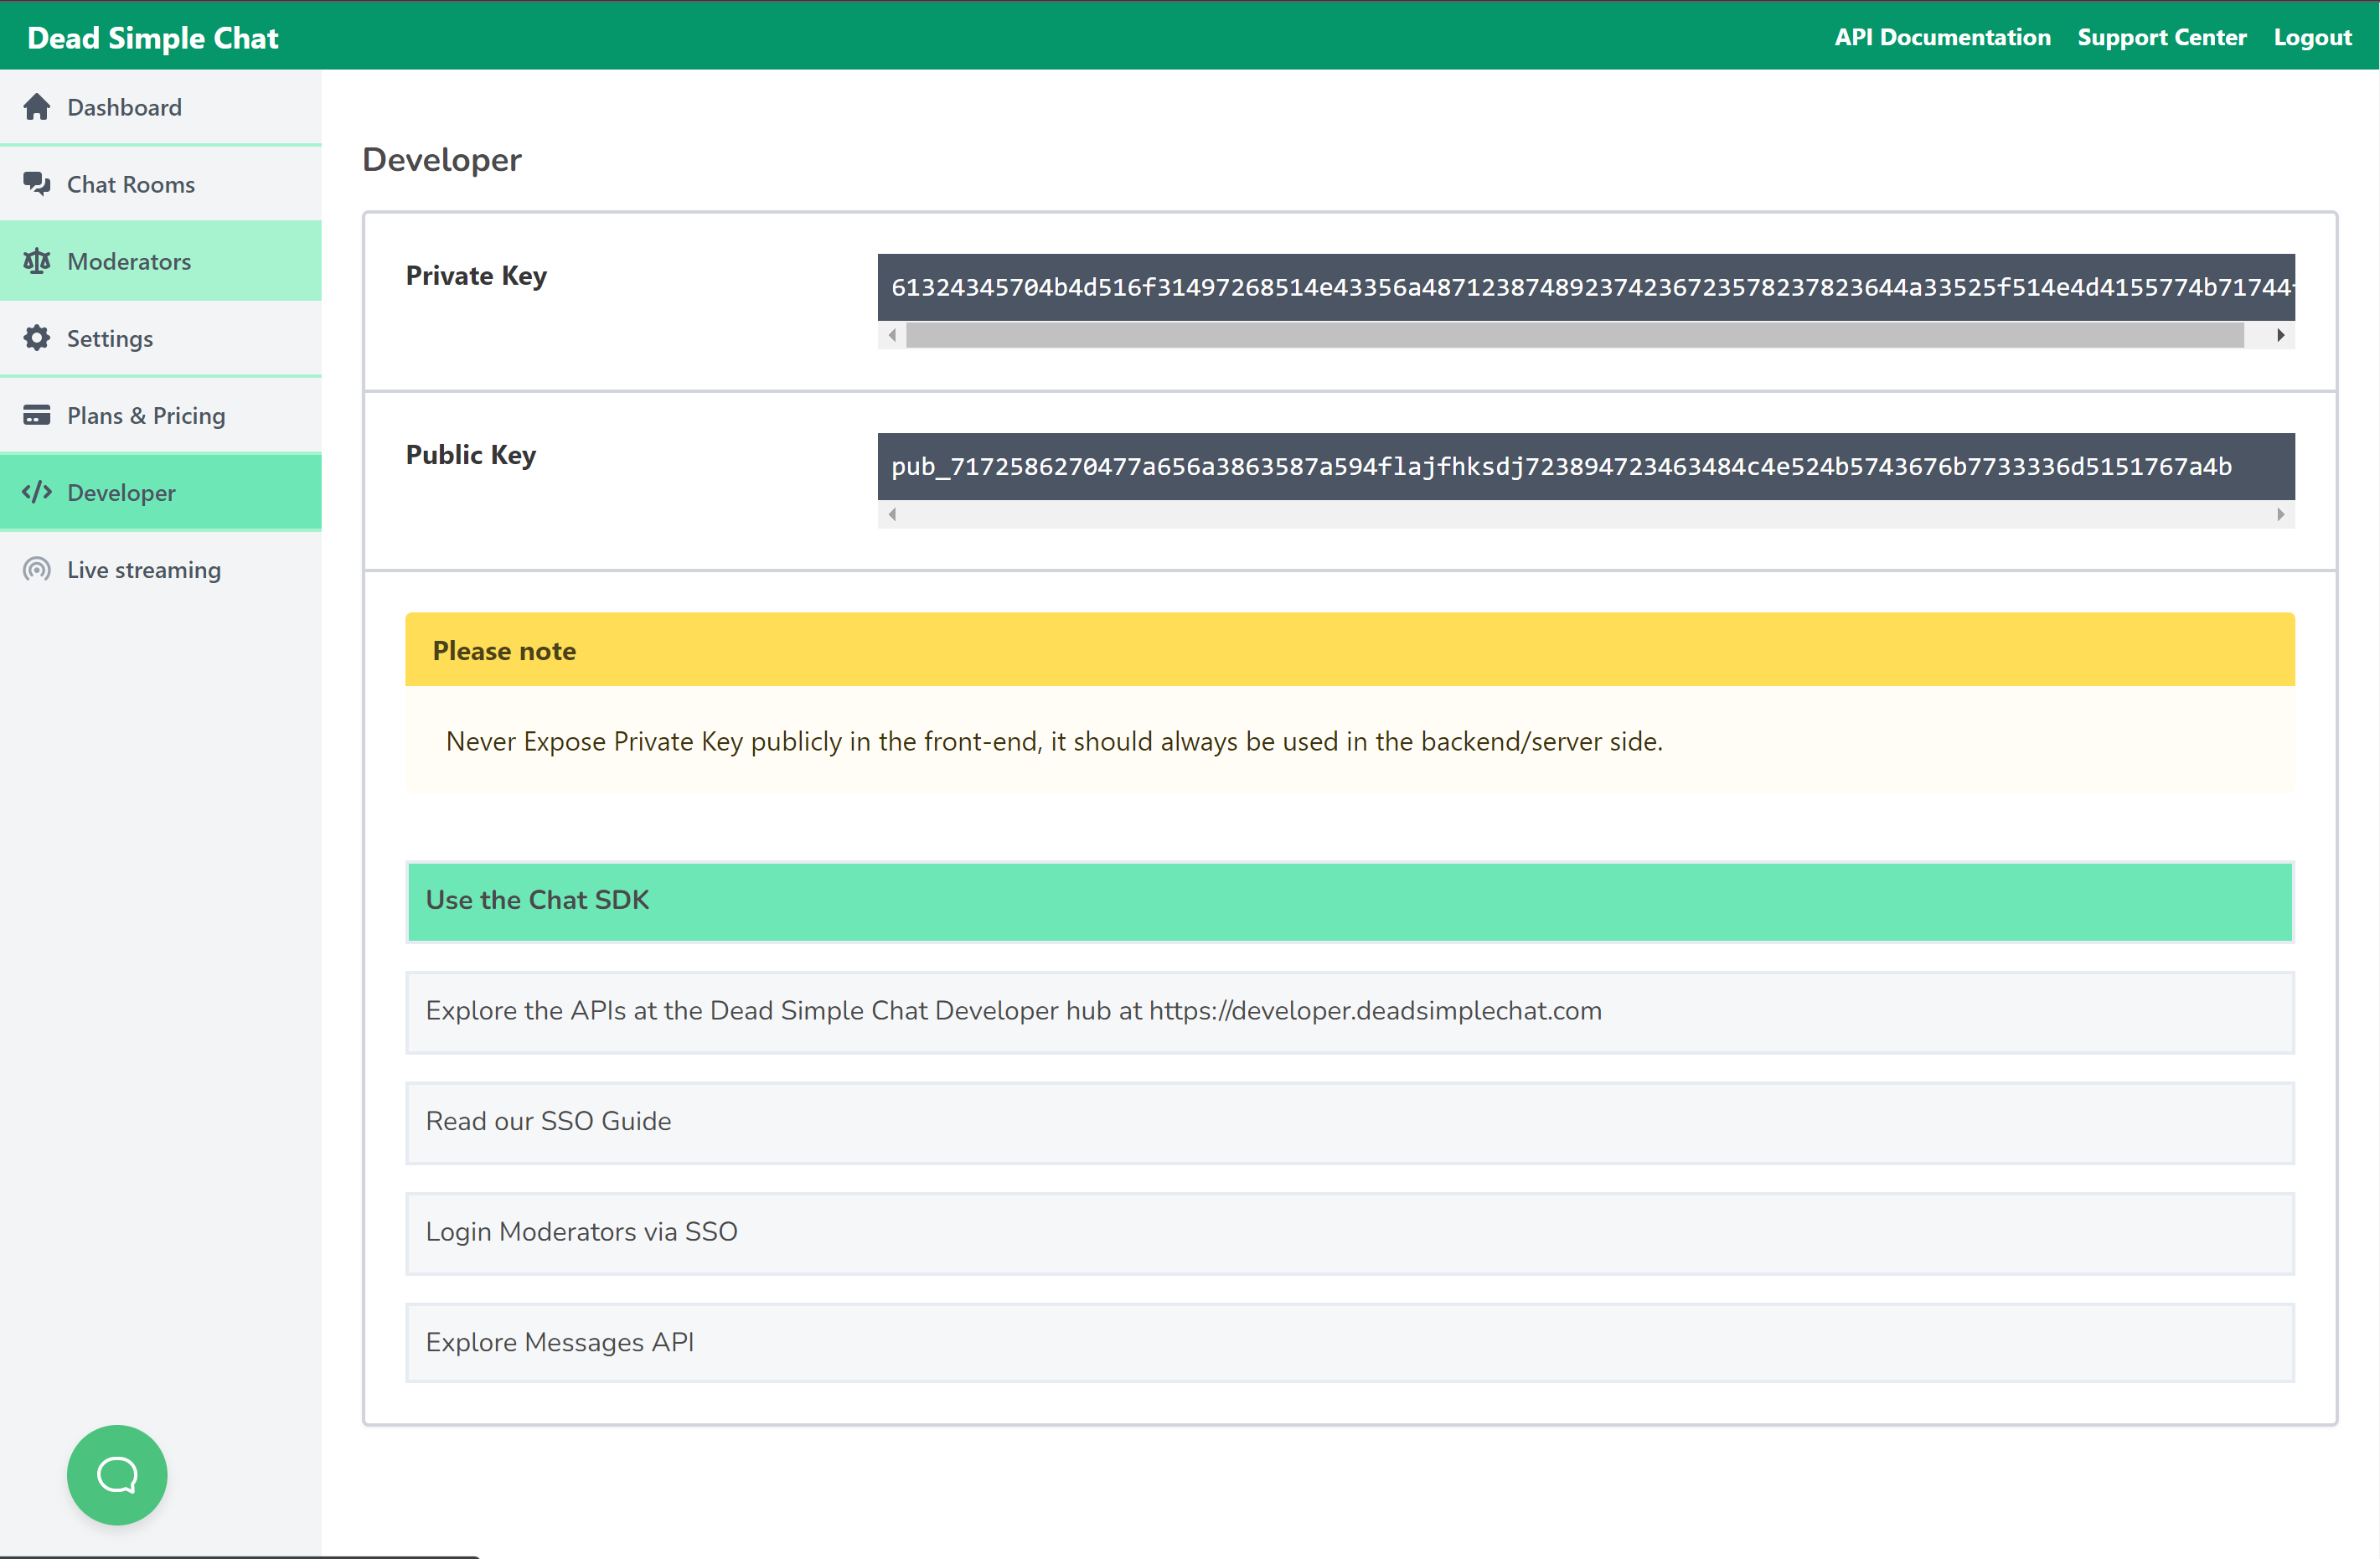
We have all the three parameters that we need to initialize and connect the chat SDK with the iframe let us do that
(async () => {
    // DSChatSDK construction accepts two parameters:
    // 1. Chat Room Id
    // 2. ID of the iFrame tag
    // 3. Dead Simple Chat Public API Key.
    const sdk = new DSChatSDK("CGOC0byXC", "chat-frame", "pub_5738506b4e495f744e74556e666a644a68766f4b69767753596239666e473533271517a485775656f354978795830")
    // Call the connect method to connect the SDK to the Chat iFrame.
    await sdk.connect();
});We will need the react hooks to initialize the SDK write the below code inside your App() function
  const [sdk, setSDK] = useState(0);
  useEffect(()=>{
    (async () => {
      // DSChatSDK construction accepts two parameters:
      // 1. Chat Room Id
      // 2. ID of the iFrame tag
      // 3. Dead Simple Chat Public API Key.
      const sdk = new DSChatSDK("CGOC0byXC", "chat-frame", "pub_7172586270477a656a3863587a594f46566e736839307737544b532d3463484c4e524b5743676b7733336d5151767a4b")
      // Call the connect method to connect the SDK to the Chat iFrame.
      await sdk.connect();
      setSDK(sdk);
  })();
}, [])The App.js code looks like
import { StatusBar } from 'expo-status-bar';
import {useState, useEffect } from 'react';
import { StyleSheet, Text, View } from 'react-native';
import { Button } from 'react-native-web';

require("./Deadsimplechat");


export default function App() {
  const [sdk, setSDK] = useState(0);
  useEffect(()=>{
    (async () => {
      // DSChatSDK construction accepts two parameters:
      // 1. Chat Room Id
      // 2. ID of the iFrame tag
      // 3. Dead Simple Chat Public API Key.
      const sdk = new DSChatSDK("CGOC0byXC", "chat-frame", "pub_7172586270477a656a3863587a594f46566e736839307737544b532d3463484c4e524b5743676b7733336d5151767a4b")
      // Call the connect method to connect the SDK to the Chat iFrame.
      await sdk.connect();
      setSDK(sdk);
  })();
  }, [])


  return (
    <View style={styles.container}>
      <iframe id="chat-frame" src="https://deadsimplechat.com/CGOC0byXC" width="400px" height="600px"></iframe>
      <StatusBar style="auto" />
    </View>
  );
}

const styles = StyleSheet.create({
  container: {
    flex: 1,
    backgroundColor: '#fff',
    alignItems: 'center',
    justifyContent: 'center',
  },
});
We have added the Chat SDK and also initialized it. Now, let us try out a simple function
We will create a logout button and call the SDK logout function when that button is clicked to log the user out of the chat room.
Inside the View element create a button element and on it create a onPress event handler and call the logout function when the button is click.
  return (
    <View style={styles.container}>
      <Button onPress={logout} title="Logout"></Button>
      <iframe id="chat-frame" src="https://deadsimplechat.com/CGOC0byXC" width="400px" height="600px"></iframe>
      <StatusBar style="auto" />
    </View>
  );
create a logout function and inside it call the sdk.logout() function
  function logout() {
    sdk.logout();
  }
The App looks like this:
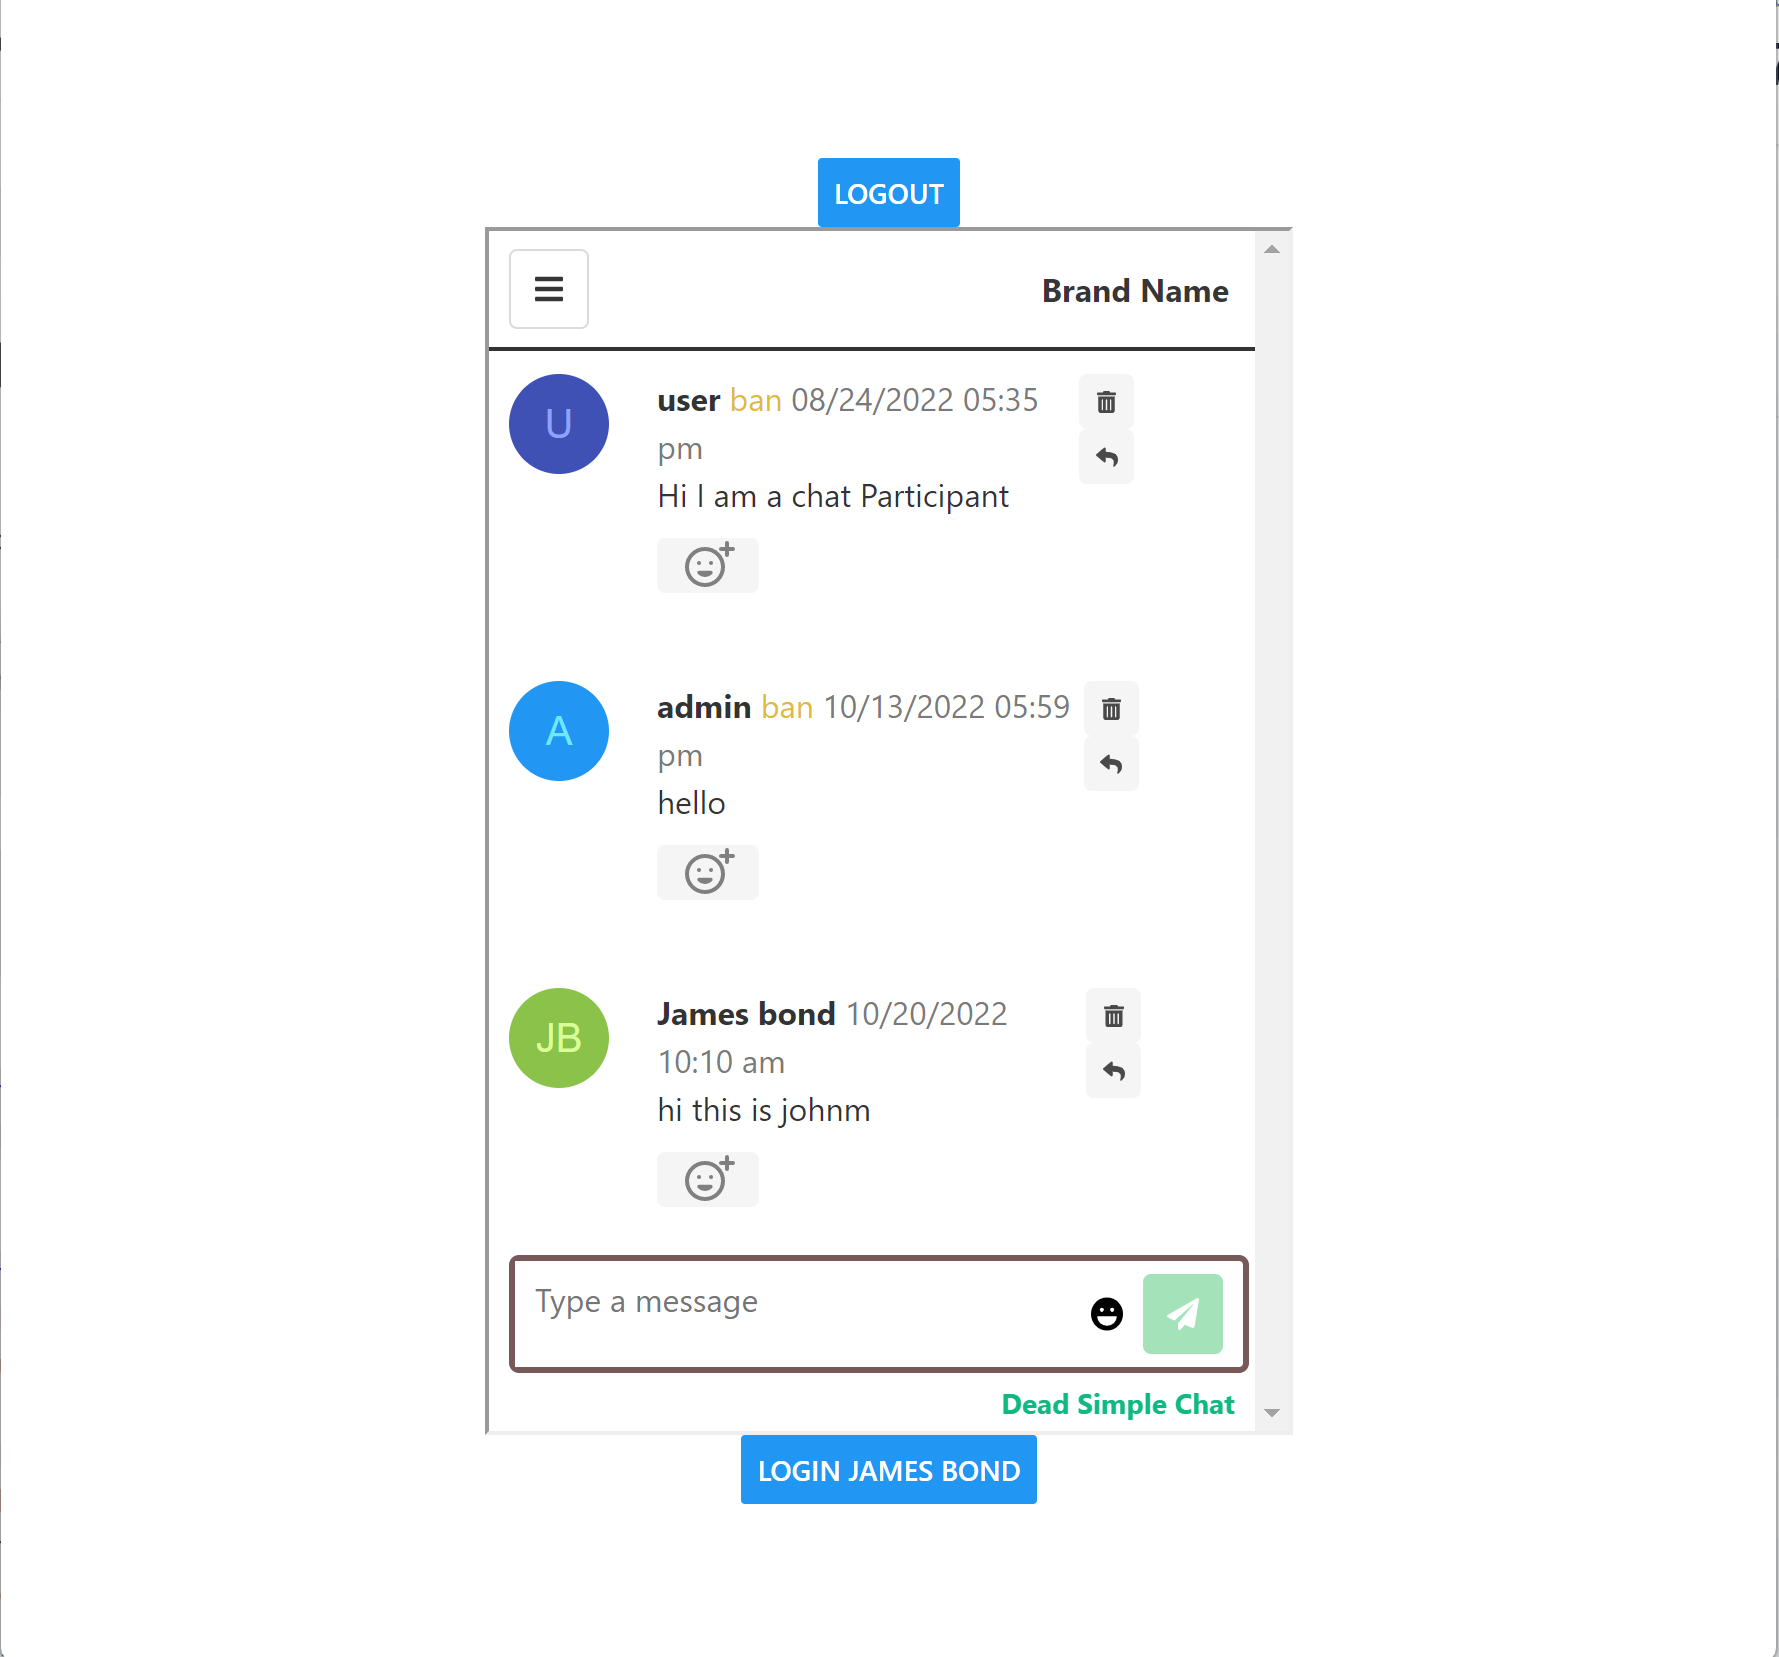
When you click on the logout button, the SDK logs you out.

Now, we have learnt how to add the chat SDK to your react native chat app and also how to initialize it and call a simple logout function.
Let us try our hand at some of the other basic functions of the chat app.
2. Adding users to chat
To add the users to the chat application you can either call the join user method or join the user using our SSO functionality
Here is the documentation for join user and SSO
We will call the joinRoom method to add the user to the chat room. Looking at the documentation for the joinRoom method, there are three possible ways to join a user to the chat room these are
- using username
- using accessToken
- using email
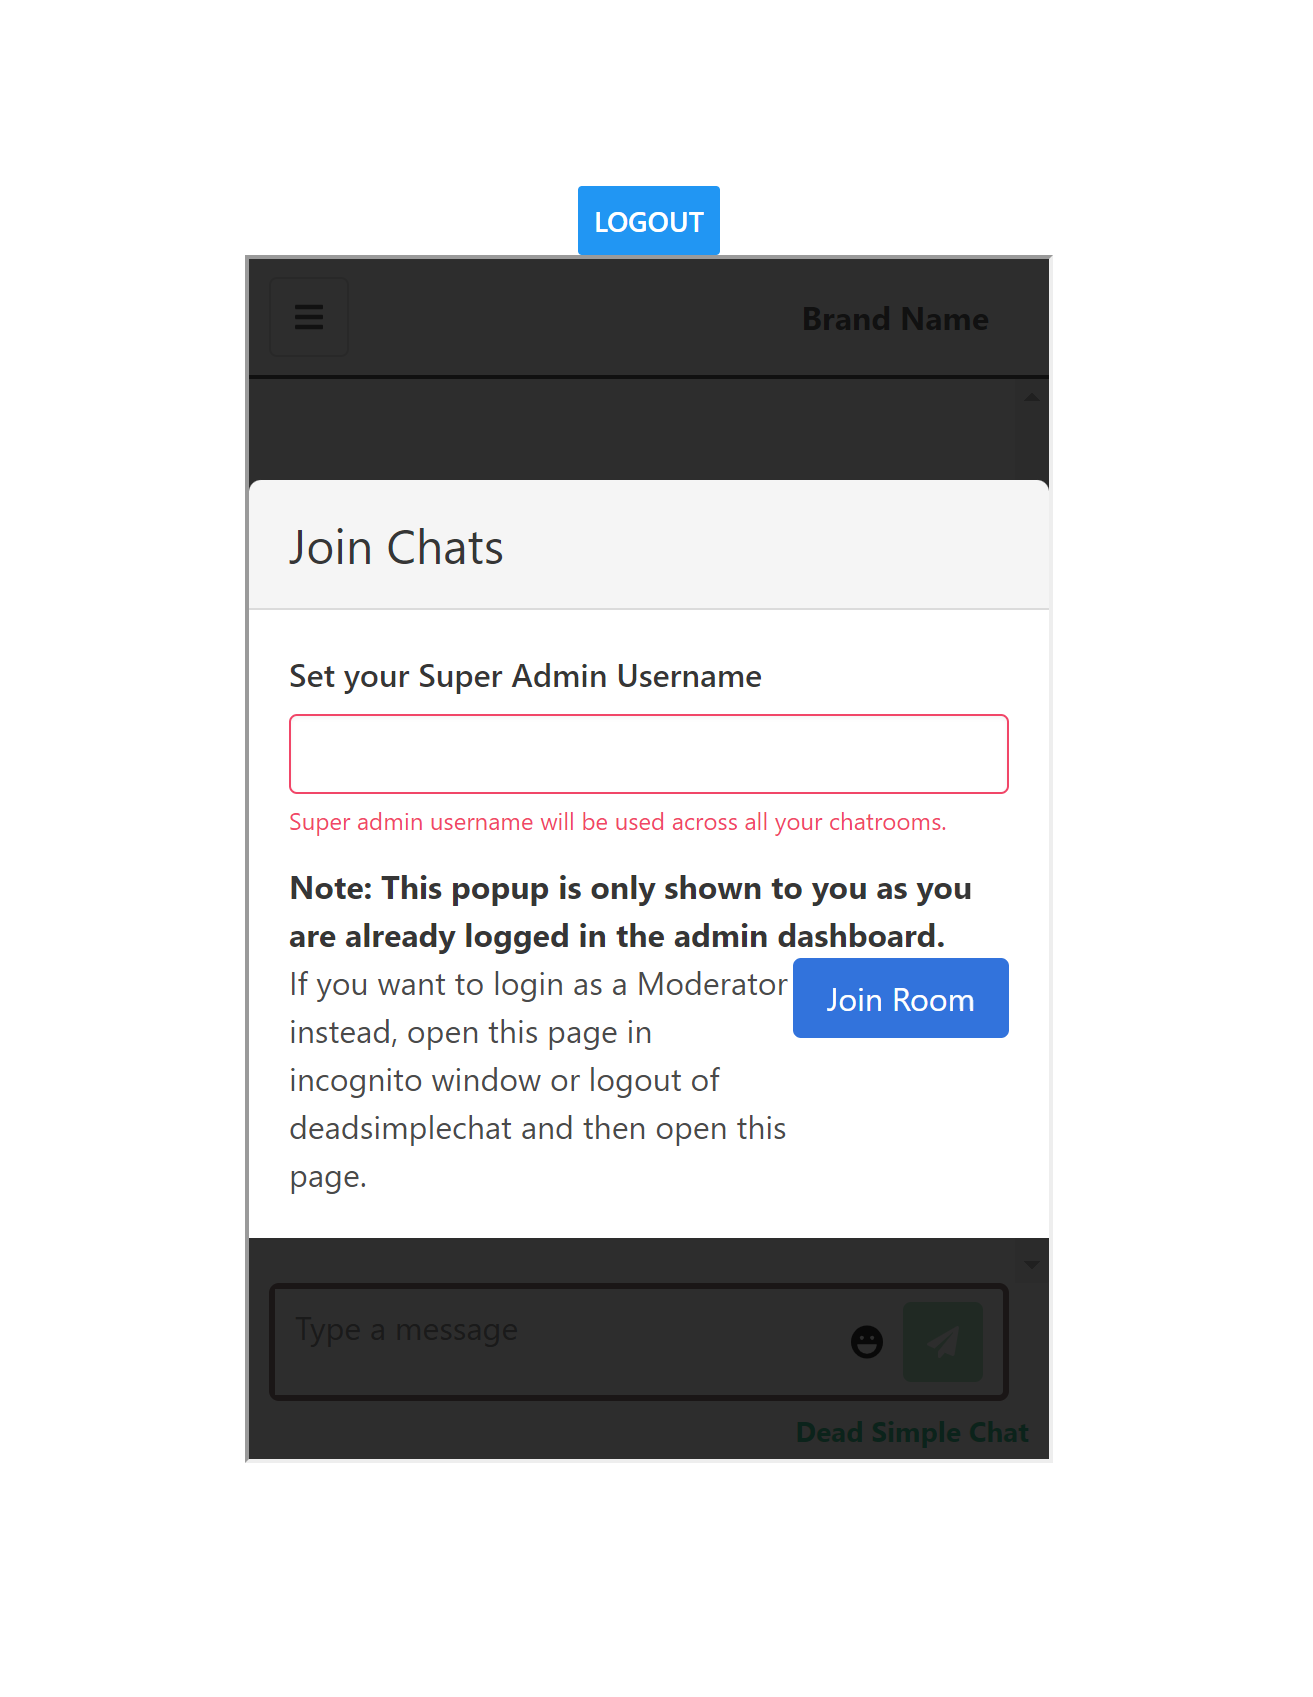
In this example we will be using the username to add the user to the chat room. In your app you might be using a database to sign in the users but in our example let us use a static username of James Bond.
let us create a login button that says: login James bond to the chat room, When clicked it will login the user into the chat room and assign the user the name of James Bond
and we will also create a login function where we will call the login method of the chat SDK with the username: James Bond.
  function login(){
    sdk.joinRoom({
      username: "James bond"
    });
  }

  return (
    <View style={styles.container}>
      <Button onPress={logout} title="Logout"></Button>
      <iframe id="chat-frame" src="https://deadsimplechat.com/CGOC0byXC" width="400px" height="600px"></iframe>
      <Button onPress={login} title="login James Bond"></Button>
      <StatusBar style="auto" />
    </View>
  );
}
This is what the React Native Chat App looks like:
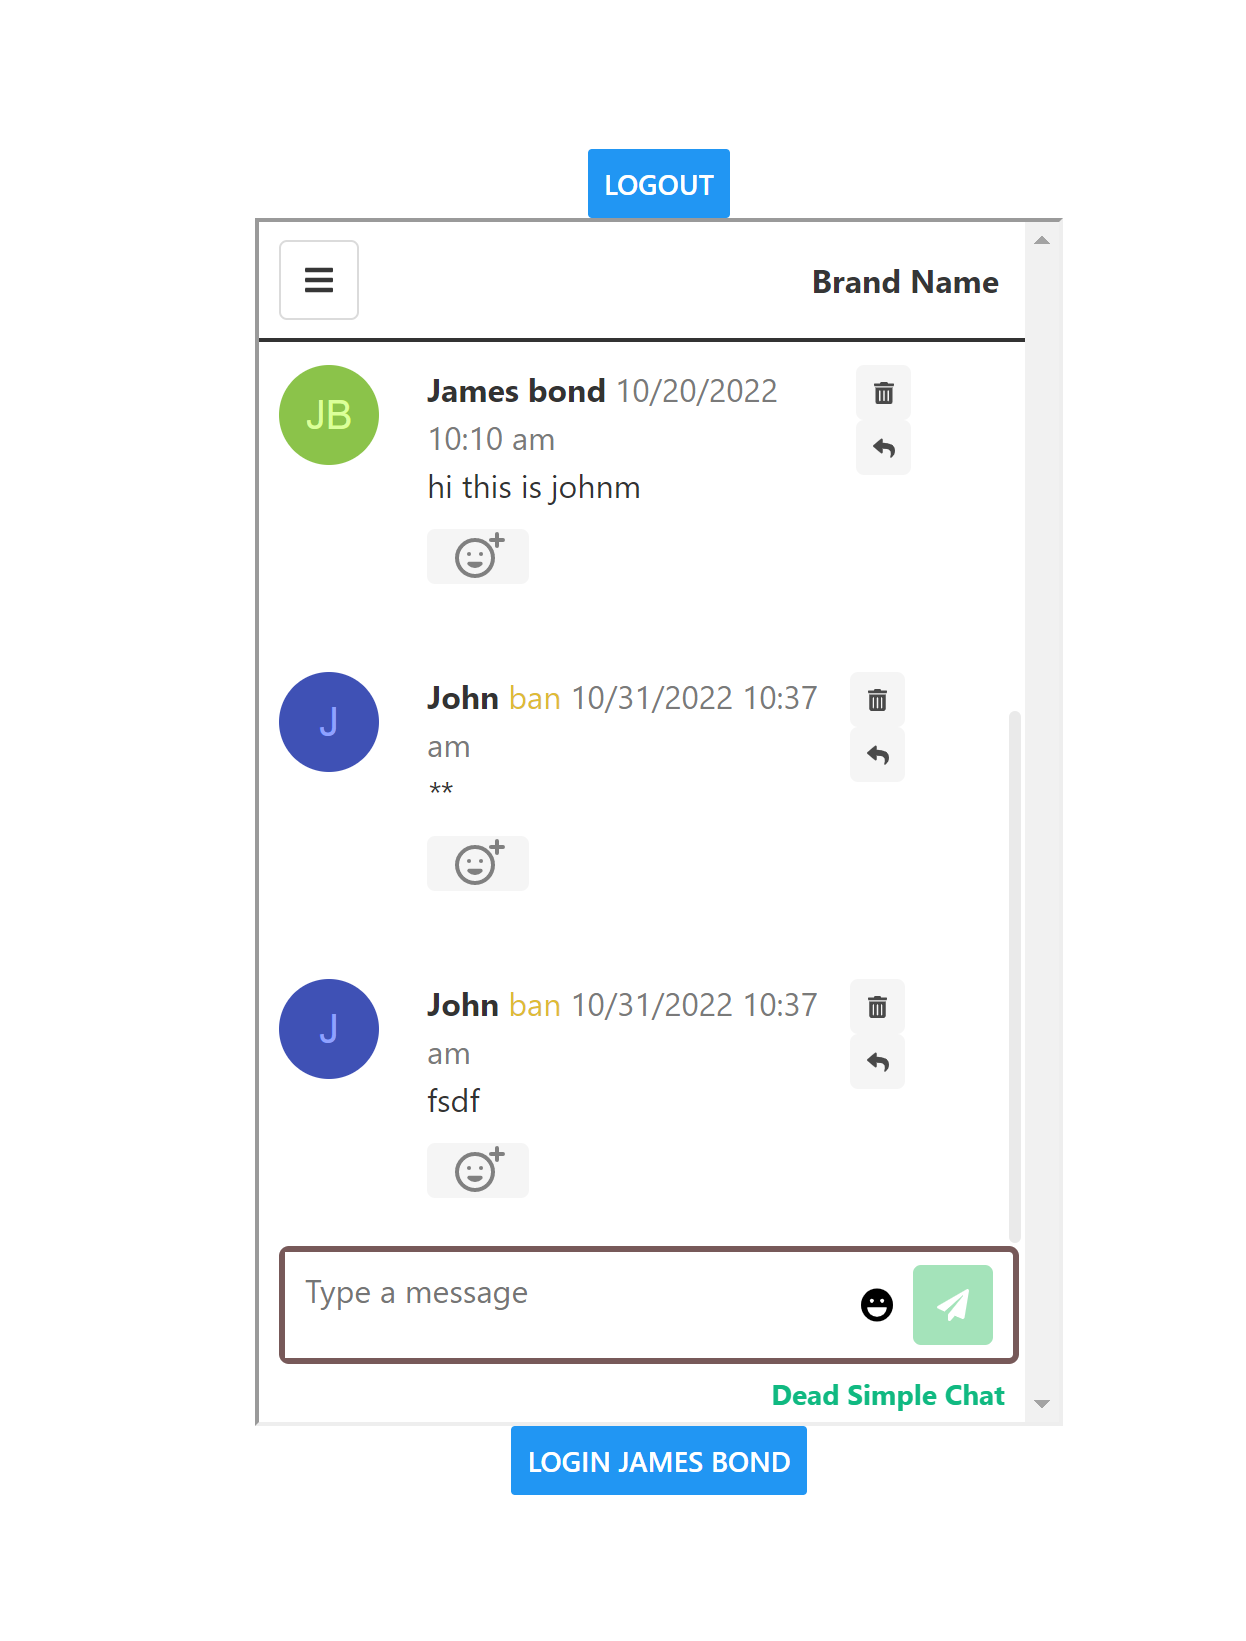
In this section we implemented a basic login button in our React Native Chat Application.
3. Customization features through code
Next we will learn how to customize the chat. you can customize every aspect of the chat room through code including
- Changing the background color
- Changing text color
- Custom Fonts
- Writing Custom CSS code
- and Much More
let us call the SDK function to load customization when the chat app first loads, so that out chat looks exactly as we want to the users
For this we will need the loadCustomization method of the chat SDK.
Let us call the loadCustomization method inside the login method that we created above to login the user.
So when the user logs in the customizations load as well.
sdk.loadCustomization({
  sidebarColor: "#ff3",
  textColor: "black",
  chatMessageFont: "Nunito"
});
the code for the login method:
  function login(){
    sdk.joinRoom({
      username: "James bond"
    });
    sdk.loadCustomization({
      backgroundColor: "#ff3",
      textColor: "black",
      chatMessageFont: "Nunito"
    });
  }
The App.js looks like:
import { StatusBar } from 'expo-status-bar';
import {useState, useEffect } from 'react';
import { StyleSheet, Text, View } from 'react-native';
import { Button } from 'react-native-web';

require("./Deadsimplechat");


export default function App() {
  const [sdk, setSDK] = useState(0);
  useEffect(()=>{
    (async () => {
      // DSChatSDK construction accepts two parameters:
      // 1. Chat Room Id
      // 2. ID of the iFrame tag
      // 3. Dead Simple Chat Public API Key.
      const sdk = new DSChatSDK("CGOC0byXC", "chat-frame", "pub_7172586270477a656a3863587a594f46566e736839307737544b532d3463484c4e524b5743676b7733336d5151767a4b")
      // Call the connect method to connect the SDK to the Chat iFrame.
      await sdk.connect();
      setSDK(sdk);
  })();
  }, [])


  function logout() {
    sdk.logout();
  }

  function login(){
    sdk.joinRoom({
      username: "James bond"
    });
    sdk.loadCustomization({
      backgroundColor: "#ff3",
      textColor: "black",
      chatMessageFont: "Nunito"
    });
  }


  return (
    <View style={styles.container}>
      <Button onPress={logout} title="Logout"></Button>
      <iframe id="chat-frame" src="https://deadsimplechat.com/CGOC0byXC" width="400px" height="600px"></iframe>
      <Button onPress={login} title="login James Bond"></Button>
      <StatusBar style="auto" />
    </View>
  );
}

const styles = StyleSheet.create({
  container: {
    flex: 1,
    backgroundColor: '#fff',
    alignItems: 'center',
    justifyContent: 'center',
  },
});
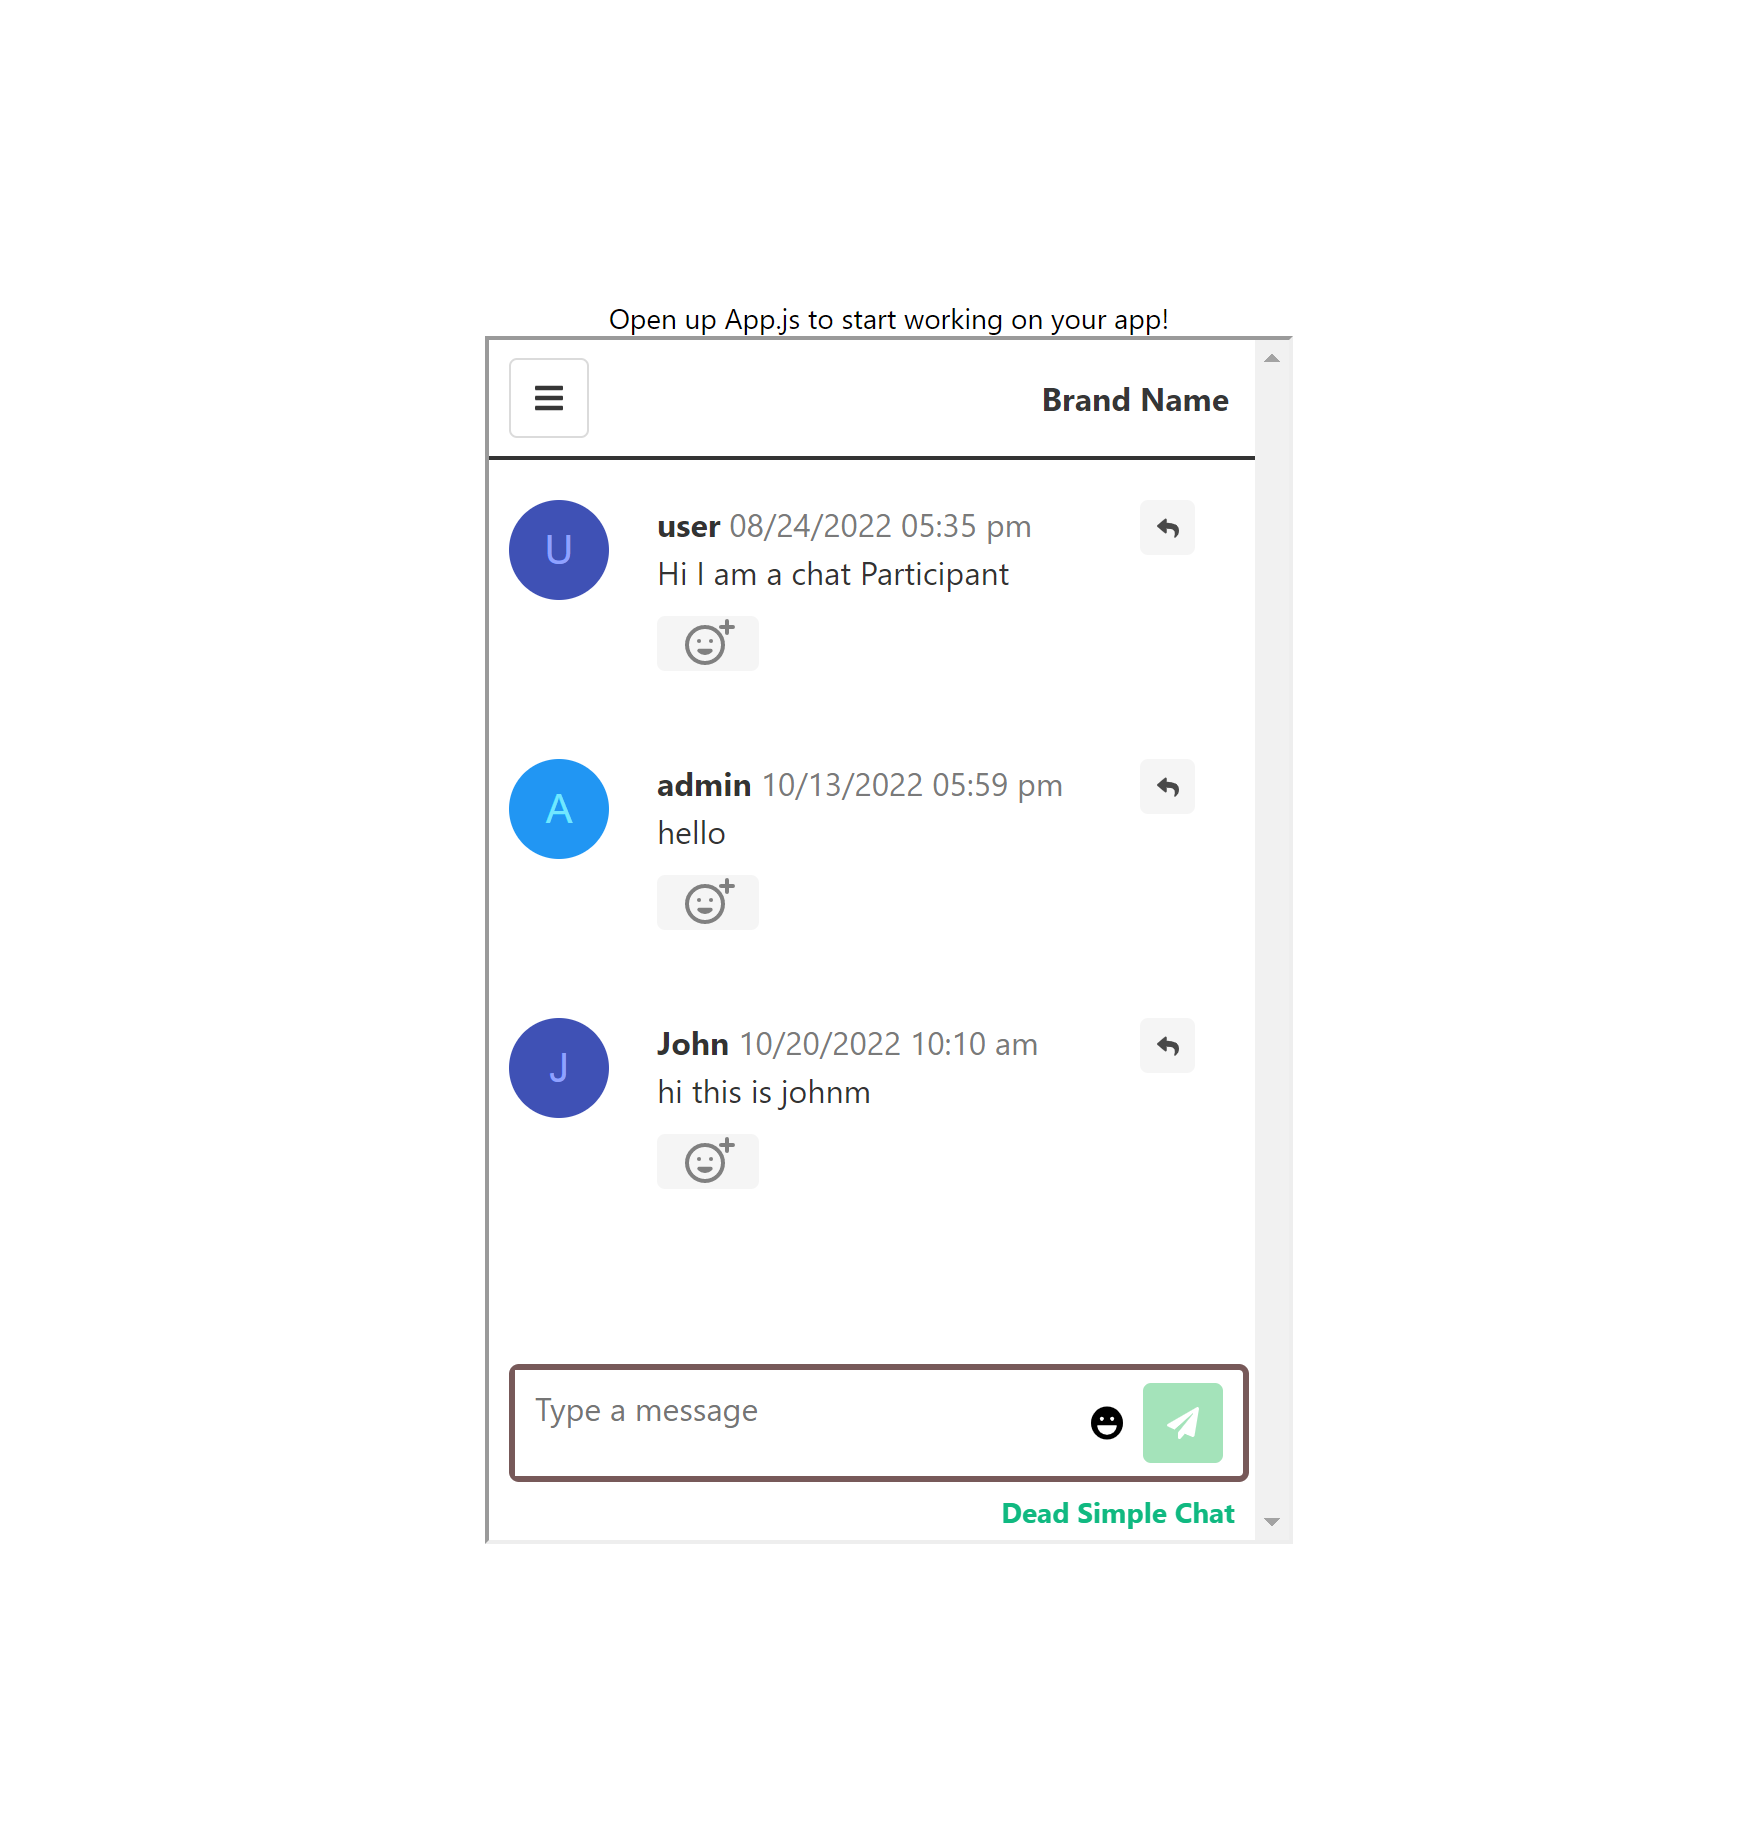
This is how the chat looks like logged out user:
Now let us login the user and see the customizations
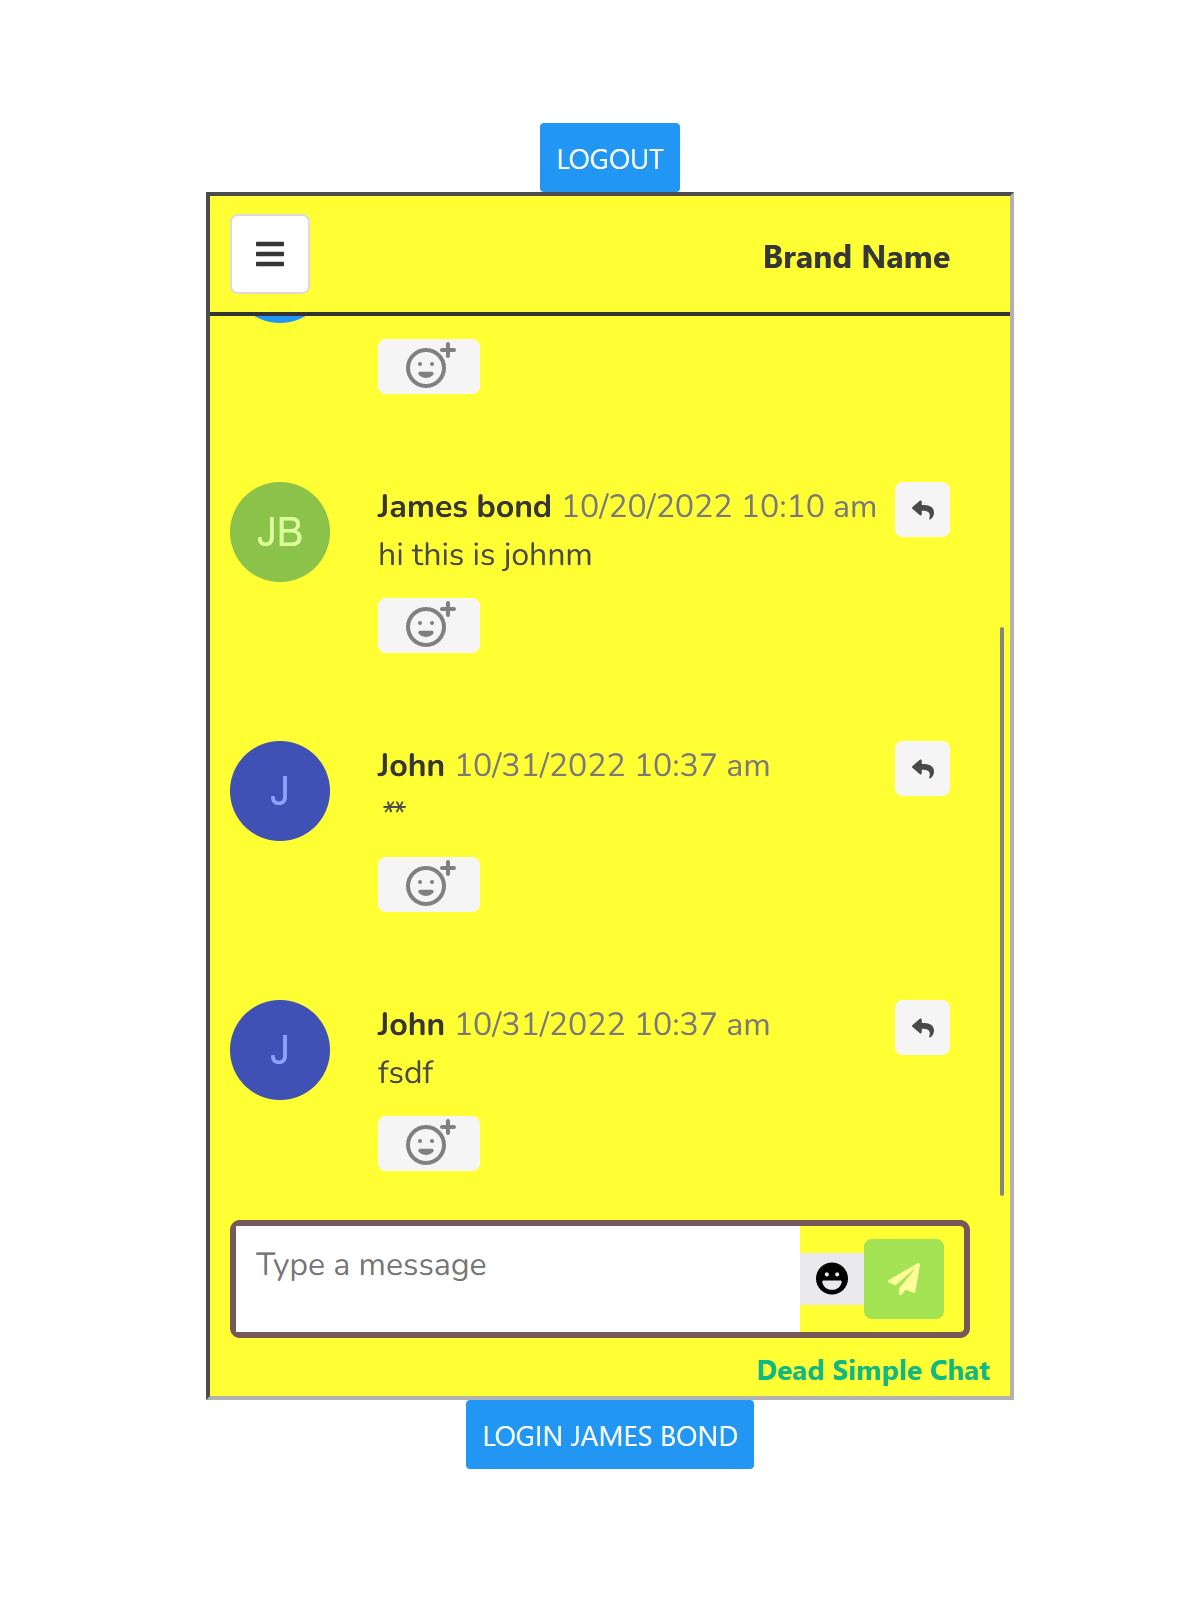
As you can see we have loaded the customization when the user logs in the chat room.
These are some of the common methods of using the chat through code. For a complete list of methods including how to
- how to send a message through chat SDK
- how to create moderators
- Ban users
- delete messages
- language translations and many more
through API and Chat SDK refer to our developer documentation
Next, let us how we can use the No-Code features of the chat. The same features that can be used via code through the API and Chat SDK can also be used without the code through User Interface.
4. Using the No Code Chat features in react native chat
Almost all the features of the chat can be used through the no code or through the UI based functionality. Here I will explain some of the most common chat functionality that you can use through the UI. These include:
- entering the chat and sending a message
- going through various functionality of the chat
- customizing the chat interface
- translating the chat interface
- embed info
- moderating the chat
- creating moderators
We will learn about all of these below.
1. Entering the chat and sending a message
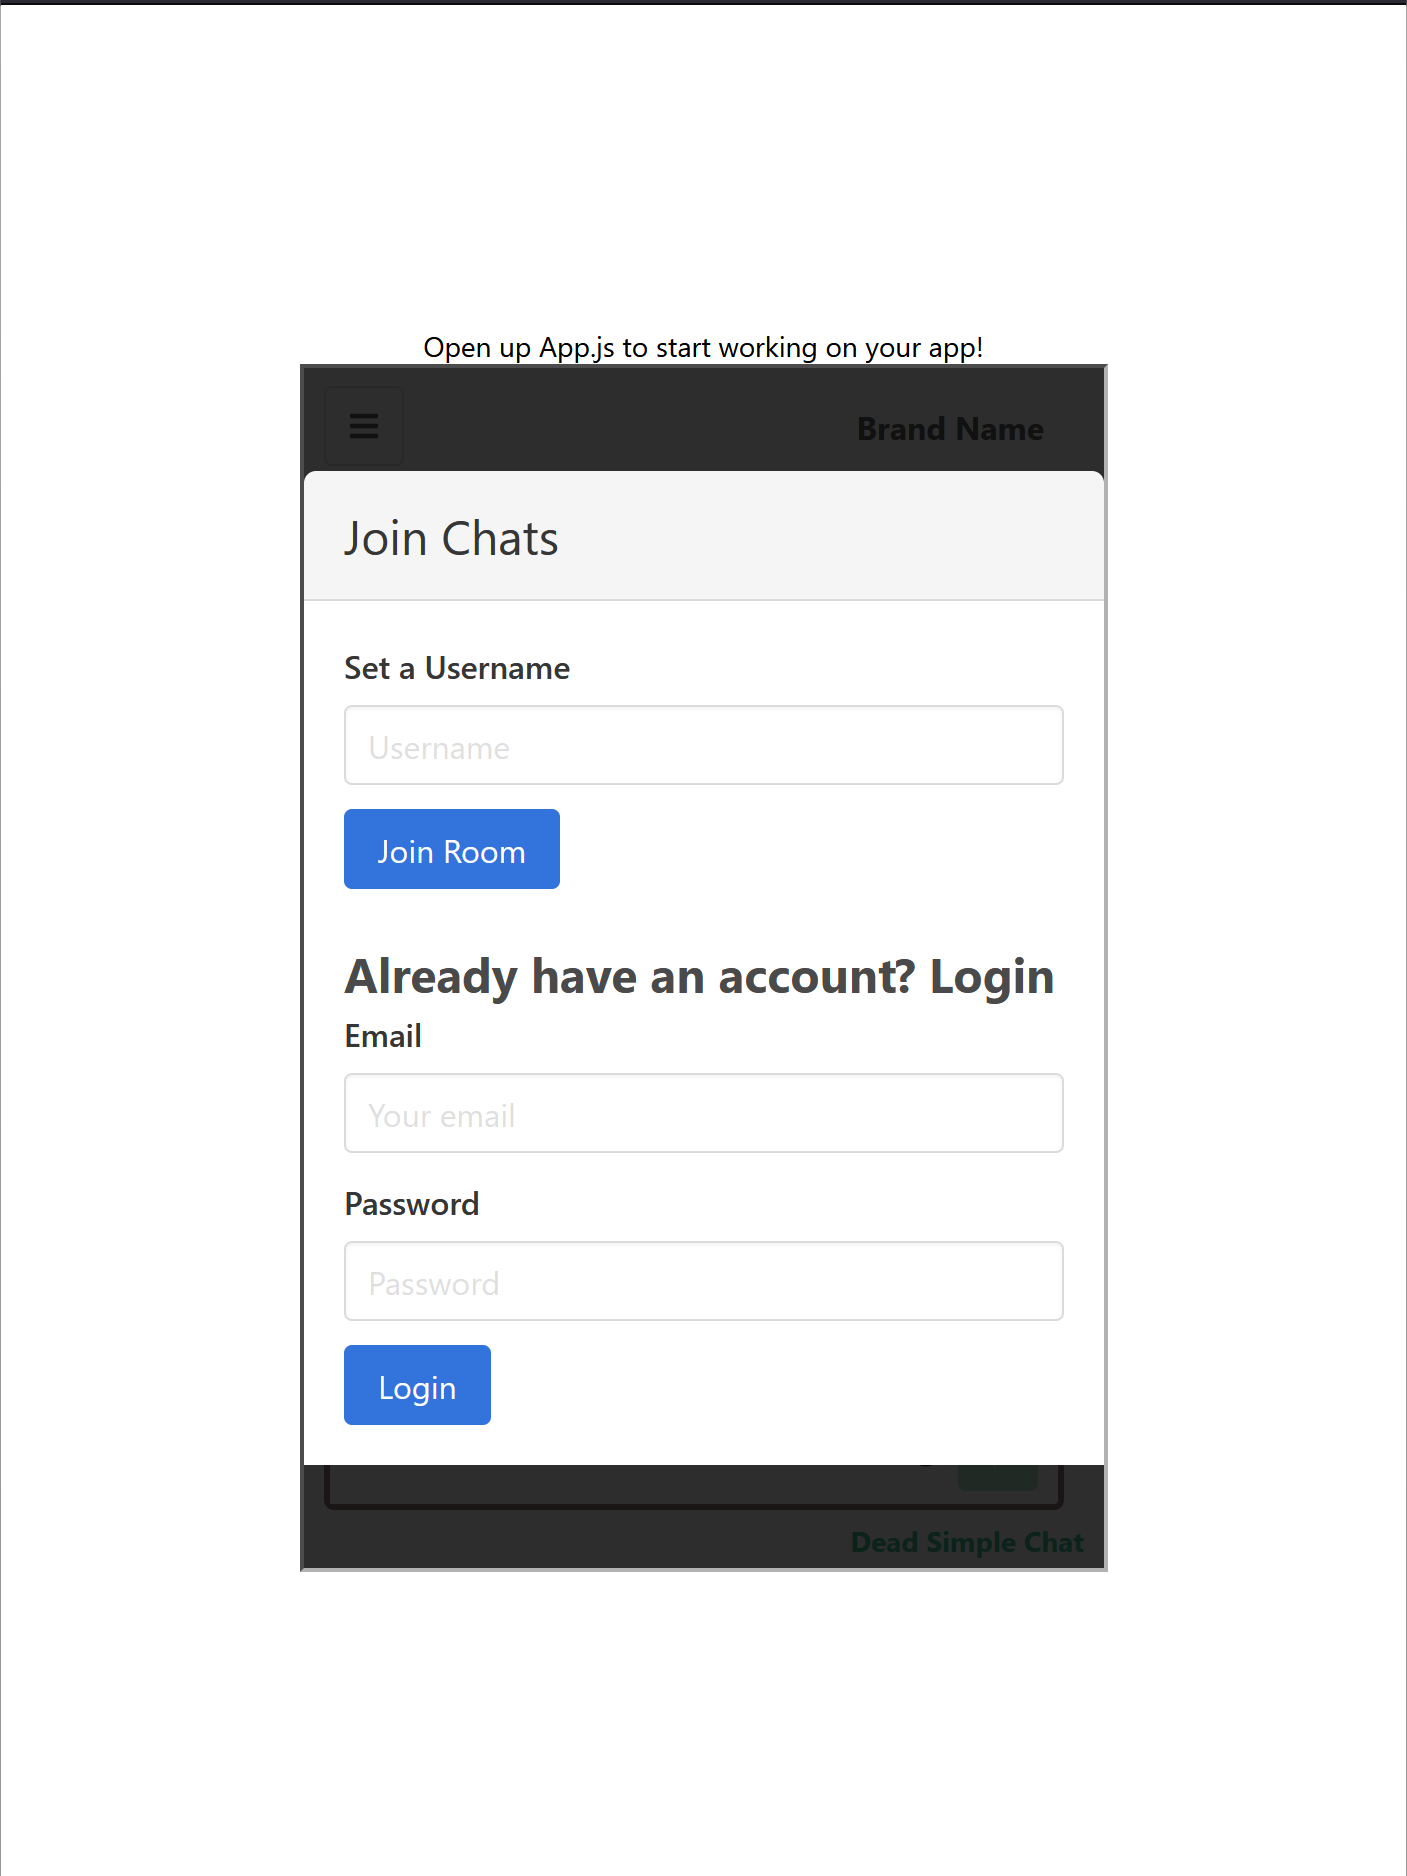
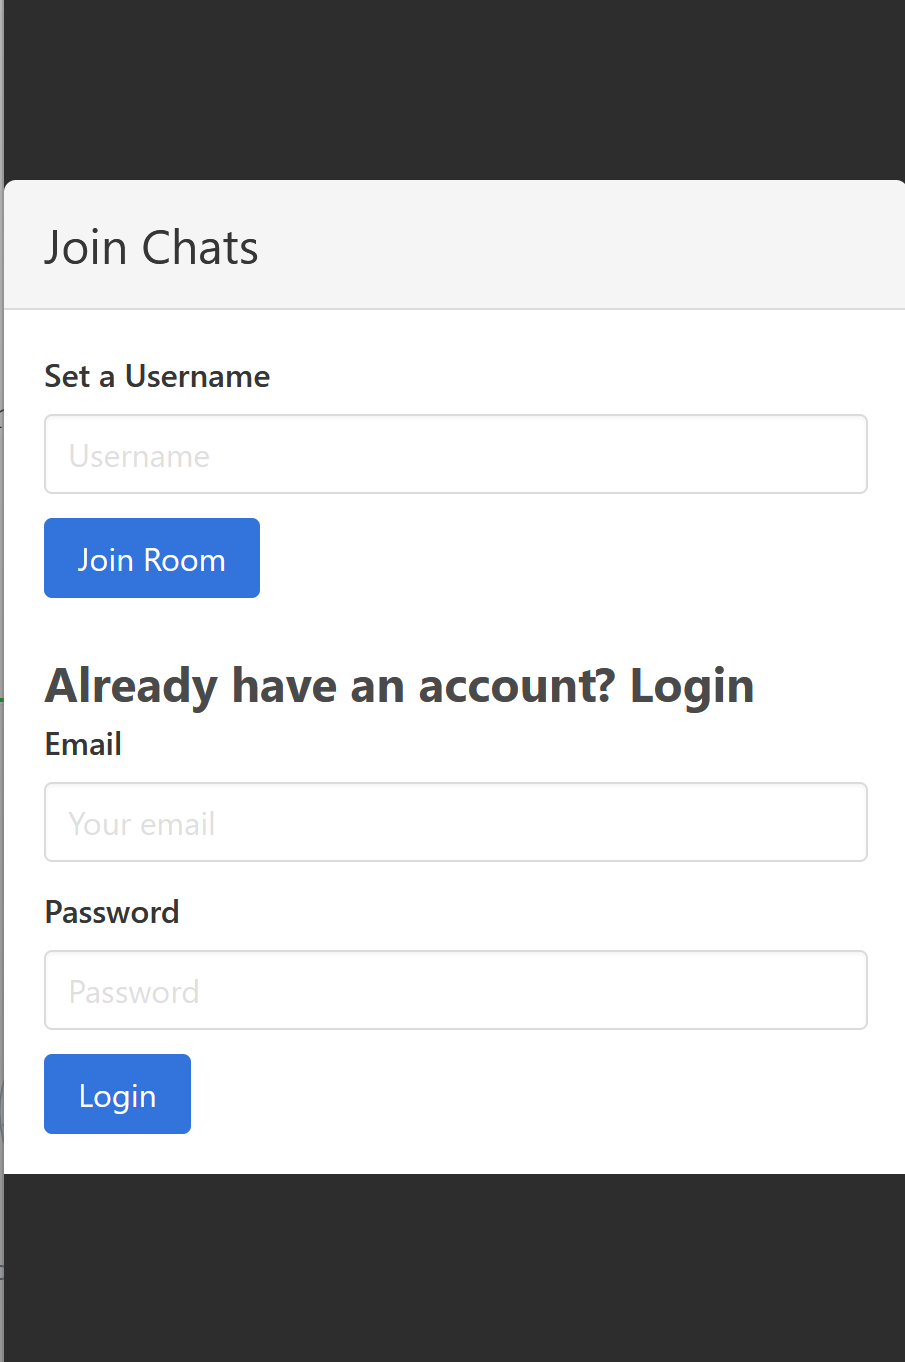
When you go to the app where you embedded the chat, you will see a screen that says set a username and enter
You can create any username of your choice and press the join room button to enter the chat room.
The screen looks like this :
2. going through various functionality of the chat
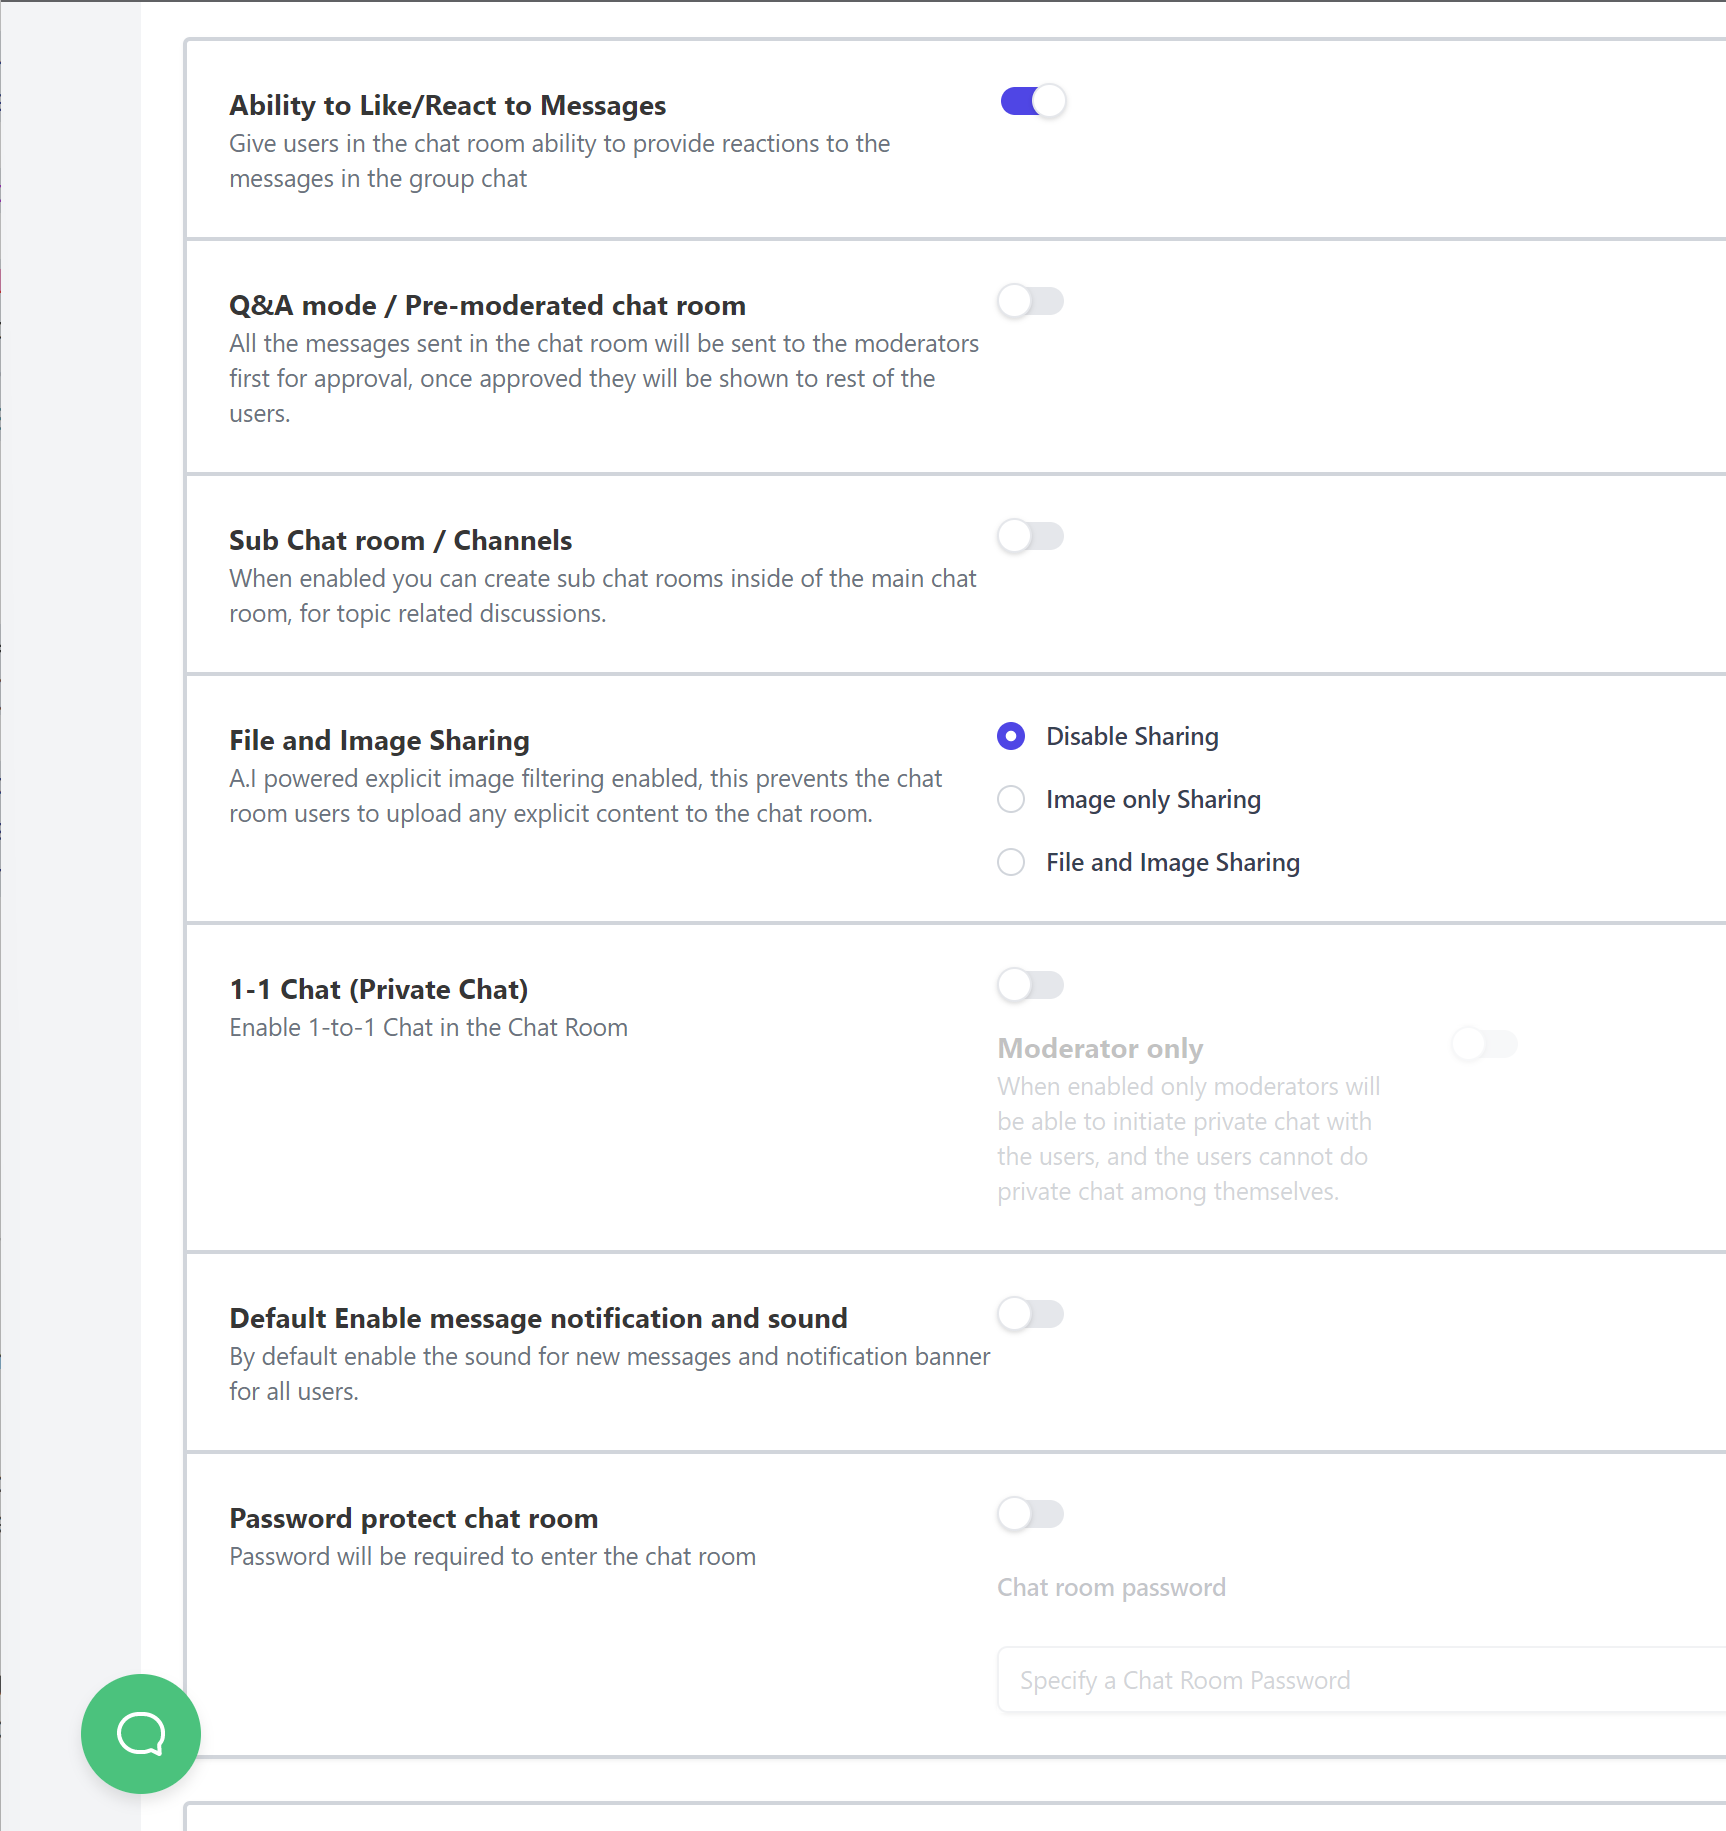
You can turn On/Off various functionality of the chat according to your needs:
Go to the General settings and there is a list of features there you can choose to turn off and turn on according to your liking:
These include:
- Adding a custom chat room logo
- Ability to react to messages and ability to like the messages
- Q&A Mode
- Channels or Sub-Chat rooms (Chat rooms inside chat rooms)
- File and Image Sharing
- 1-1 Private Chat
- Enable message notification for users
- Password Protect the chat room
- Export all messages and files and delete all messages and files.
- turn the chat On/Off as needed.
3. Customizing the Chat interface
Each chat room in DeadSimpleChat is completely independent of other chat rooms. Means users of one chat room cannot enter another chat room and hence each chat room needs to be customized individually
To customize a chat room click on the Create Chat Room button on the dashboard or
go to Dashboard -> Chat Rooms -> Edit ( next to the chat room you want to customize)
Once you are in the General section of the chat room click on the Customize button at the top to enter the customize section of the chat room
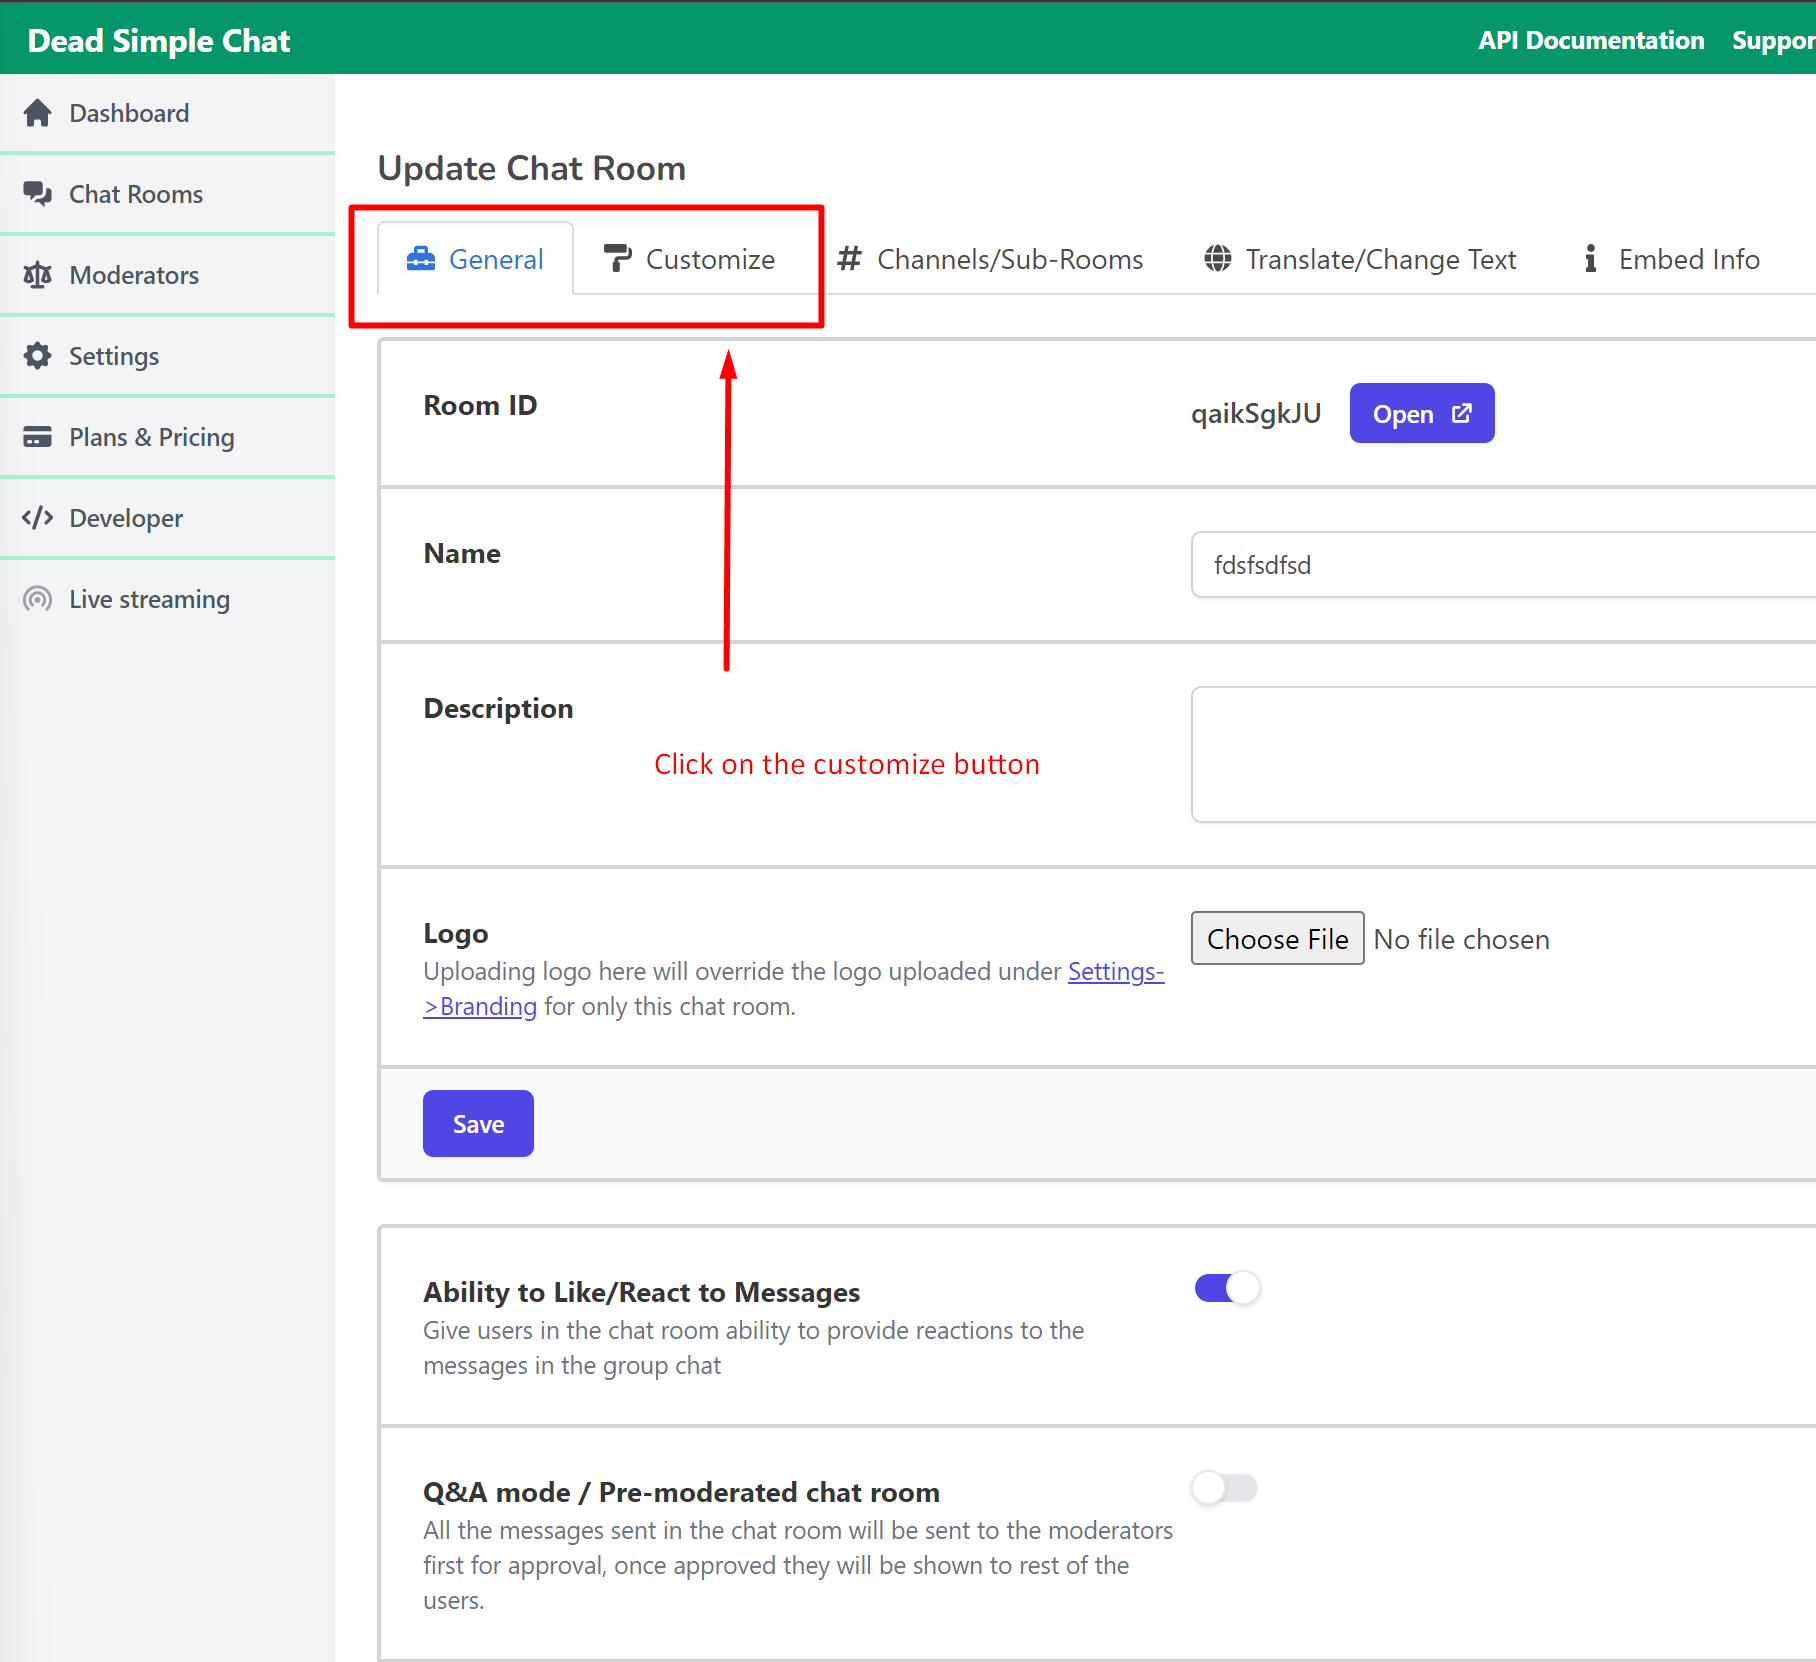
Once you click on the Customize button you enter the customize section of the chat room.
The customize section looks like this:
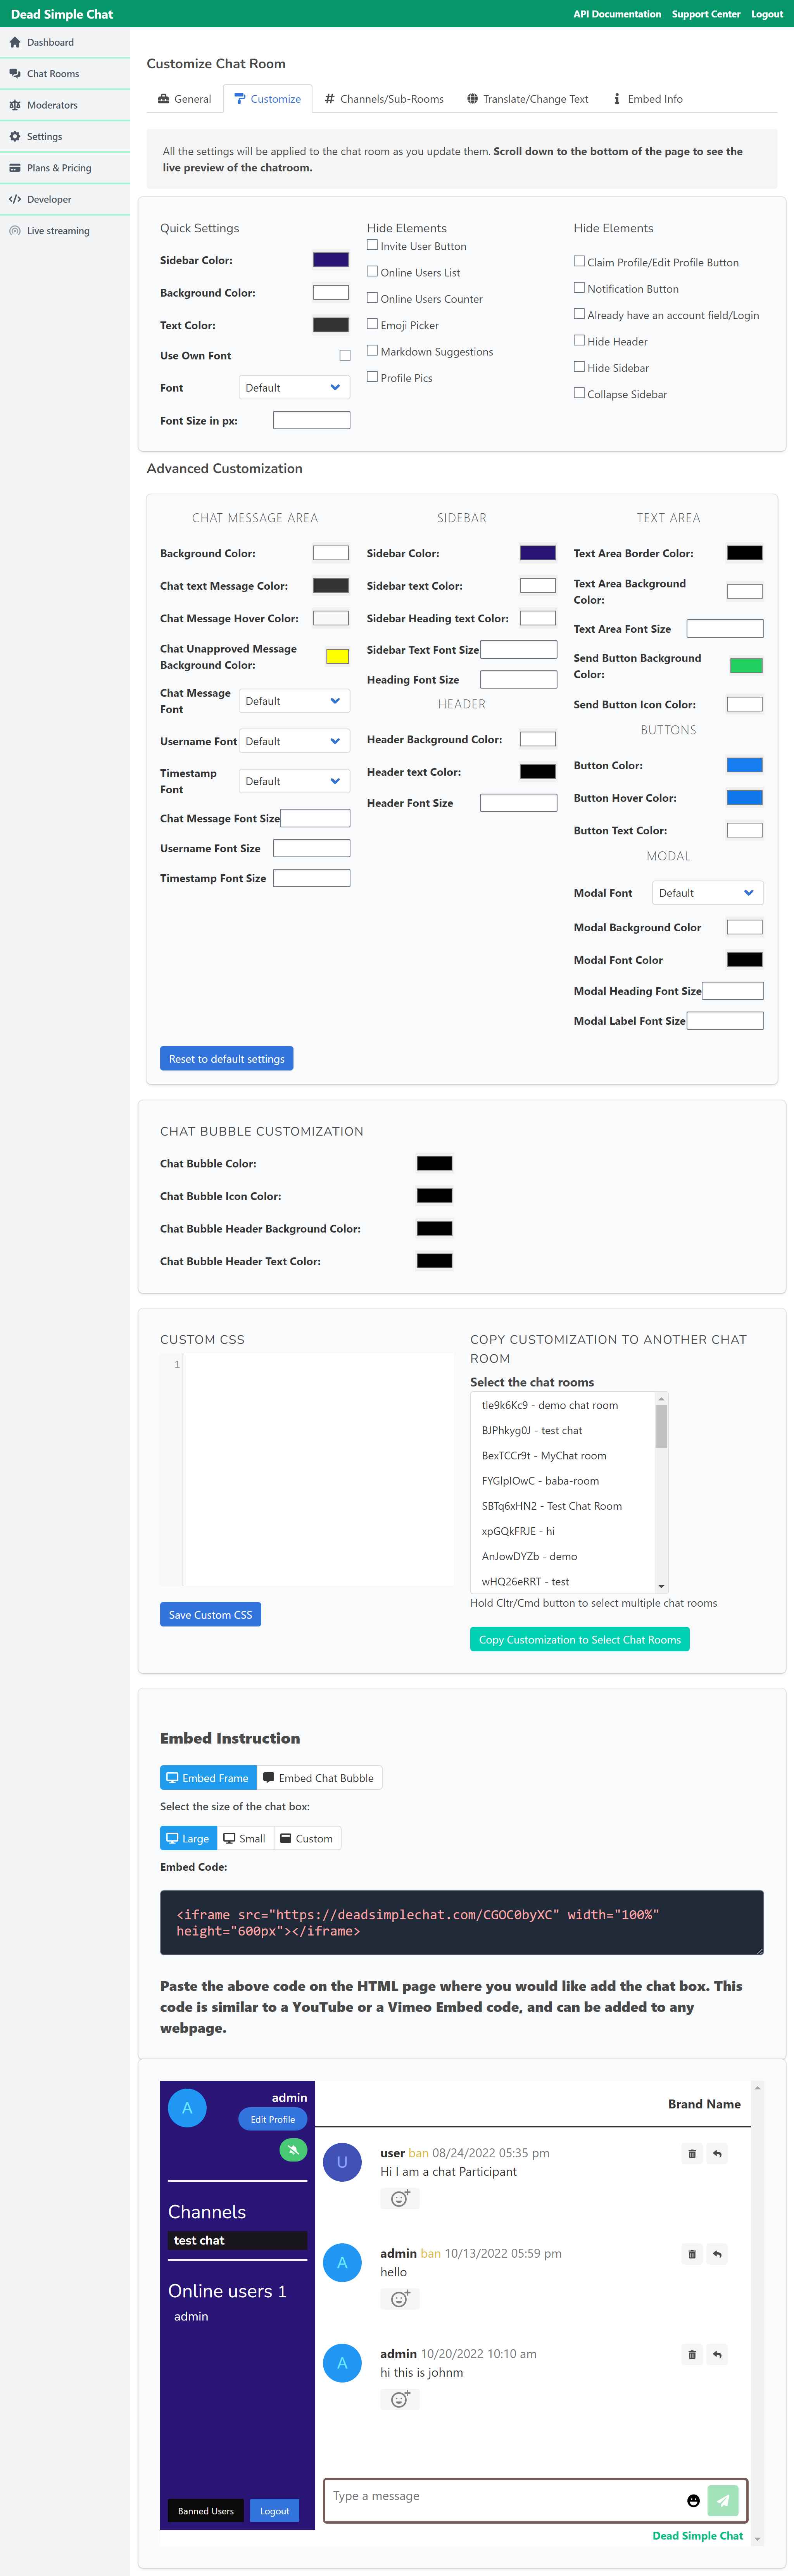
Here you can customize your chat application to your hearts content.
You can
- Change background colors
- Change text colors
- Use custom fonts
- Hide elements within the chat app
- Write Custom CSS as well (Refer to our Custom CSS Class guide)
As you customize the chat room the customization takes place in real time in the chat room below
You can easily copy the customizations to multiple chat rooms via our copy customization tool.
4. Translate the chat interface
You can easily translate the chat interface into any language of your choice.
You can edit the translations as well to say whatever you want in the chat room
Lets us see the translate chat interface;
As you can see there is a list of headings here and you can write in the text box next to the heading anything you want the heading to say.
For example you can make the heading Autoscroll paused say Défilement automatique en pause or anything else that you like, by typing in the box next to the heading.
You can also copy the translations to other chat rooms as well by using the copy customization tool at the end of the page.
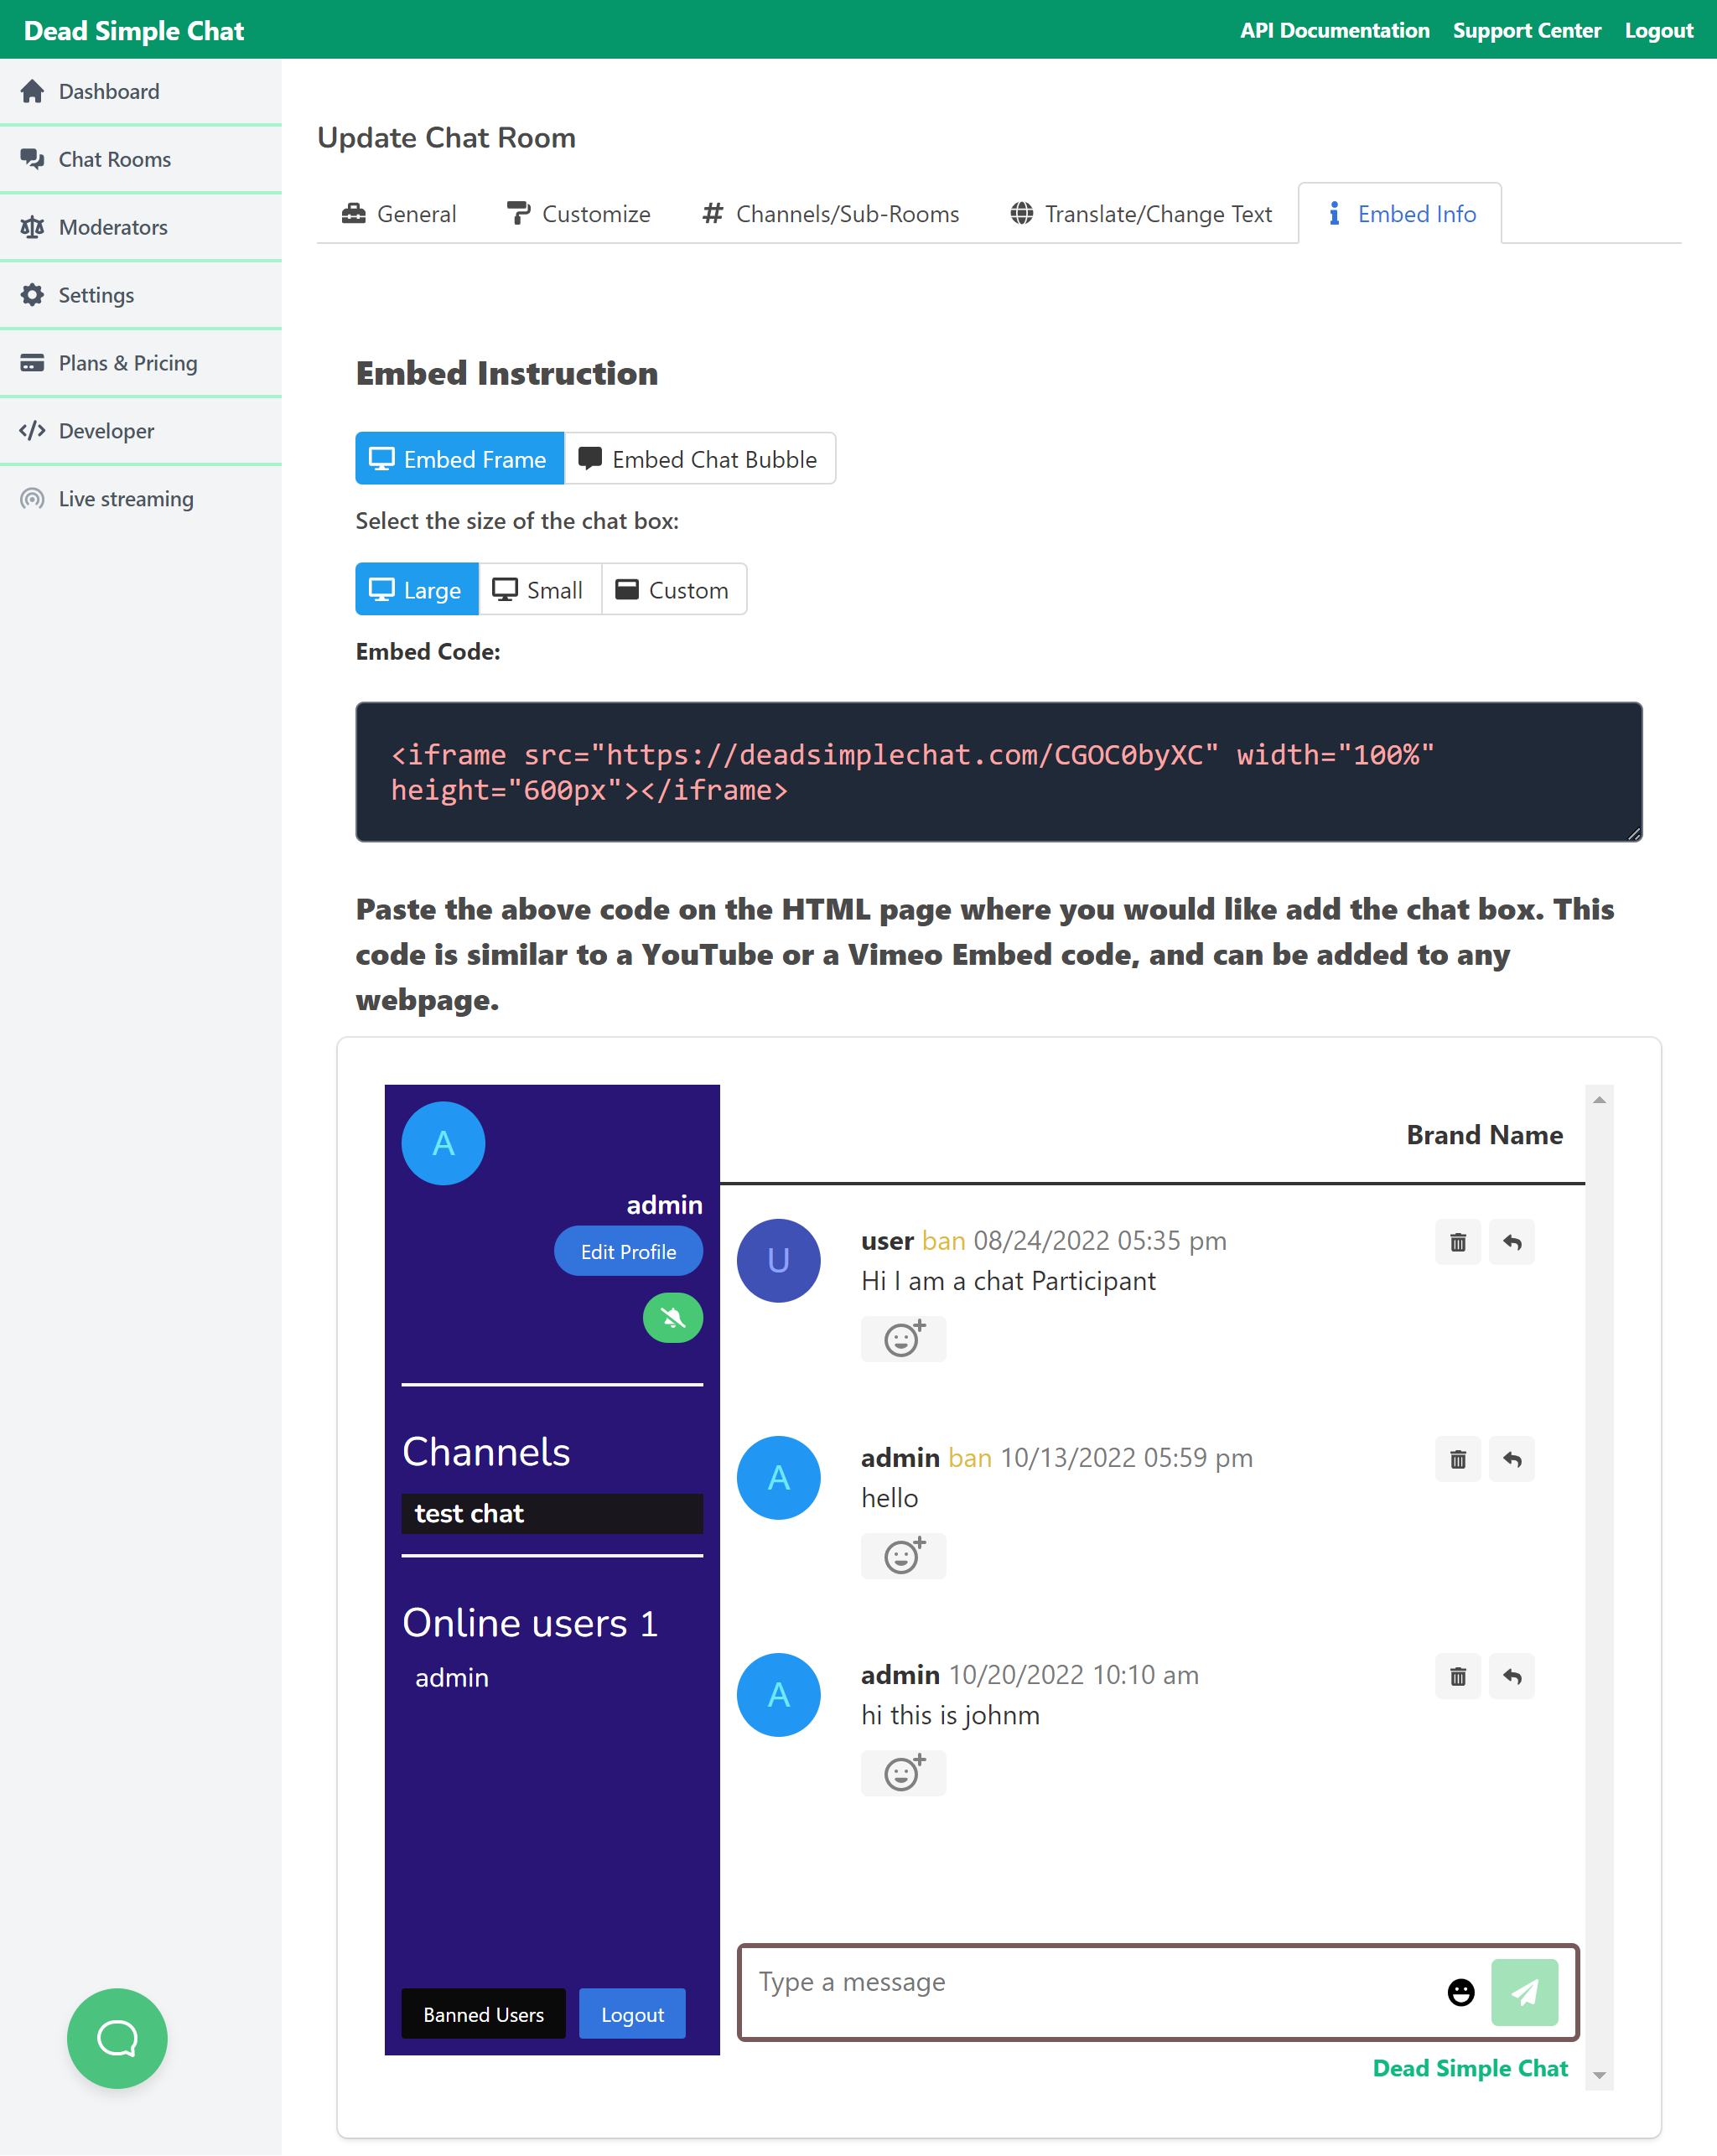
5. Embed Info Page
And lastly we come to the embed info page.
Here you can copy the embed code and paste it in your HTML to embed the chat room on your website.
The code is an iFrame code and it works with all kinds of websites including
- React Native APP
- iOS
- Android
- Ionic
- Plain HTML
- WordPress
- Other CMS Platforms
- Electron app for MAC, Windows and Linux
- much more
You can customize the size of the chat room here as well.
there are three options large, small and custom size to suit all needs. When you change the sizes you can see the chat room change in real time.
6. Moderating the Chat Rooms
You can easily moderate the chat rooms. The Admin and Moderators can moderate the chat rooms
The person that creates the account with DeadSimpleChat is the admin. The Admin can create Moderators that can also moderate the chat room
There are three ways to moderating the chat room
- Deleting Messages
- Banning Users
- Banning Bad words
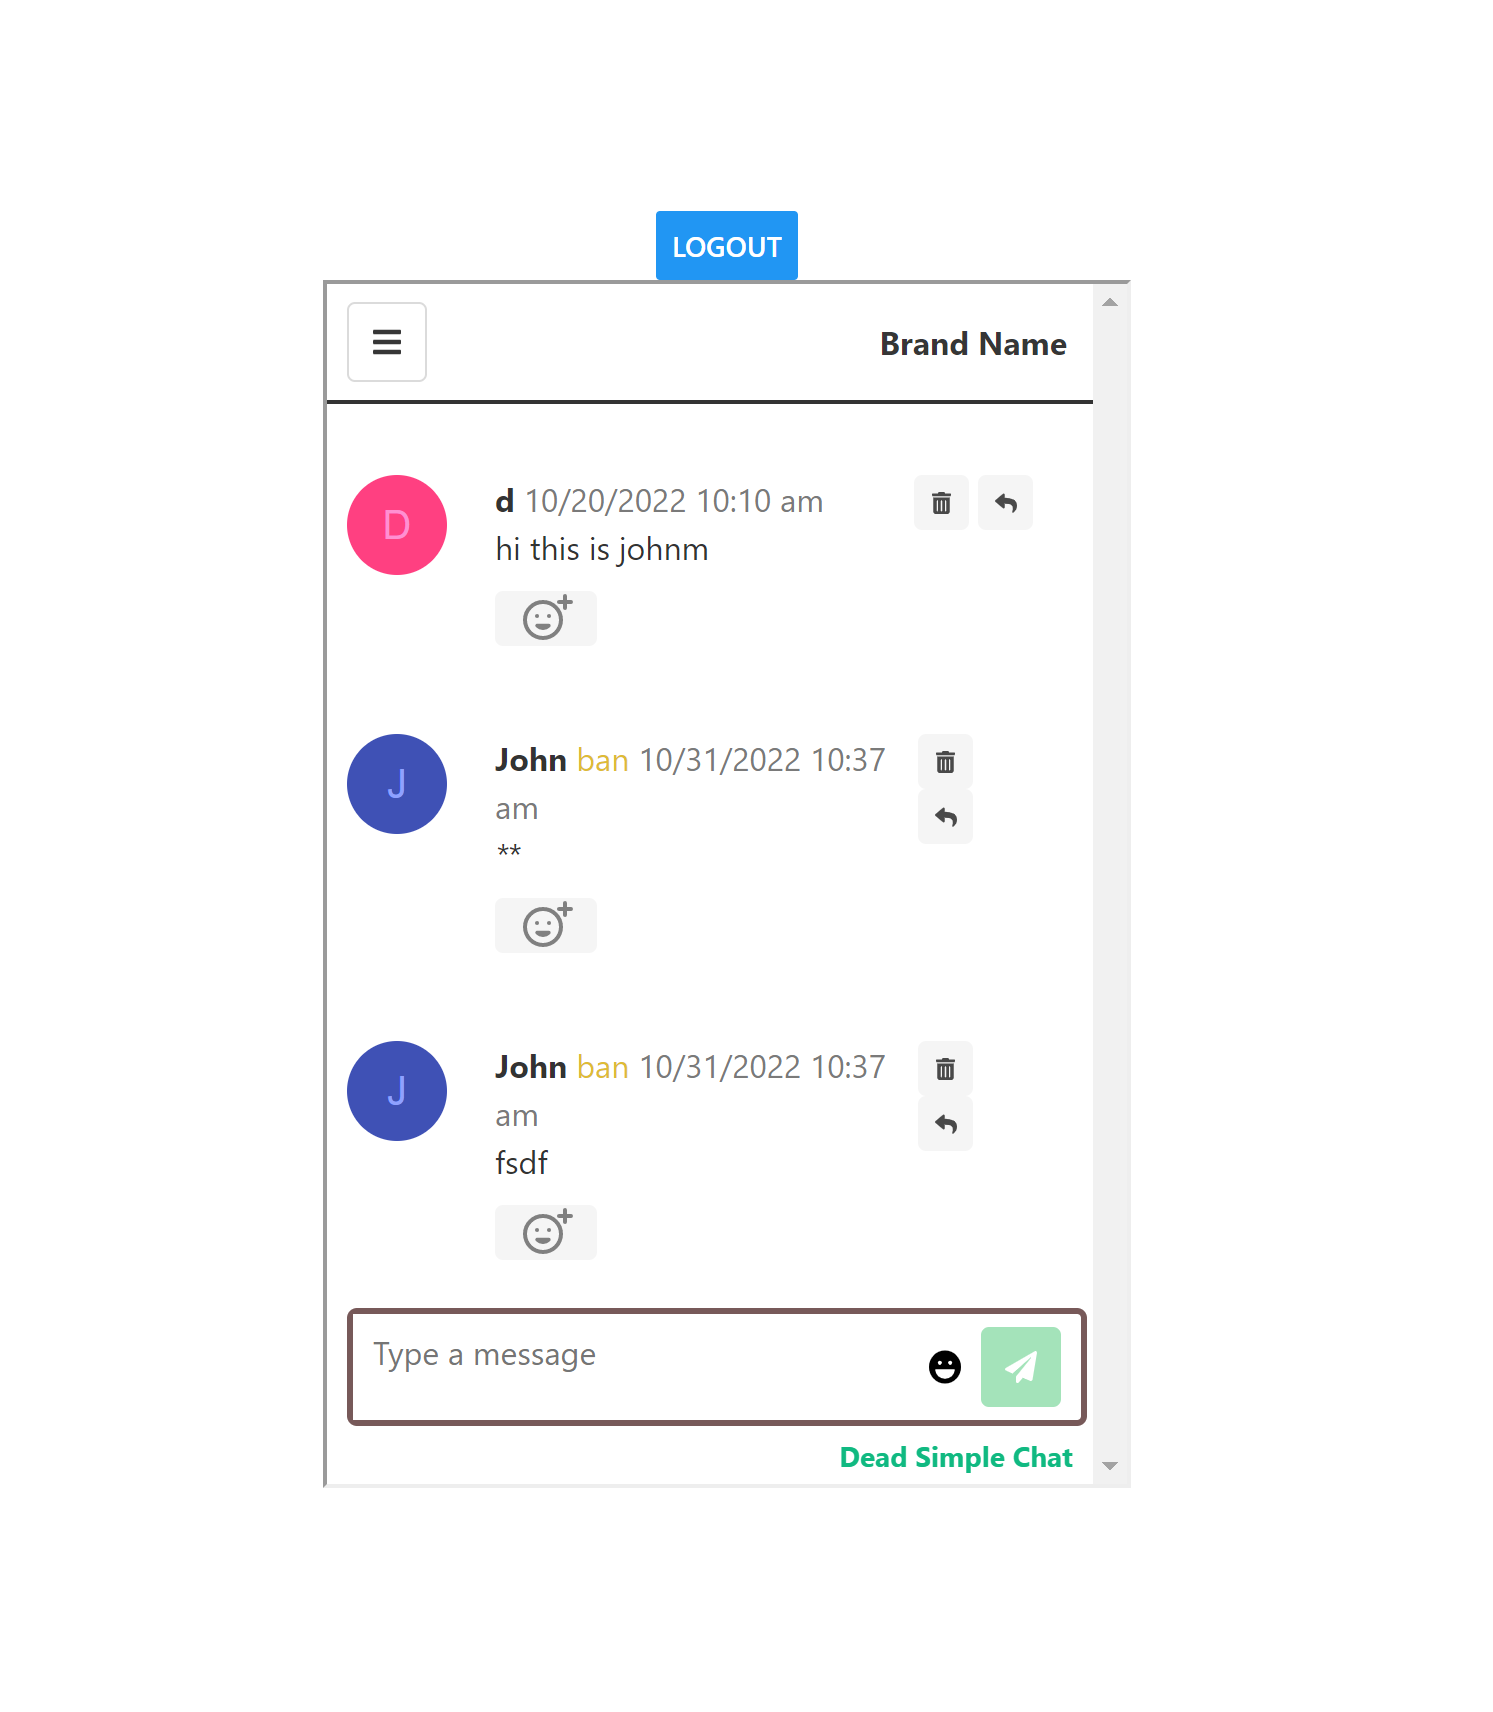
As an Admin / Moderator you will see buttons like the ban button to ban a user and the trash can button to delete the message next to the users in the chat.
Only Admin and Moderators can see these buttons, normal users cannot see these buttons
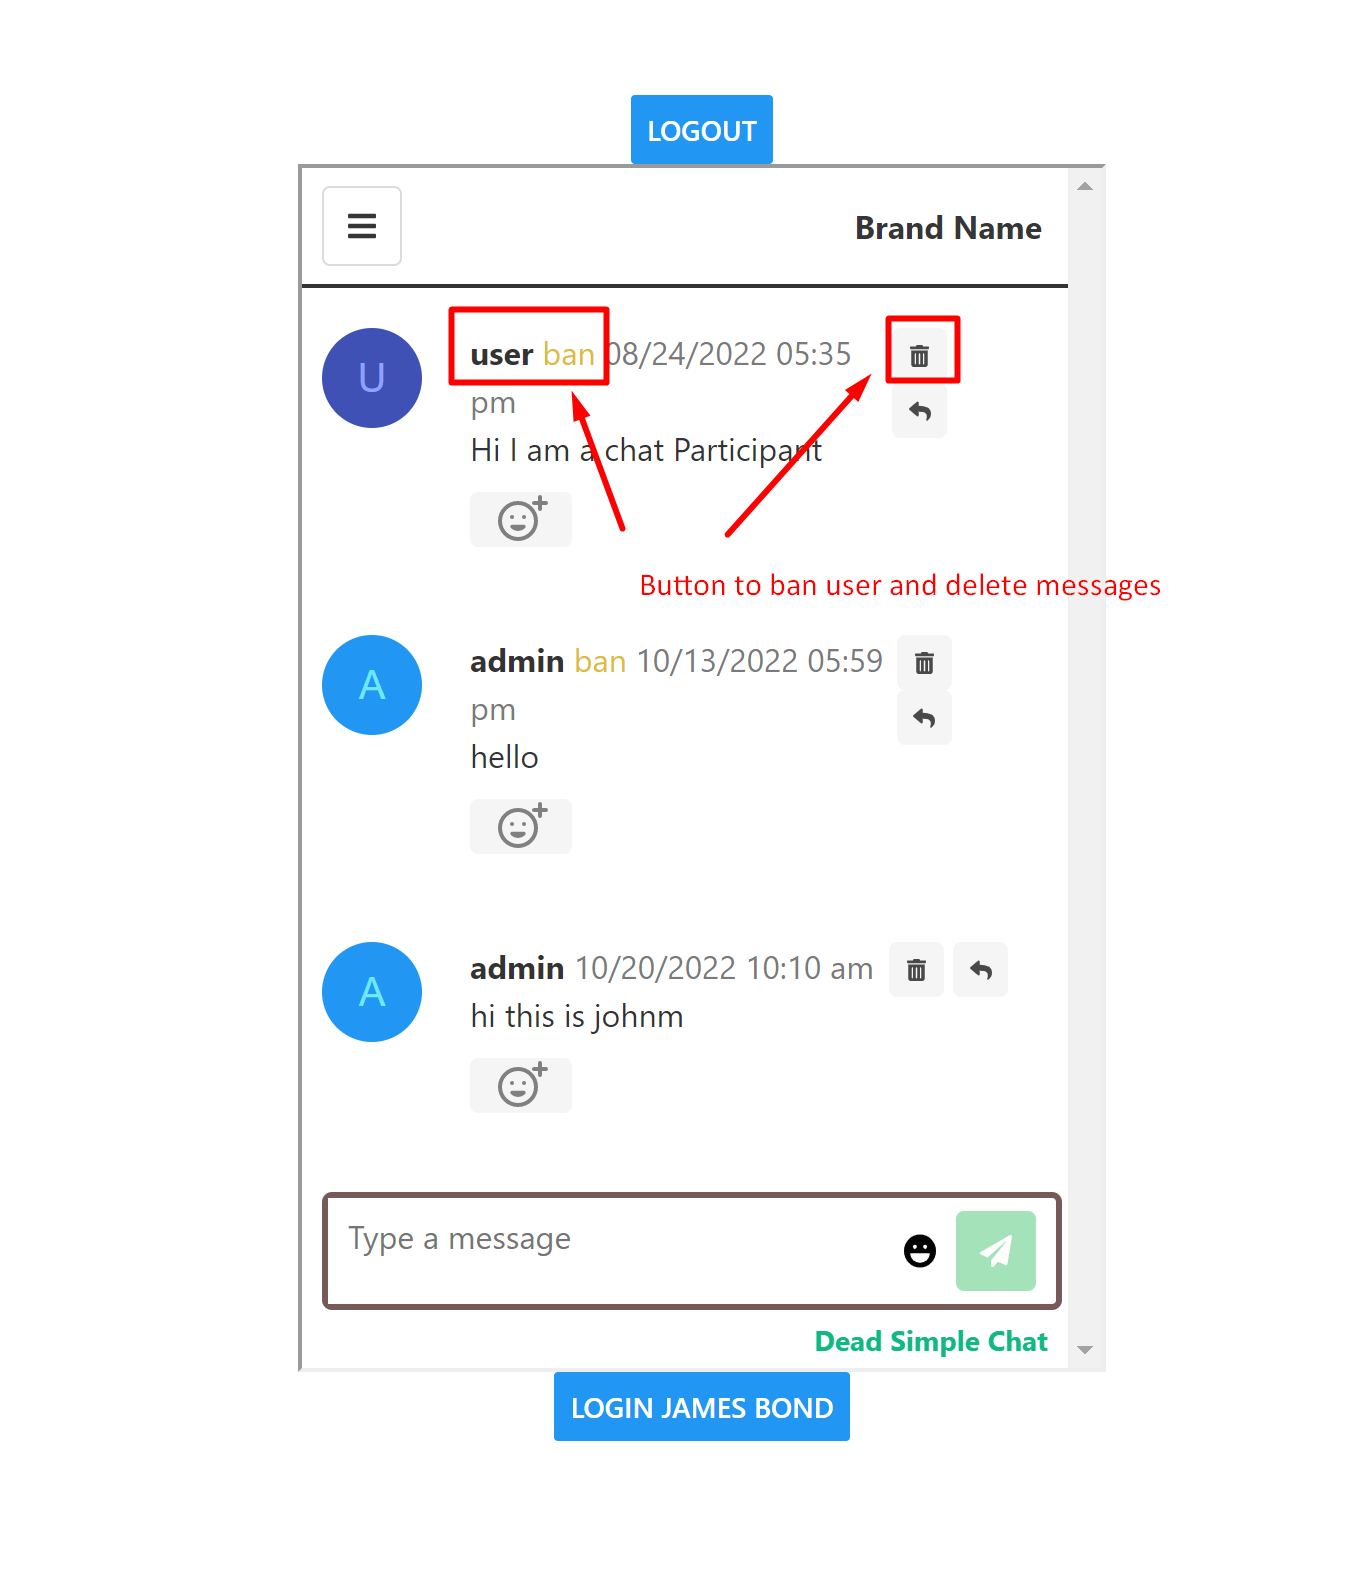
Admin and Moderator View
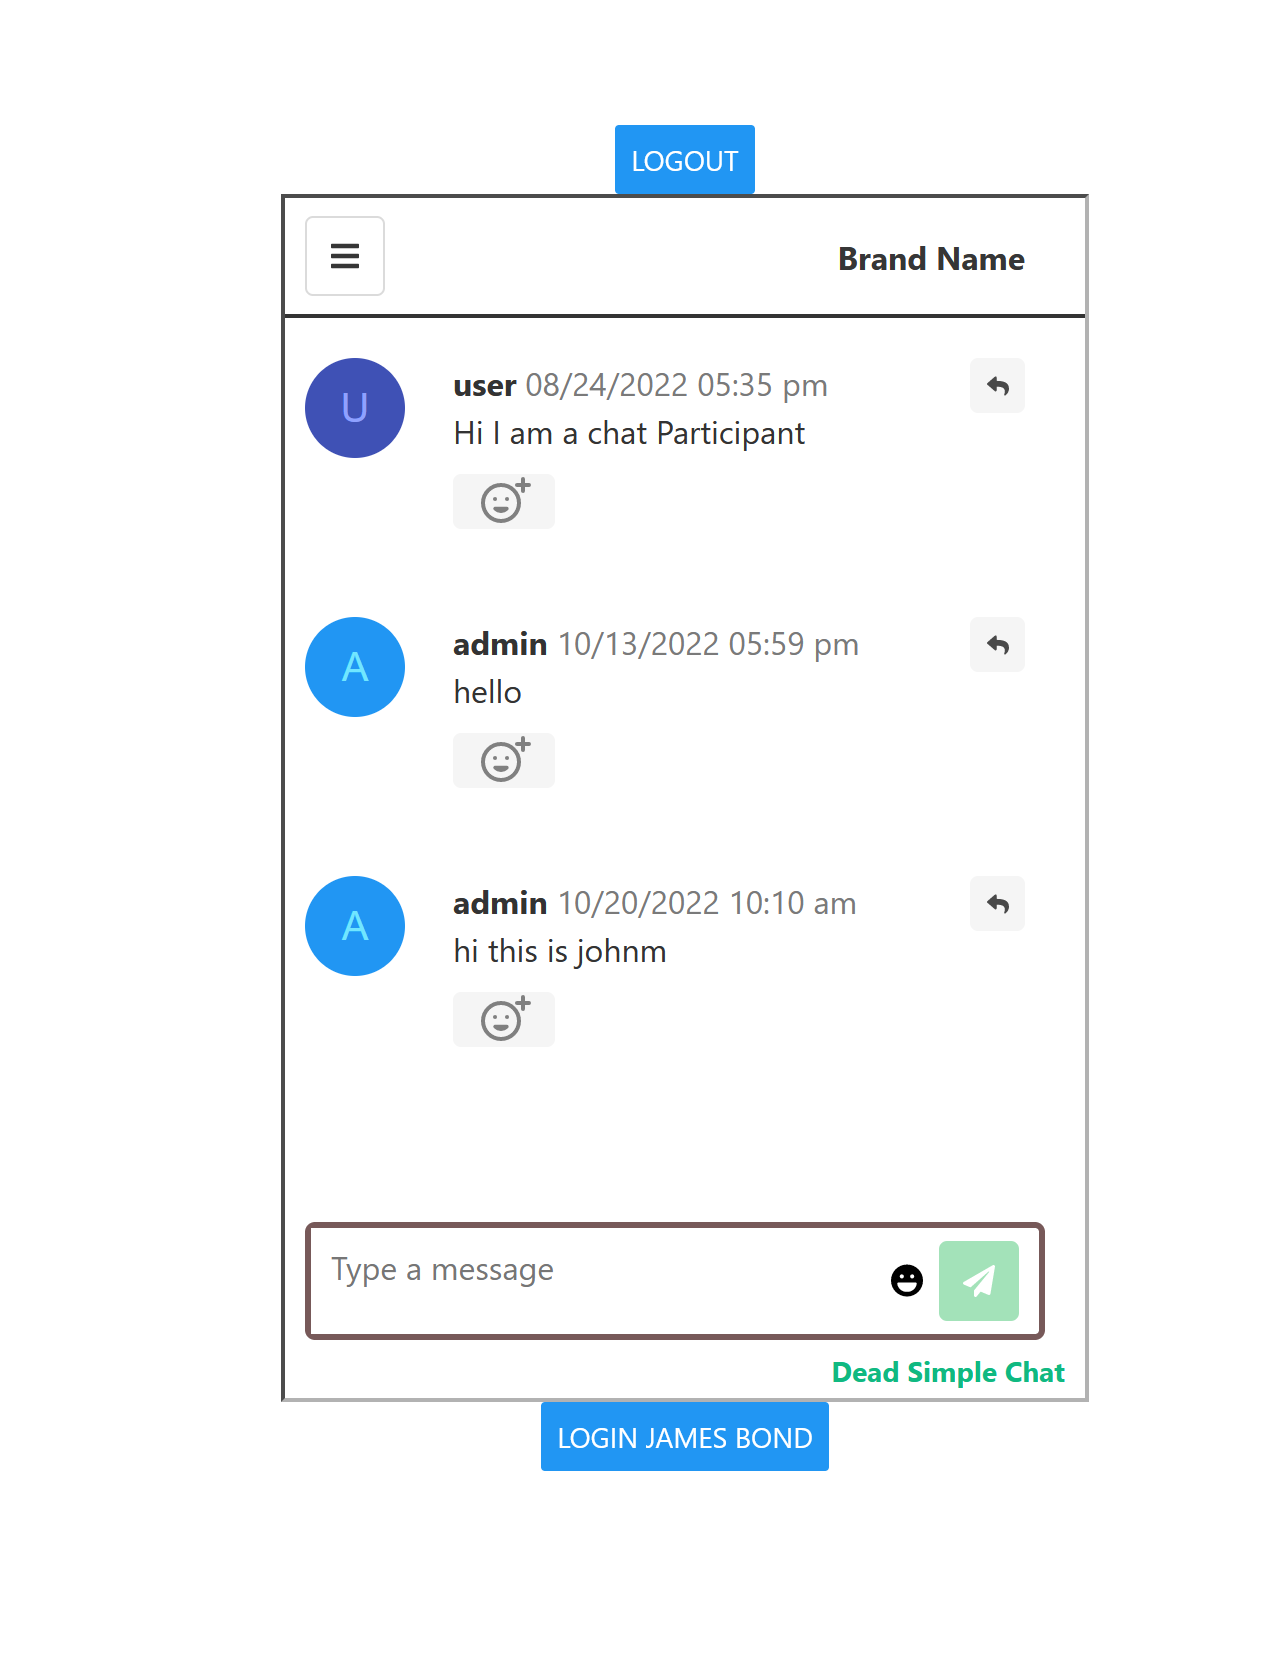
Normal user view
You can upload a list of bad words as well and these words will automatically be deleted from the chat room.
The whole sentence containing these words will not appear.
Thus in this section we have learnt how we can moderate the chat rooms through UI.
You can moderate your react native chat application through API and Chat SDK as well.
7. Creating Moderators
Creating Moderators is easy with DeadSimpleChat. Go to Dashboard -> Moderators
Here you can create a username for the moderator and set a password.
You can assign the moderator specific chat rooms or you can create a universal moderator that can moderate all the chat rooms.
click on the save button

When you click the save button the credentials for the moderator login are created.
If you can look at the Manage Moderator section there is a table
username means the username of the moderator in the chat room
email email used to login to the chat room
password password used to login to the chat room
chat rooms chat rooms assigned to the moderator
You can delete the moderators from this table as well.
You can also use the SSO to login the moderators into the chat room or login the moderators via the Chat SDK as well.
To login as a moderator go to the chat app where you will see the login screen.
You can set up a username and enter as a normal user or under the
Already have an account section put in your Moderator credential to login as a moderator
Conclusion
In this article we have learnt how to create a react native chat application. We have also learnt how to use the chat SDK and how we can use the chat through the no code route as well.
If you have any questions / concerns with regards to chat feel free to contact us at support[at]deadsimplechat.com
Ready to Add Chat to Your Website?
Get started for free. No credit card required.
Start a Free Trial
![Webinar Chat: The Complete Guide to Engaging Your Audience [2026]](/blog/content/images/size/w600/2026/02/article-hero-webinar-chat.svg)