This article was updated on 18 september 2024 to include new diagrams and section on automatic switching with bash scripts
In this article we are going to learn about how to switch between various nvm versions
- What is NVM?
- How to install NVM the step by step Guide
- Verifying NVM is properly installed
- Installing Specific versions of Node JS
- Setting a default version of node Js with NVM
- How to check for Node versions available to install
- Switching between Node versions
- Automatic version switching with .nvmrc
- Strategies for ensuring consistency across development environments
- conclusion
What is NVM?
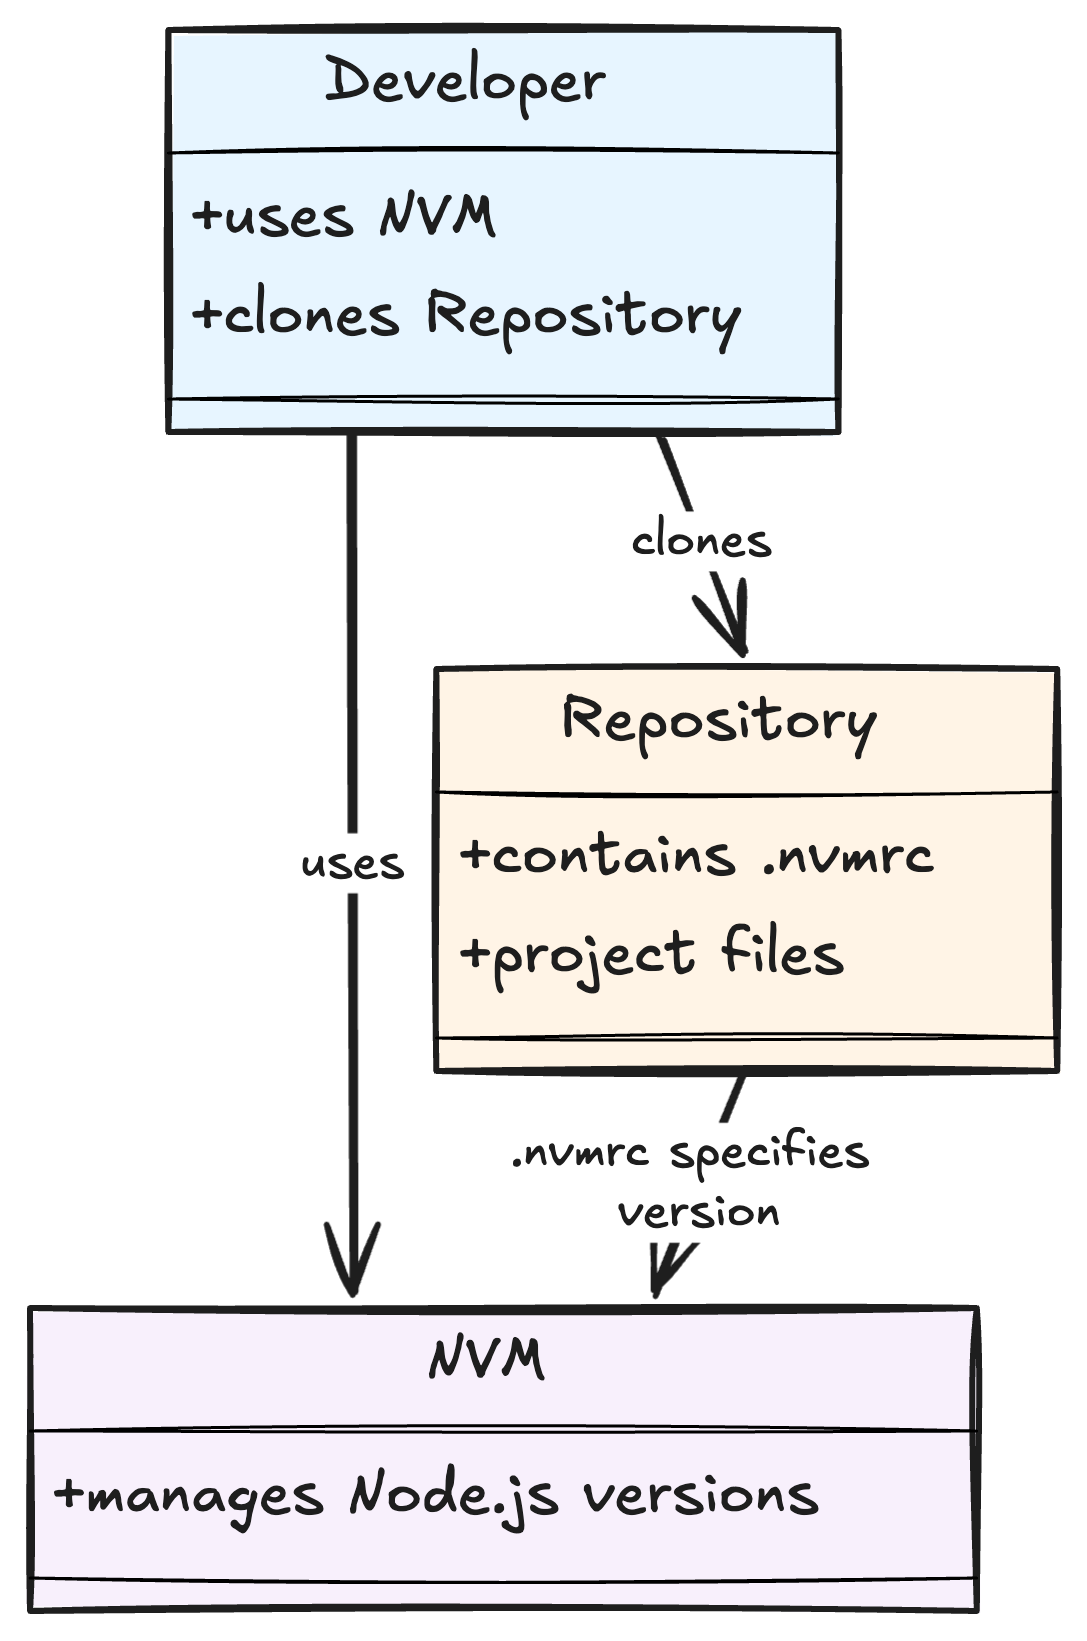
Node version manager also called as NVM is a software utility that allows developers to switch between different versions of node
Some of the important features of NVM
- Multiple version management
- Easy switching
- Version specific global packages
- No need for sudo
- compatibility testing
- Legacy support
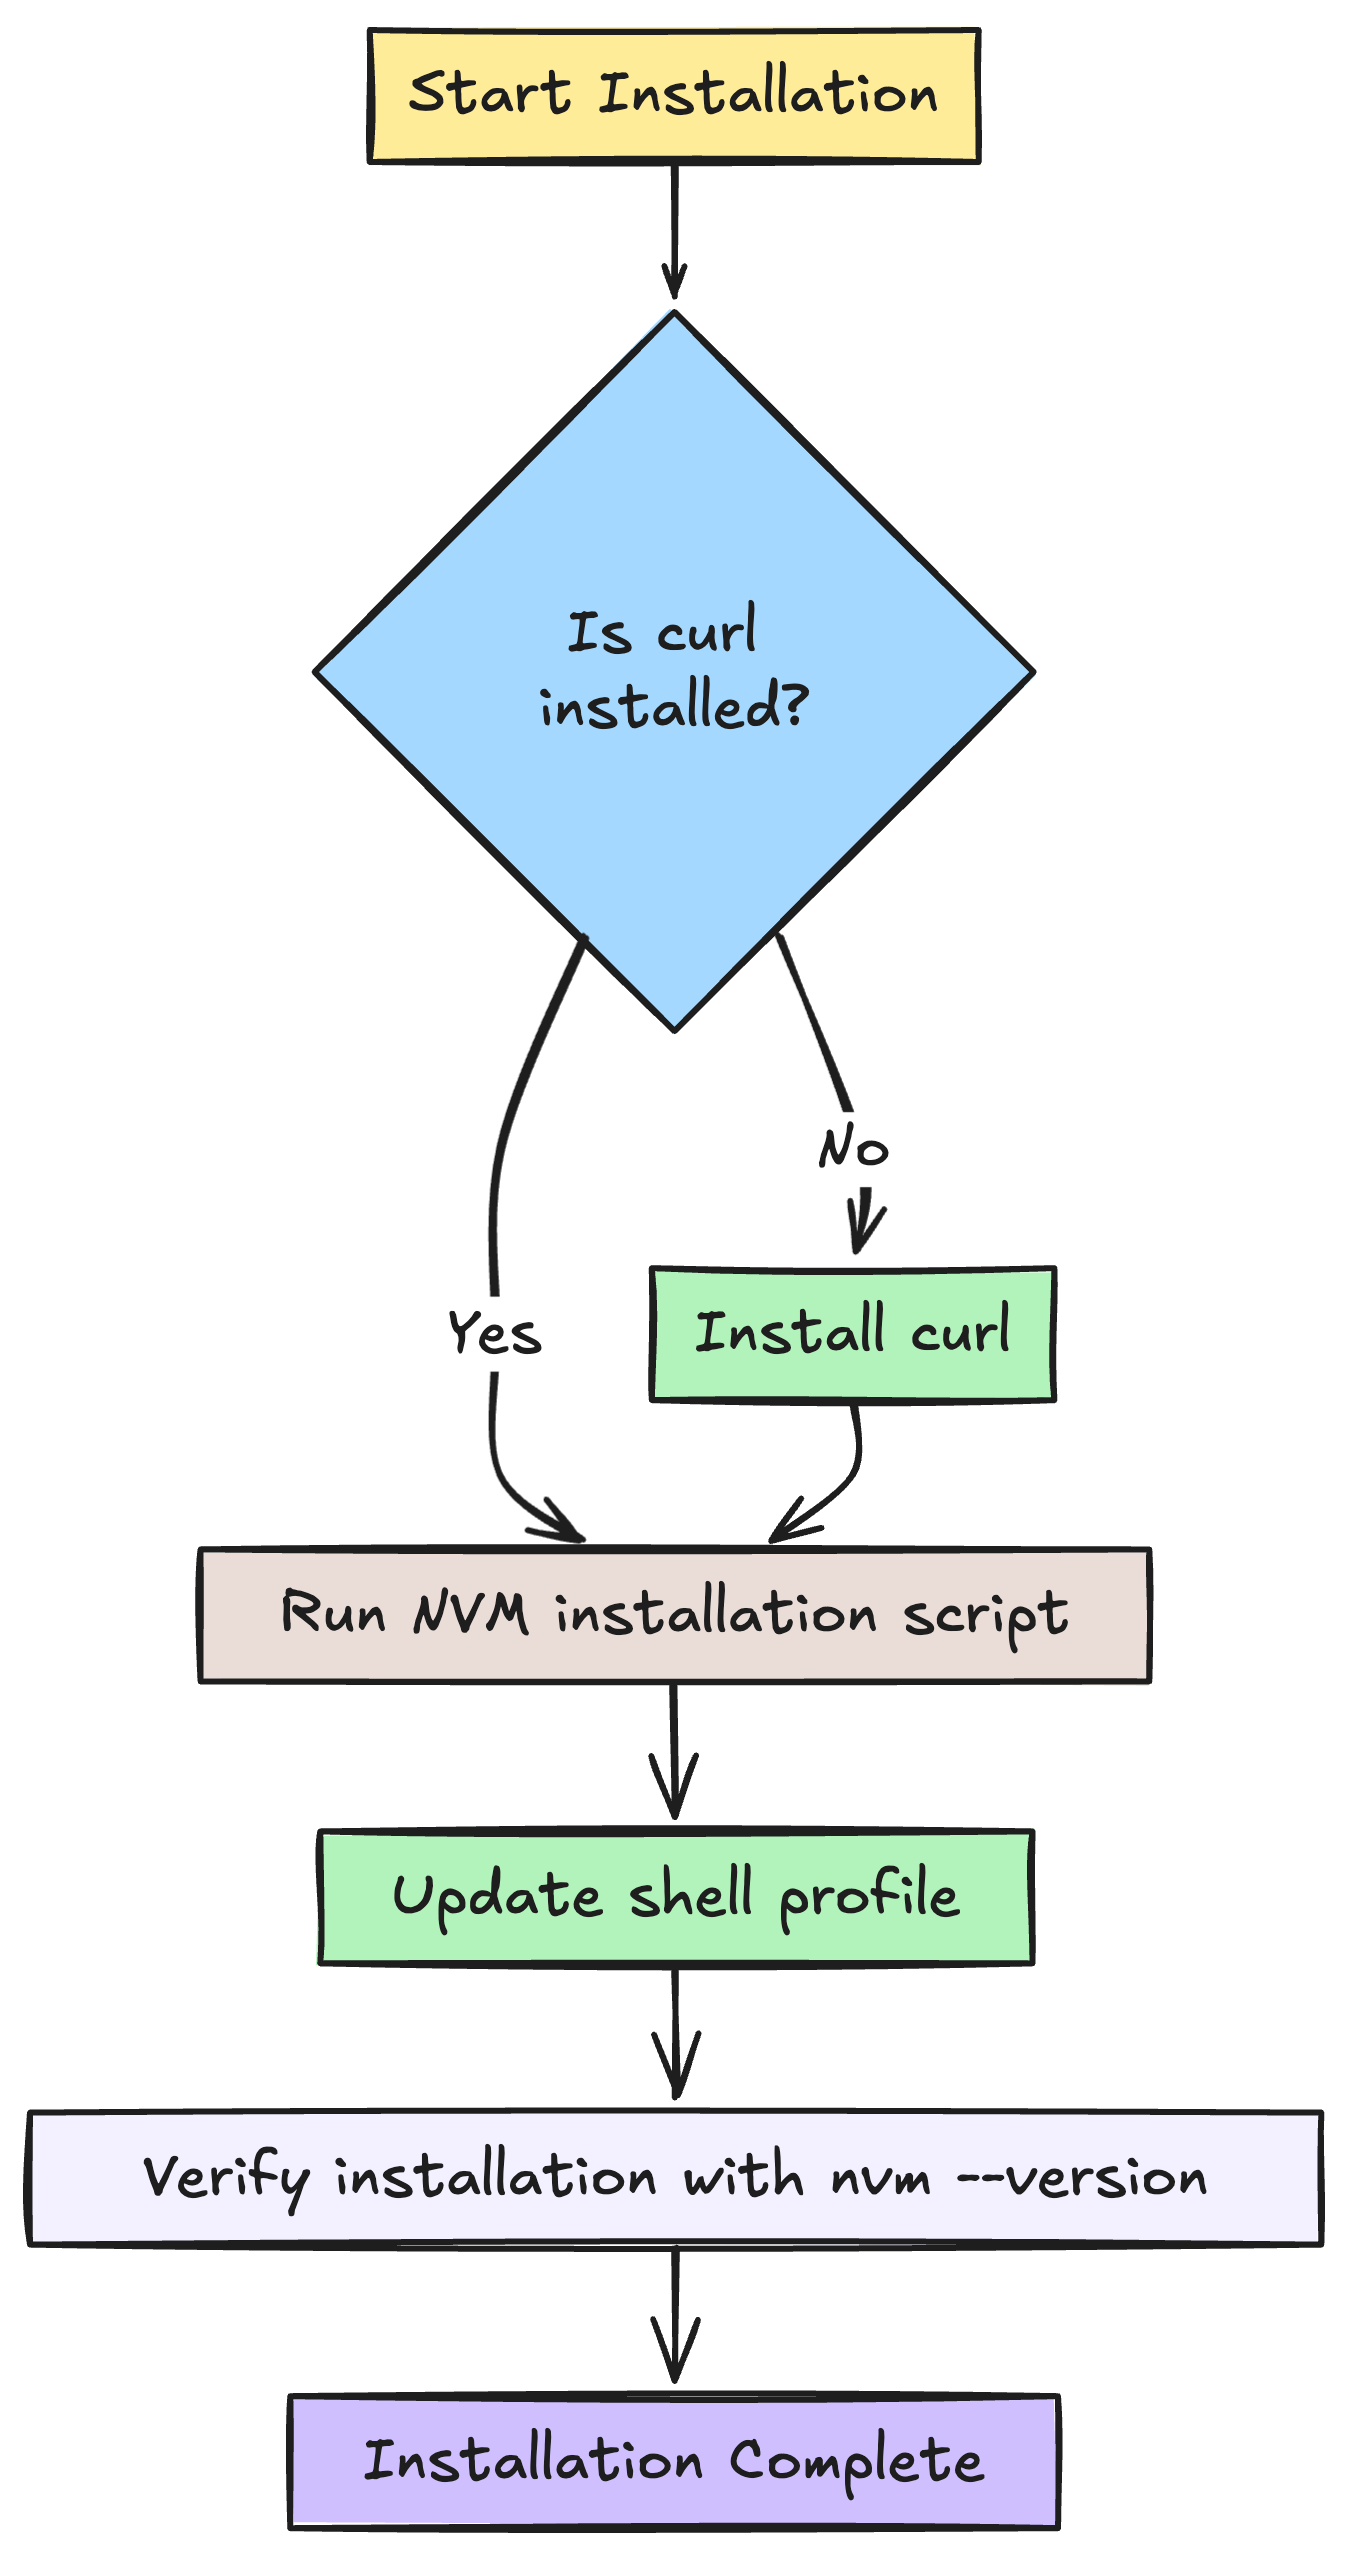
How to install NVM? Step by Step guide (Mac, Linux and Windows)
In this section we are going to learn how to install nvm in a step by step manner. We are also going to cover different operating systems such as Mac, linux and windows
So, no matter what operating system you are using, we have got you covered
Installing NVM on macOS and Linux
The most common method of install nvm on mac or linux is using the curl script or wget. As both mac as well as linux use the similar terminal program bash or similar, method of install is also the same
If you are looking for a JavaScript Chat SDK and API, you can consider DeadSimpleChat SDK
On linux if you do not have the curl installed, first install the curl software like
install curl
sudo apt install curlusing curl
curl -o- https://raw.githubusercontent.com/nvm-sh/nvm/v0.39.1/install.sh | bash
using wget
wget -qO- https://raw.githubusercontent.com/nvm-sh/nvm/v0.39.1/install.sh | bash
updating the profile
you need to add the nvm script to your shell profile for it to work. The installation script usually automatically adds the nvm to your shell profile, if for some reason it doesn't then
Use the below script to add it to your .bashrc , .profile or .zshrc
export NVM_DIR="$([ -z "${XDG_CONFIG_HOME-}" ] && printf %s "${HOME}/.nvm" || printf %s "${XDG_CONFIG_HOME}/nvm")"
[ -s "$NVM_DIR/nvm.sh" ] && \. "$NVM_DIR/nvm.sh" # This loads nvm
Verifying installation
nvm --versionInstalling nvm on windows
generally windows users use WSL for development and windows is also encouraging this. But if for any reason you need to install nvm on your windows machine
You can install the nvm-windows library
Installing specific versions NodeJs
You can install latest version of node js or any specific version of node using nvm
to install a specific version of node use
nvm install 14.16.0 # write the specific version that you want to installinstalling the latest version using nvm
nvm install nodeYou can check whether the node version has changed properly you can type the below command
node --version # outputs the desired node js version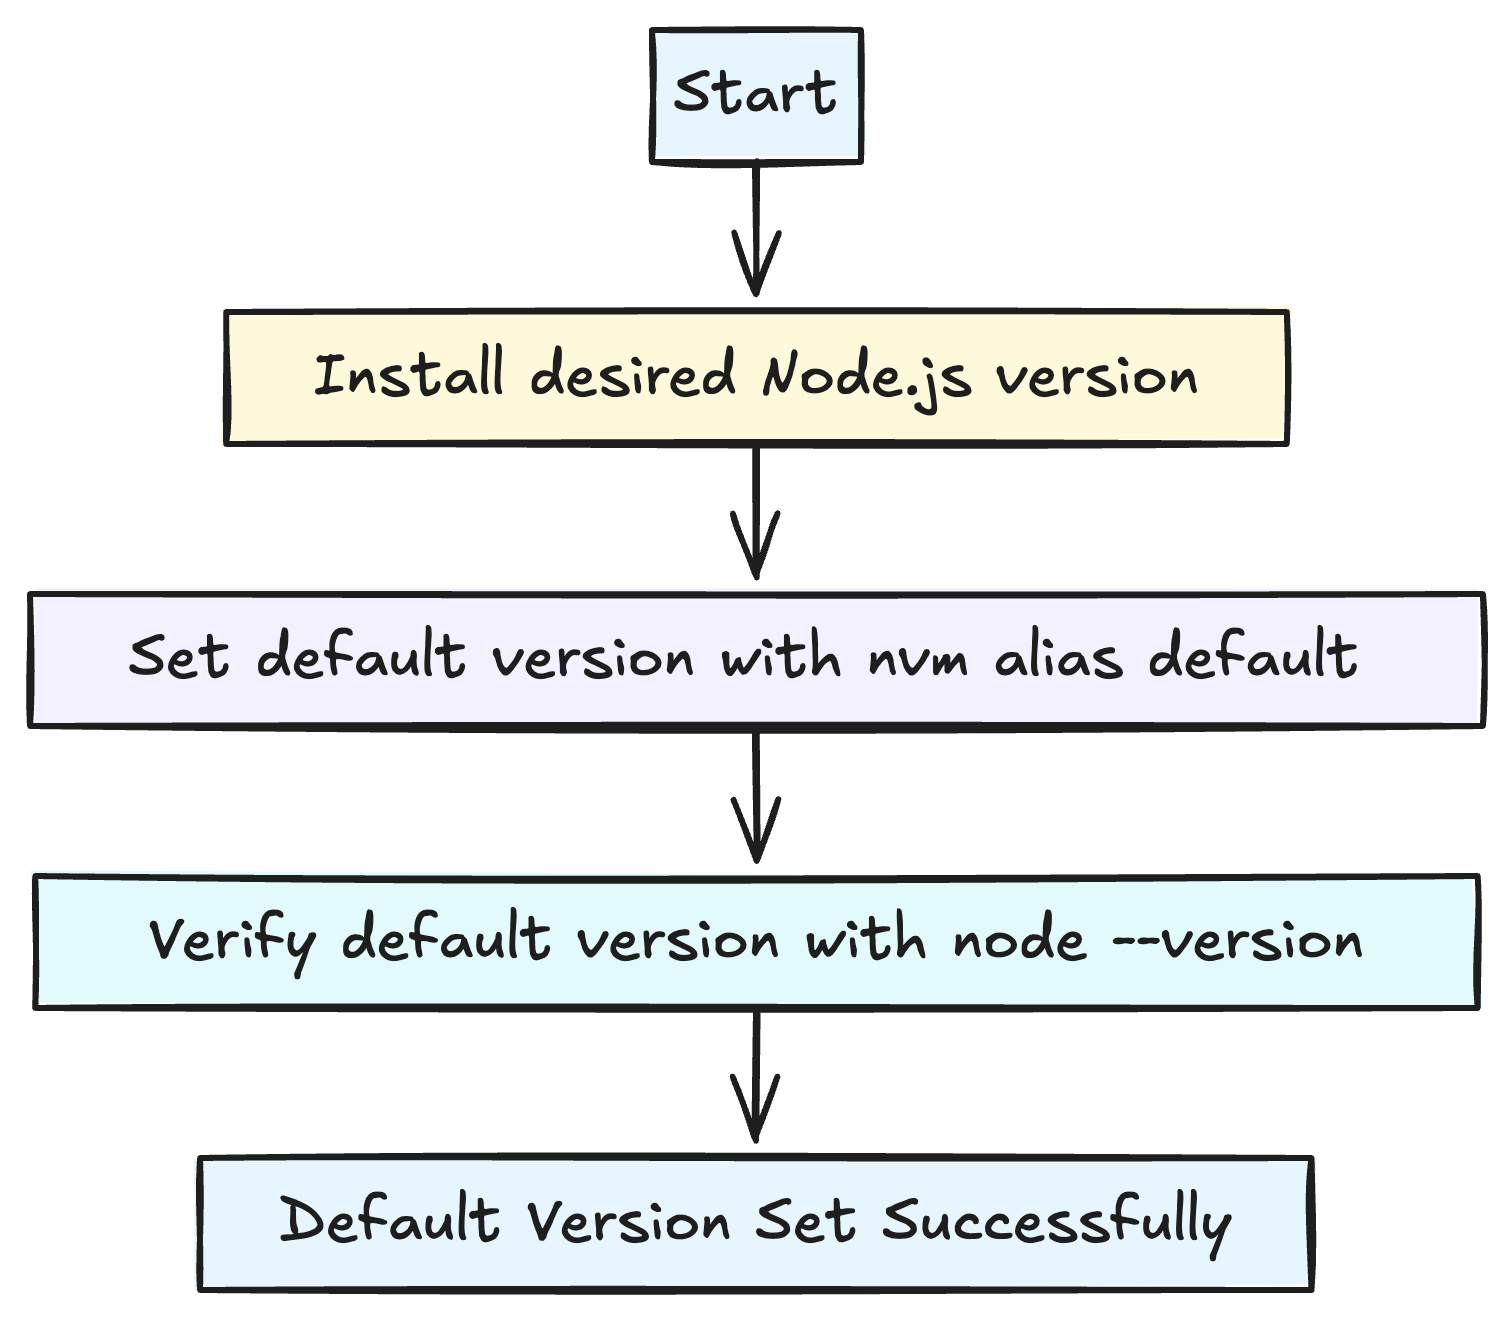
Setting the default node js version with nvm
you can also set a node js version as default on your machine. It can be the latest version or it can be any version that you desire
you can do this by
nvm alias default 18.4.0then you can verify that the default node version is set by
node --versionHow to check for Node versions available to install
It is quite easy to check for nodejs versions that are available to install. Simply, open your terminal and type the following command
nvm ls-remoteIt gives you a whole list of nodejs to choose from like this
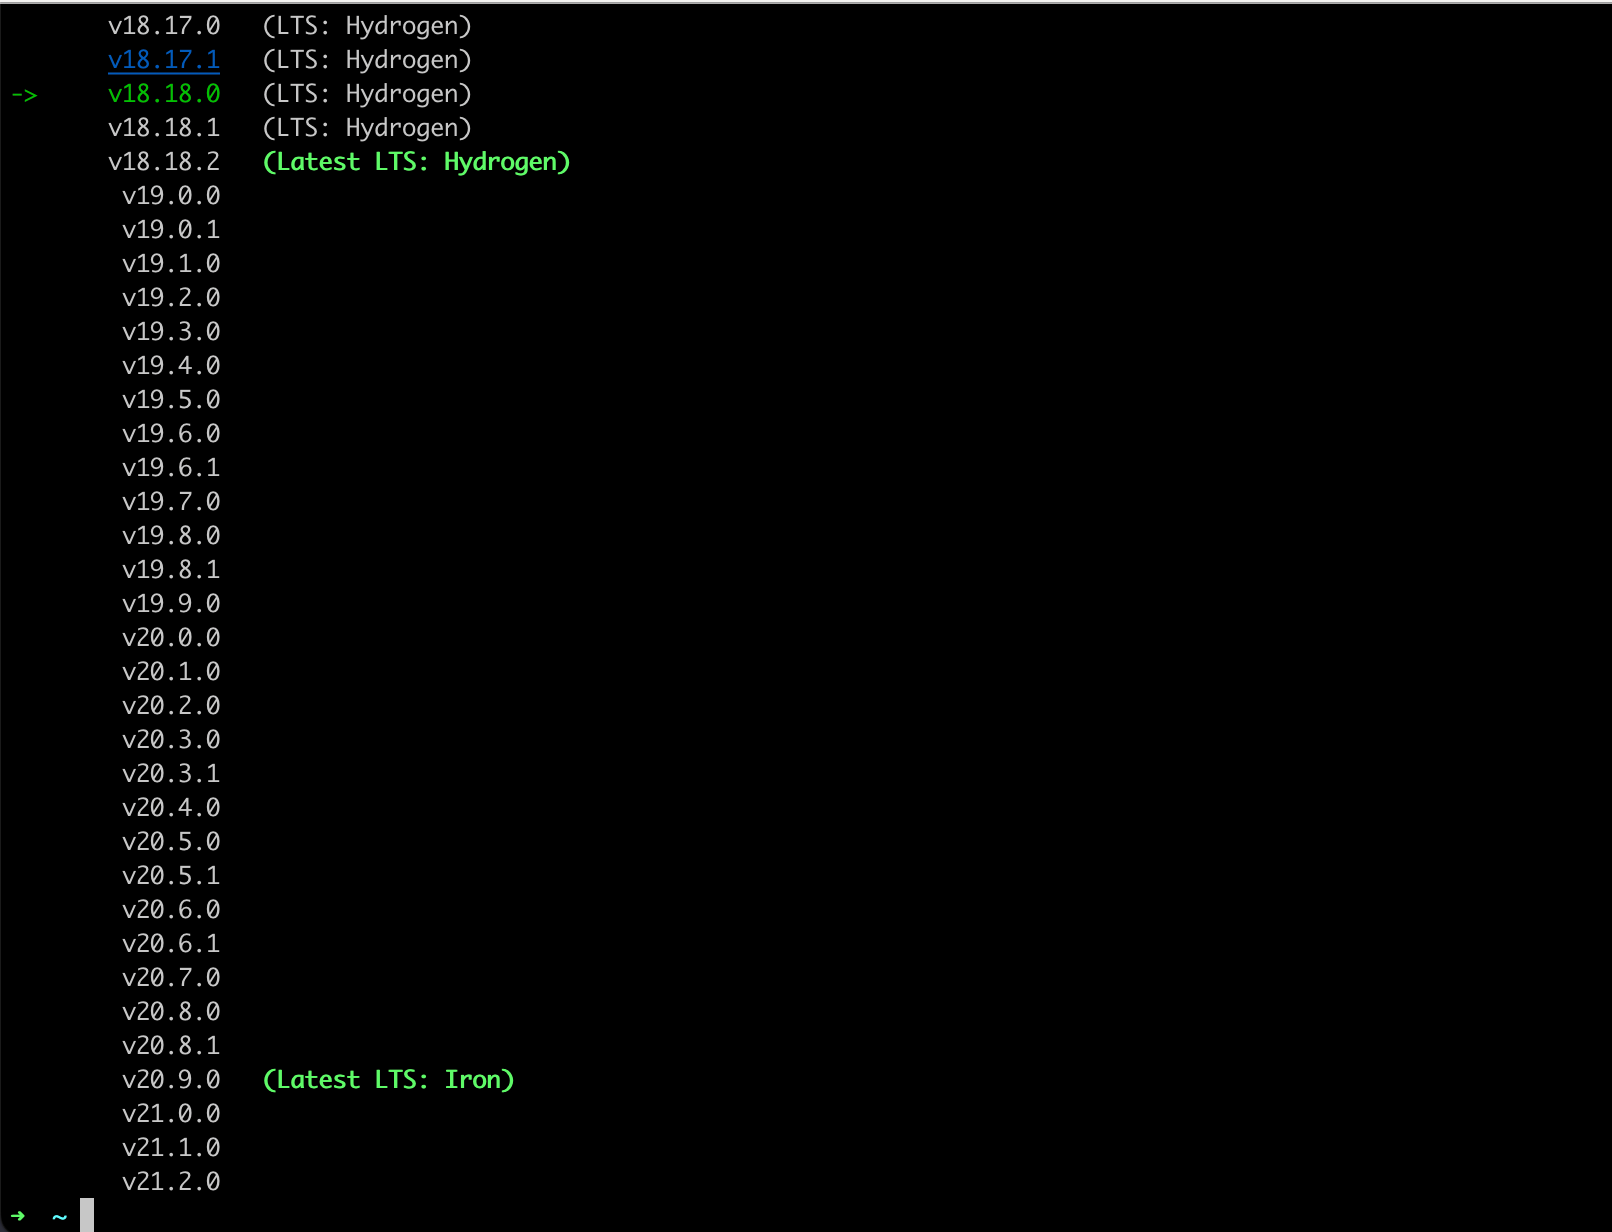
- the list is ordered from oldest to newest versions
- each line is a different version of node
- LTS versions are highlighted with the word LTS written besides them
- If you are interested in the LTS version of a specific version you can type
nvm ls-remote --lts
to install a specific version just type
npm install 20.7.0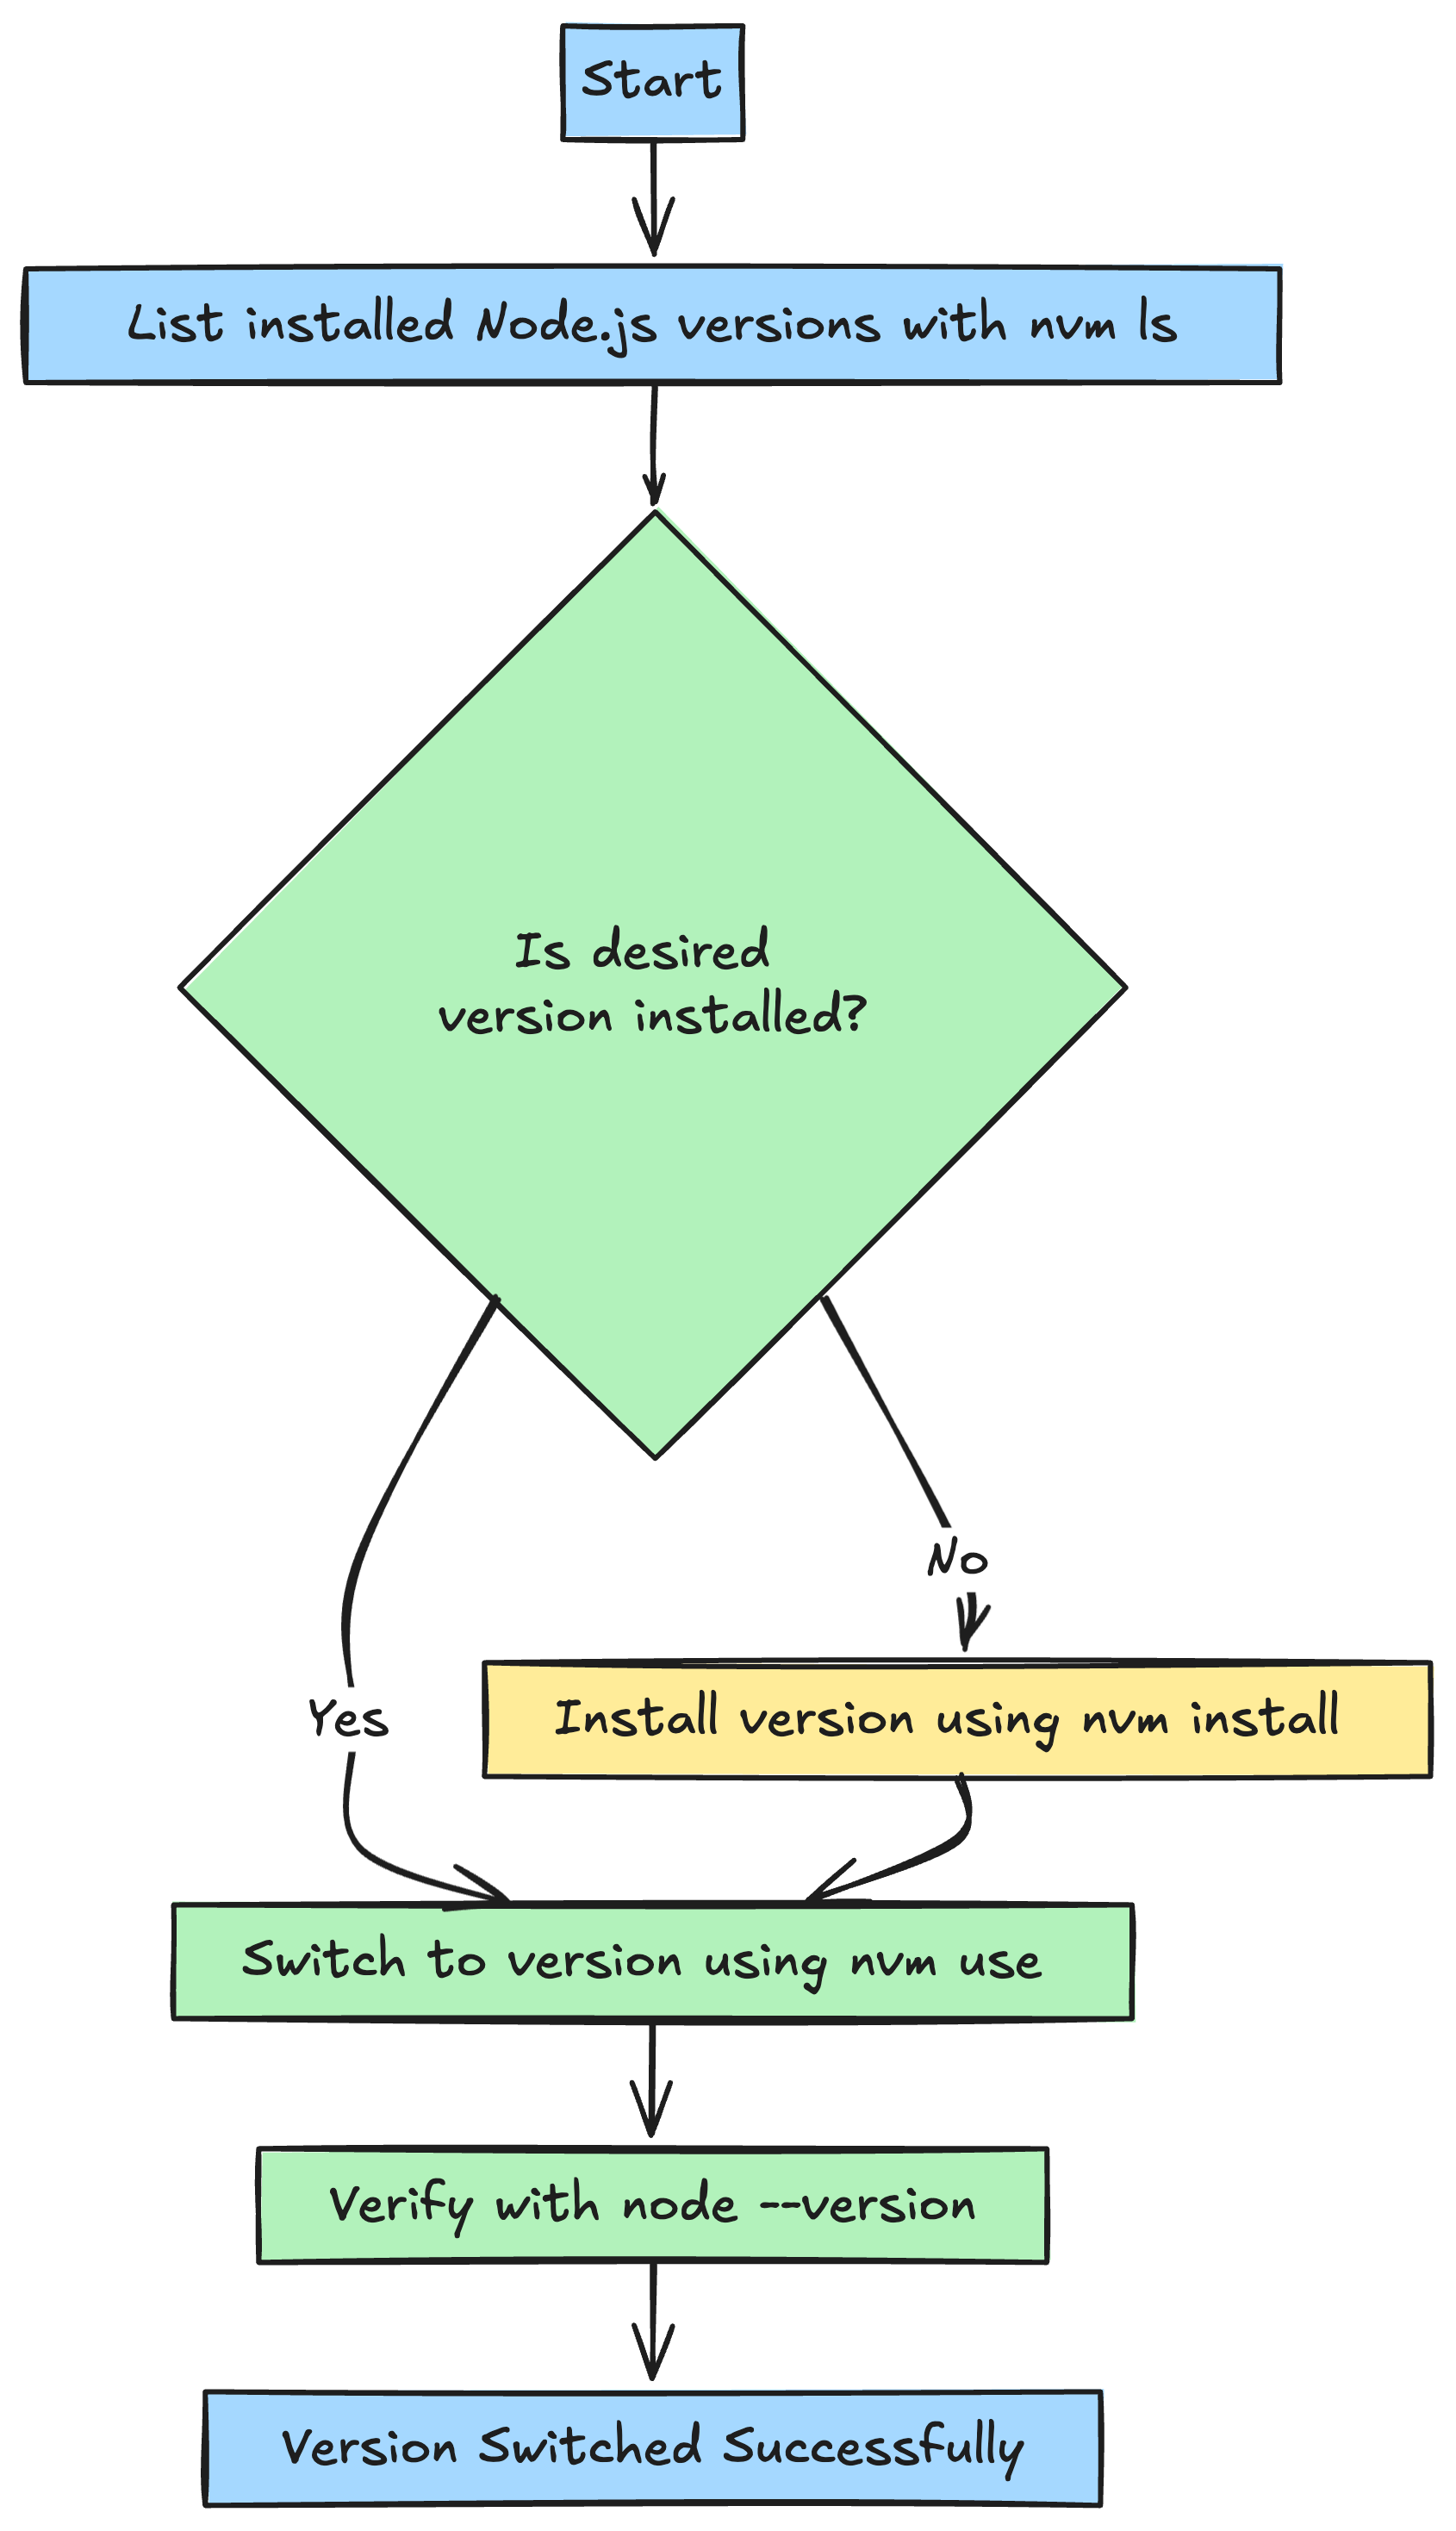
Switching between different versions of node
It is quite easy to switch between different versions of node.
- List all the versions available to switch between with
nvm lsor you can install a version from the remote repository and then switch to that version usingnvm ls-remote - Then type the below command to switch to a particular version with
nvm use 18.18.23. You can check whether you have successfully switched to the selected version with the node -v command
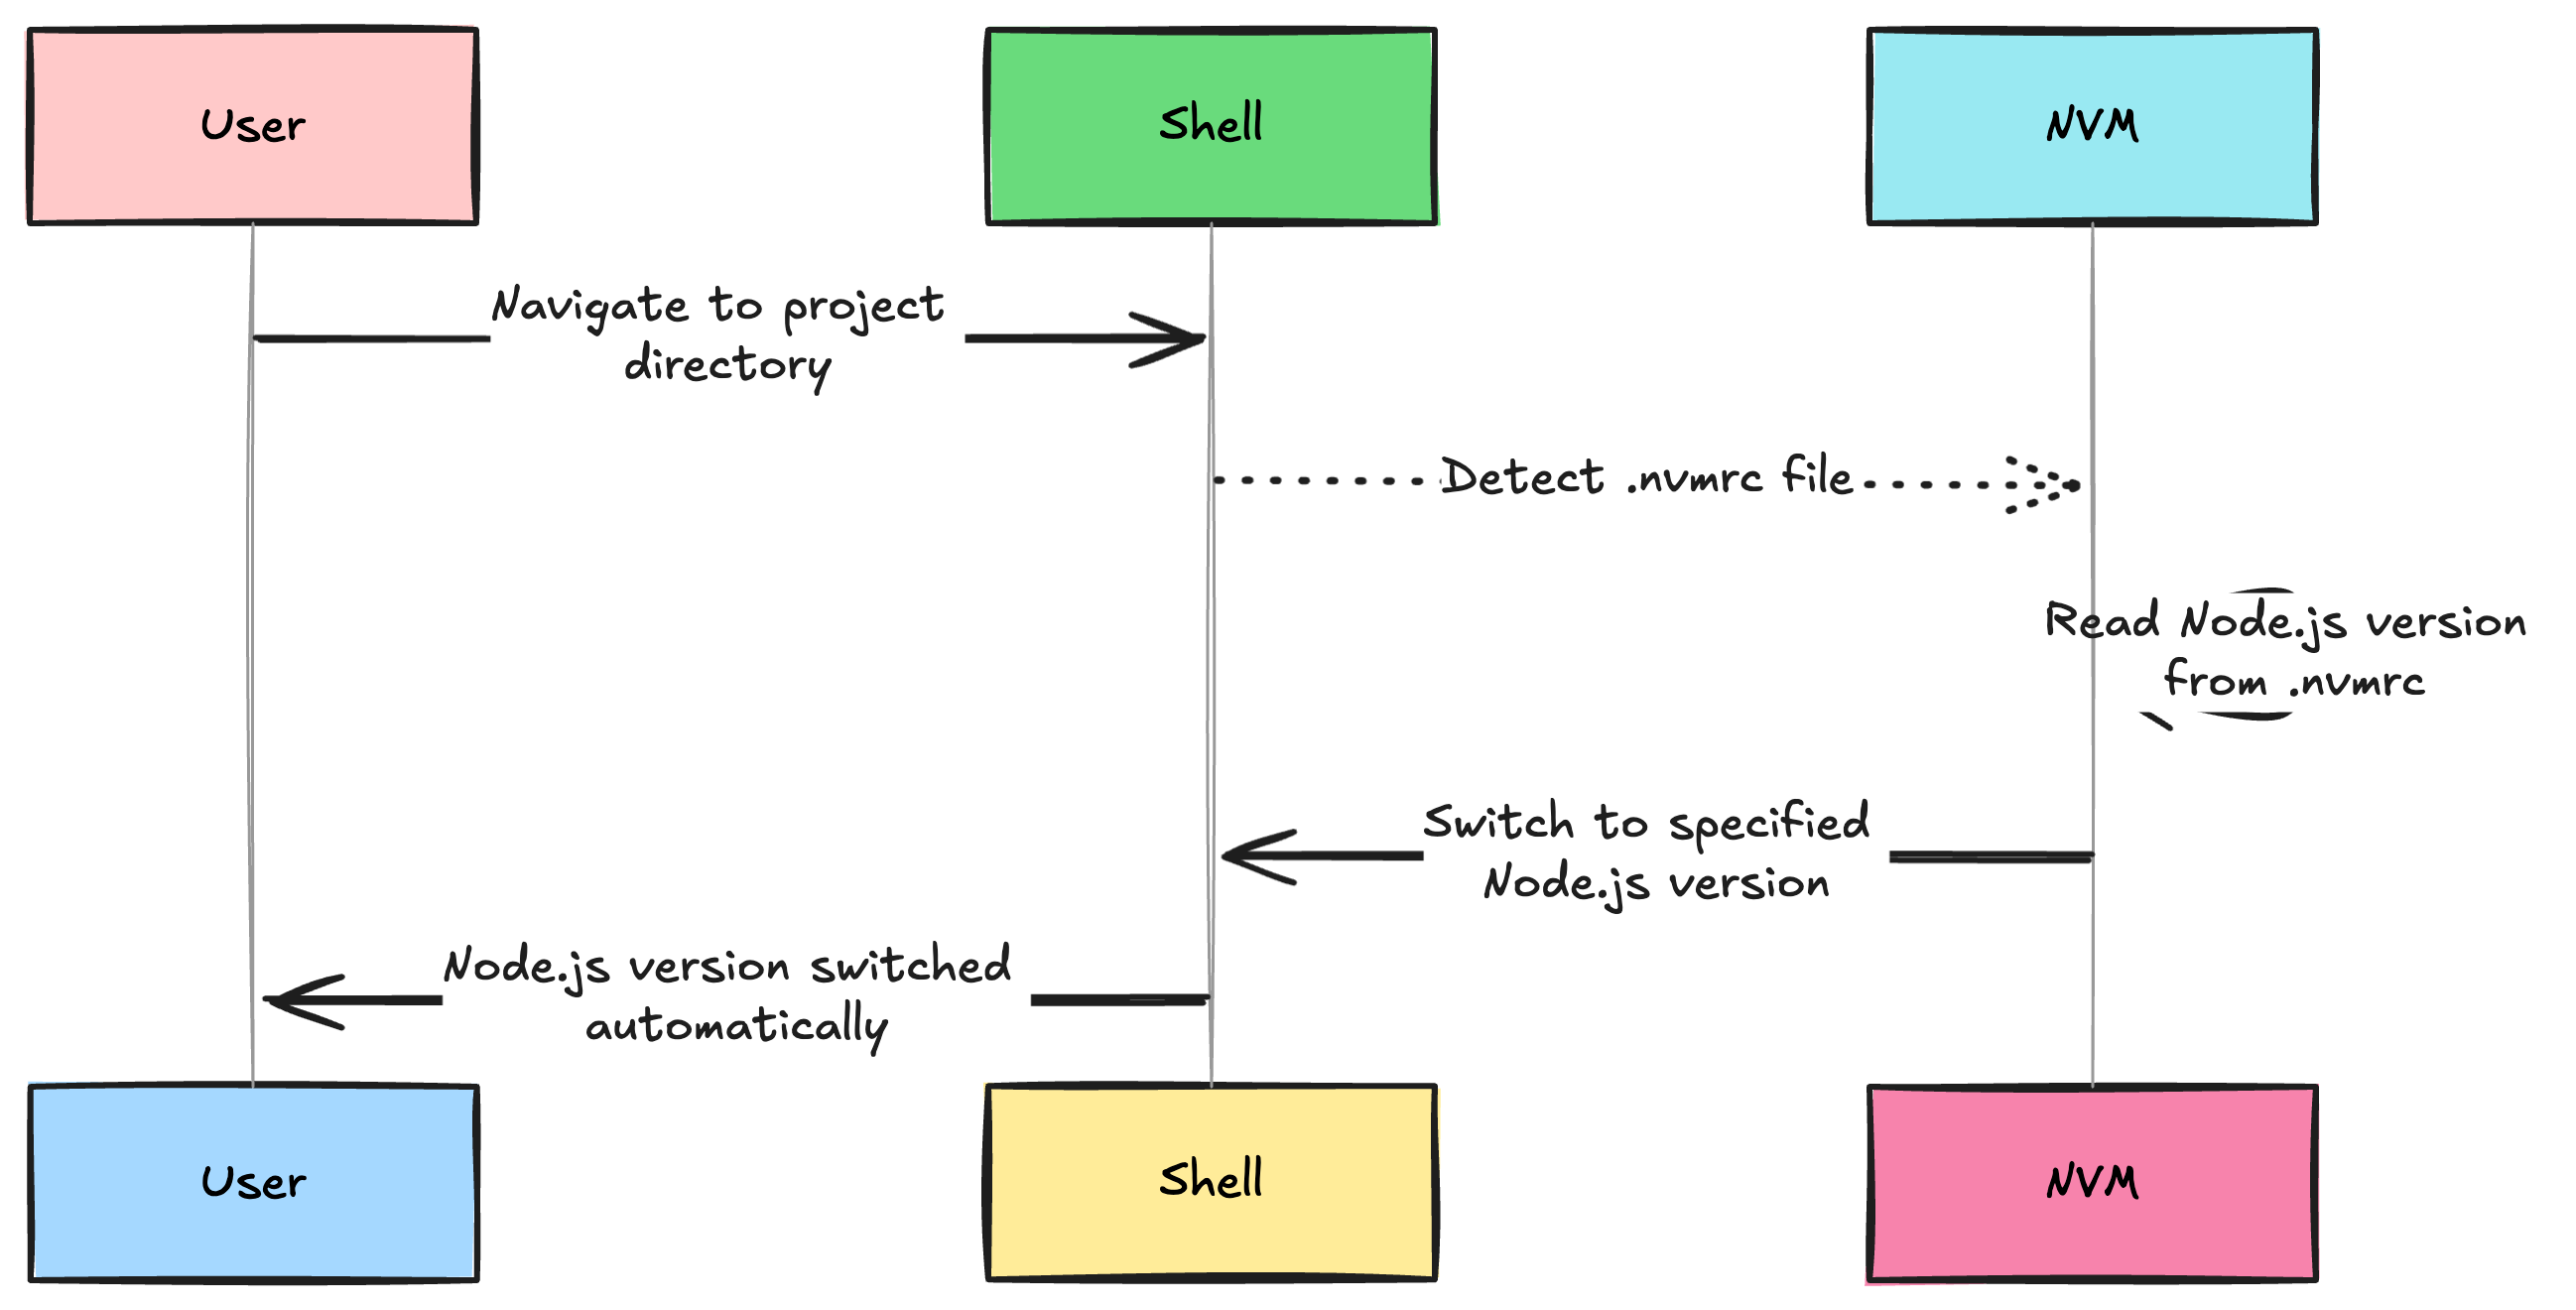
Automating Version Switching with .nvmrc:
How to automate the process of switching Node.js versions in a project environment.
Step 1: Creating an .nvmrc file
- navigate to your projects root directory then
cd /path/root_directory- create the
.nvmrcfile
you can create a new file like this
touch .nvmrc- Specify the node js version that you want to use in that specific project
18.18.0and this tells nvm to use the specificed version of node when running your project
Automating the switching the process
Here are the steps to automate the switching process.
You want to automatically run the nvm run peocess whenever you navigate to the project directory
for this you need to add a script to your shells profile
- Edit the shell profile
- for bash go to
./bashrcor./bash_profile - for zsh users edit the
~/.zshrc
2. Add the following script
include the following script in your profile file
autoload -U add-zsh-hook
load-nvmrc() {
  local node_version="$(nvm version)"
  local nvmrc_path="$(nvm_find_nvmrc)"

  if [ -n "$nvmrc_path" ]; then
    local nvmrc_node_version=$(nvm version "$(cat "${nvmrc_path}")")

    if [ "$nvmrc_node_version" = "N/A" ]; then
      nvm install
    elif [ "$nvmrc_node_version" != "$node_version" ]; then
      nvm use
    fi
  elif [ "$node_version" != "$(nvm version default)" ]; then
    echo "Reverting to nvm default version"
    nvm use default
  fi
}
add-zsh-hook chpwd load-nvmrc
load-nvmrc
then reload the profile with the following code
source ~/.zshrc # Or the appropriate file for your shell
and that's it now you know how to install and use different versions on Nodejs with NVM
Adding Scripts to your shell profile for automatic version switching
You can also add specific scripts to your shell profile in order to ensure the correct Node.js version is automatically activated based on the presense of .nvmrc file
Here are the guide for both Bash as as well zsh scripts
For Bash Shell
Step 1:
The Bash profile file is typically located in teh /.bashrc or /.bash_profile open the file using your text editor or terminal like so
nano ~/.bashrcStep 2: Adding the script
Append the below script at the end of your bashrc file
cd() {
  builtin cd "$@"
  if [ -f .nvmrc ]; then
    nvm use
  fi
}
Explanation of how the script works
- the
cd() { ... }: This defines a function and overrides the defaultcdcommand in Bash builtin cd "$@"This calls the orignalcdfunction with all the argumentsif [ -f .nvmrc ]; then ... fiThis checks if there is an.nvmrcfile in the project directory, that we have navigated tonvm use: The above code checks if there is an.nvmrcfile in the directory and if the file exits thenvm usecommand telss the NVM to switch to the specified node js version that has been specified in that.nvmrcfile
What happens when you cd now
- Changing directories: You can change directories as you always have using the
cdcommand - Checking for
.nvmrc: When you enter into a directory the script will check if there is an.nvmrcfile there. If there is no file it does not do anything and nothing happens - Switch to a new node js version: If there is an
.nvmrcfile there the script will change the NodeJs version to whatever the node js version is specified in the.nvmrcfile
For ZSH Shell
Step 1: Open you Zsh profile
the zsh profile is usually located in the ~/.zshrc. you can open it in your text editor or using your terminal like so
nano ~/.zshrcStep 2: Add the following script at the end of your zsh profile
autoload -U add-zsh-hook

load-nvmrc() {
  local node_version="$(nvm version)"
  local nvmrc_path="$(nvm_find_nvmrc)"

  if [ -n "$nvmrc_path" ]; then
    local nvmrc_node_version=$(nvm version "$(cat "${nvmrc_path}")")

    if [ "$nvmrc_node_version" = "N/A" ]; then
      nvm install
    elif [ "$nvmrc_node_version" != "$node_version" ]; then
      nvm use
    fi
  elif [ "$node_version" != "$(nvm version default)" ]; then
    nvm use default
  fi
}

add-zsh-hook chpwd load-nvmrc
load-nvmrc
Explanation of script
autolaod -U add-zsh-hookThis makes sure that the zsh hook i savailable to loadload-nvmrc() { ... }Defines a new function called asload-nvmrcthat handles the automatic bersion switching logic
Variables:
local node_version="$(nvm version)": This variable currently stores the active Node Js versionlocal nvmrc_path="$(nvm_find_nvmrc)": Screaches for a.nvmrcfile in the current directory
Logic:
if [ -n "$nvmrc_path" ]; then ... fi: Checks for a./nvmrcfile path was foundlocal nvmrc_node_version=$(nvm version "$(cat "${nvmrc_path}")"): This reads the Node Js version specified in the.nvmrcfileif [ "$nvmrc_node_version" = "N/A" ]: If the spcified version of node is not install this code checks for itelif [ "$nvmrc_node_version" != "$node_version" ]; then nvm useIf the node version is not installed this installs itelif [ "$node_version" != "$(nvm version default)" ]; then nvm use defaultIf the./nvmrcfile is not found and the current version is not default this code switches to the default version
Hooks:
add-zsh-hook chpwd load-nvmrcThis adds a hook so thatload-nvmrcis called everytime you change a directoryload-nvmrc: Theload-nvmrccalls a function everytime the shell starts
Reloading your Shell Profile
After adding the script you need to re load your shell profiles in order to apply the changes
For Bash
source ~./bashrcor
source ~/.bash_profileFor zsh
source ~/.zshrcor just close and reopen your terminal window
Testing the Automatic version switching
step 1: Create a .nvmrc file in your project root folder
go to your project root directory and create a .nvmrc file and specify and Node.js version there
cd /path/to/your/root_project
echo "22.0.0" > .nvmrc
step 2: Navigate back and again to your project directory
cd ~
cd -
Step 3: Check the node js version
check the if the node version changes with node -v
node -v
# it should output v22.0.0
Need Chat API for your website or app
DeadSimpleChat is an Chat API provider
- Add Scalable Chat to your app in minutes
- 10 Million Online Concurrent users
- 99.999% Uptime
- Moderation features
- 1-1 Chat
- Group Chat
- Fully Customizable
- Chat API and SDK
- Pre-Built Chat
Need TURN server, we recommend going with Metered TURN servers starting at 0.04 USD / GB
If you need a free version of the turn server we also have the OpenRelayProject.org a free TURN server.
Ready to Add Chat to Your Website?
Get started for free. No credit card required.
Start a Free Trial
![Webinar Chat: The Complete Guide to Engaging Your Audience [2026]](/blog/content/images/size/w600/2026/02/article-hero-webinar-chat.svg)
