
In this article we are going to cover environment variables also known as env variables. These are basically key-value pair of data set that is stored in the operating system level
In this article we will learn about environment variables in NodeJs with examples
- What are Environment variables
- Why are env variables are important
- Prerequisites for the project
- Installing NodeJs and setting up a new Project
- Initializing your first env variable with NodeJS
- env variables in API calling / async tasks
- env variables in Database operations / async tasks
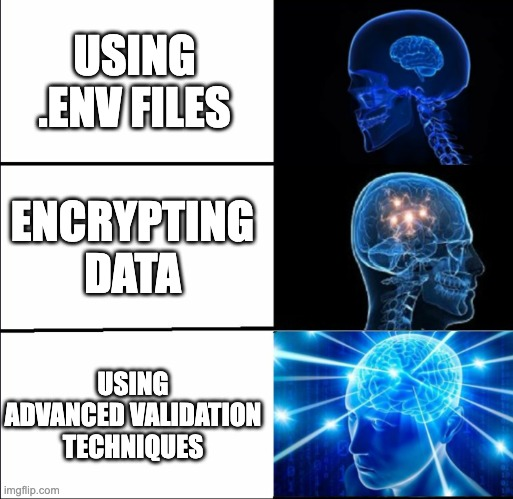
- Advanced env variable manipulation in Node JS: Encoding, Validation and type conversion
- Secrets management and Security Best Practices with examples
- Common Pitfalls and how to avoid them
- Conclusion
Environment Variables
Environment variables are a key-value pair data set that are avaiable at the operating system level. These data set are available in all major operating system command line shells Windows, Mac and Linux
Why are env variable important?
- Separation of concerns
- Security
- Portability
- Scalability
- Compatibility
- Interoperability
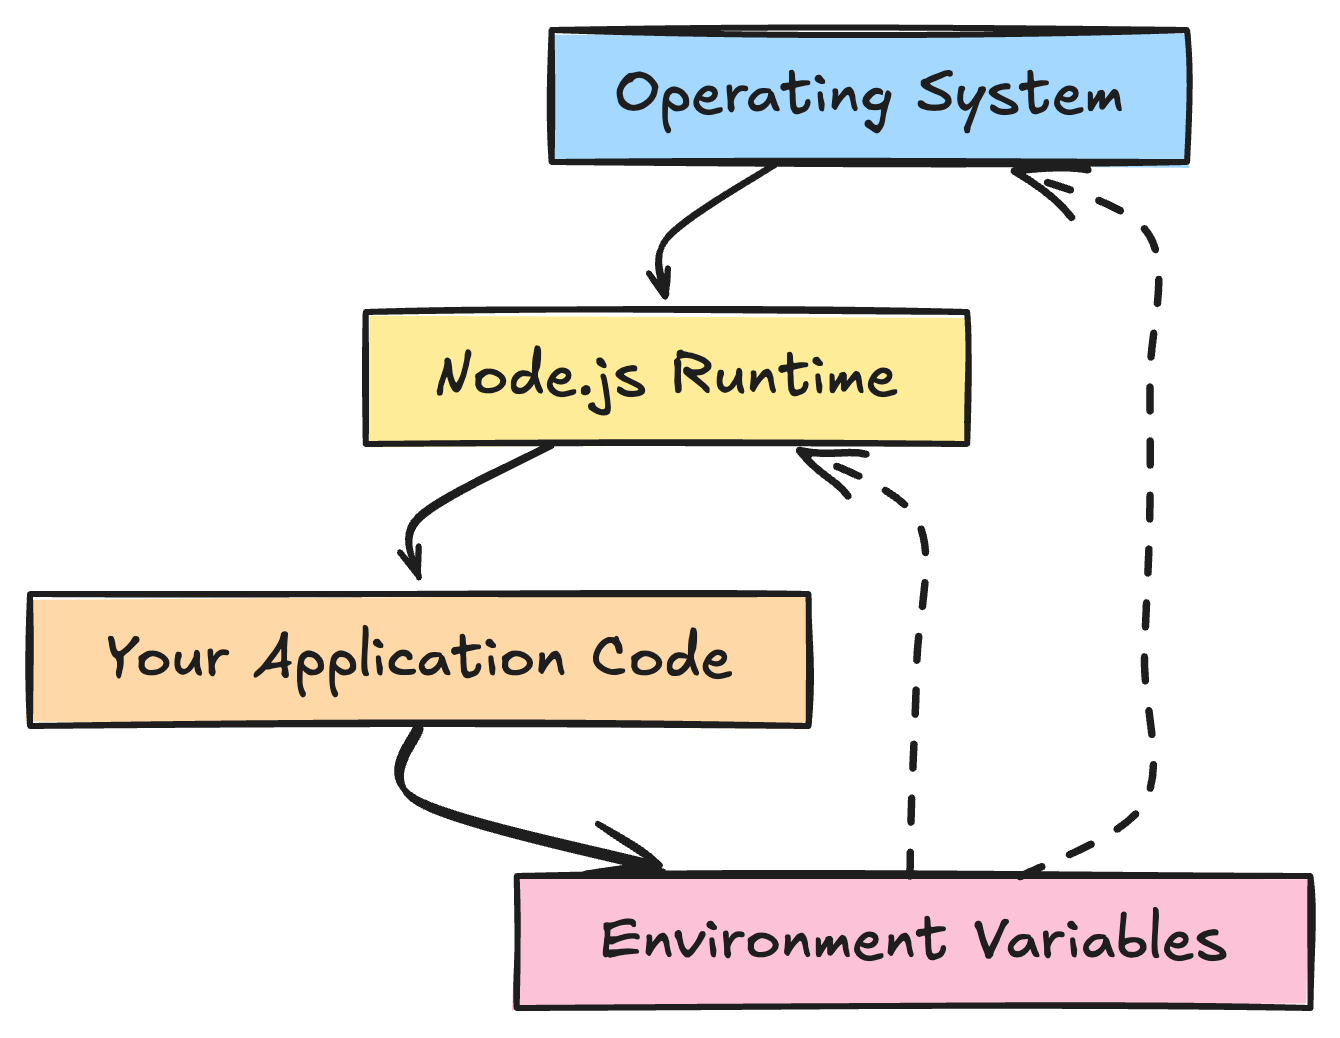
- Operating System: This is where the Environment variables are stored
- Node Js runtime: Interacts with the operating system in order to obtain environment variables
- Your App Code: Interacts with the
process.envto get the environment variables
Prerequisites for this Project
In this project we are going to assume the following
- Basic knowledge of NodeJs
- Basic Knowledge of JavaScript
- Some knowledge of Backend development
Installing Node and setting up the project
These are different methods of installing NodeJS on your machine. You can go to the node official website and download a version from there
Let us consider installing nodejs in a linux operating system prefrably ubuntu

Step 1: Open your terminal
Step 2: Use curl or wget script below to install nvm using the nvm git repository. run the script to install the nvm
curl -o- https://raw.githubusercontent.com/nvm-sh/nvm/v0.39.3/install.sh | bash
# OR
wget -qO- https://raw.githubusercontent.com/nvm-sh/nvm/v0.39.3/install.sh | bash
Step 3: Close and re-open your terminal and run the following to apply the script
export NVM_DIR="$HOME/.nvm"
[ -s "$NVM_DIR/nvm.sh" ] && \. "$NVM_DIR/nvm.sh"Step 4: Confirm Installation
You can confirm that NVM has been installed on your system by running the following command
nvm --versionStep 5: Installing Node
type the below command to install the latest version of node
nvm install latestor
nvm install --ltsStep 6: Setting the default version
you can set a default version of node to be used across your system by using the following command
nvm alias default 20.8.0Step 7: Checking if node is installed
you can type the below command to check if the node is installed on your system
node -v # tells you the current version of node on your system. In our case it is 20.8.0If you are looking for a JavaScript chat SDK to build chat messaging, you can consider DeadSimpleChat JavaScript SDK
Initializing the project
Now, that we have installed the node on our machine. Let us create a new project where we will be using the env variable
create a new directory and name it env-demo and cd into the directory
mkdir env-demo
cd env-demoNow, that we have created the folder and cd into it. Type the below command to initalize a new project and fill out the fields as you see fit
npm initpackage name: (env-demo)
version: (1.0.0)
description:
entry point: (index.js)
test command:
git repository:
keywords:
author:
license: (ISC) this will create a package.json file for you that looks something like this:
{
  "name": "env-demo",
  "version": "1.0.0",
  "description": "",
  "main": "index.js",
  "scripts": {
    "test": "echo \"Error: no test specified\" && exit 1"
  },
  "author": "",
  "license": "ISC"
}

Initializing your first env variable: Step By Step
Step 1: Install the dotenv package
Now that you have initialized the project in the above section and created a package.json file. In your terminal type the below command to install the node dotenv package that is used to create env files
npm install dotenv --saveThis will install the dotenv package and save it as a dependency in your package.json file. that should look something like this
{
  "name": "env-demo",
  "version": "1.0.0",
  "description": "",
  "main": "index.js",
  "scripts": {
    "test": "echo \"Error: no test specified\" && exit 1"
  },
  "author": "",
  "license": "ISC",
  "dependencies": {
    "dotenv": "^16.3.1"
  }
}
Step 2 Create the .env file
- In your root folder create a new file and name it
.env. - Open your .env file in your text editor and create some key-value pairs. These are your environment variable. I have created some for your reference below
DATABASE_URL=sample-database-url
PORT=3000
SECRET_KEY=mysecretkey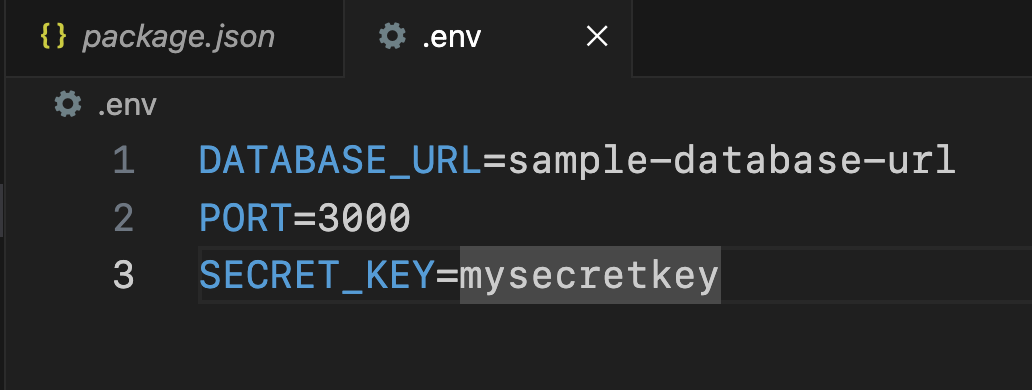
Step 3 Load and read the env variables
In your root folder create an index.js file and then open your terminal and type the below command to install express js.
npm install express --saveThis installs expressjs and saves it as a dependency in your package.json file, your package,json looks like this
{
  "name": "env-demo",
  "version": "1.0.0",
  "description": "",
  "main": "index.js",
  "scripts": {
    "test": "echo \"Error: no test specified\" && exit 1"
  },
  "author": "",
  "license": "ISC",
  "dependencies": {
    "dotenv": "^16.3.1",
    "express": "^4.18.2"
  }
}
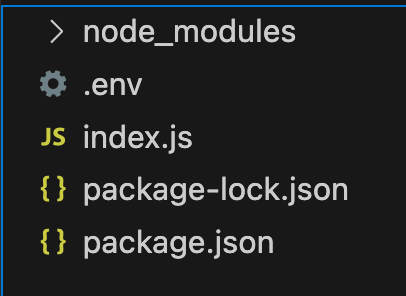
and your project structure looks like this
Now, open your index.js file and type the below command to start a simple web server.
const express = require('express');
const app = express();
const port = 4000;  // defaults to 4000

app.get('/', (req, res) => {
    res.send('Hello World!')
  })

app.listen(port, () => {
  console.log(`Server running on http://localhost:${port}/`);
});
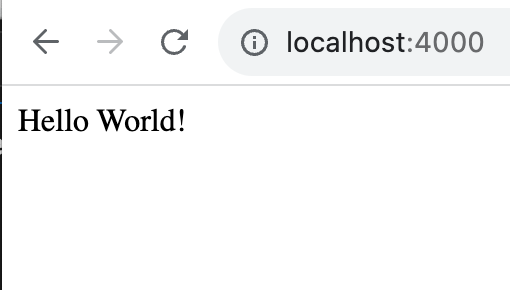
run the code with
node index.jsand go to localhost://4000 to get the hello world
loading and reading the .env file
Now that we have the server running let us read the .env file that we created in the previous step and load the port details from the .env file
Open the index.js file and require the dotenv library there
require('dotenv').config()now, you can access the .env file using the process.env. Let us use the process.env to access the port number in our index.js file
const express = require('express');
require('dotenv').config()
const app = express();
const port = process.env.PORT || 4000;  // Read from .env if not available then defaults to 4000

app.get('/', (req, res) => {
    res.send('Hello World!')
  })

app.listen(port, () => {
  console.log(`Server running on http://localhost:${port}/`);
});
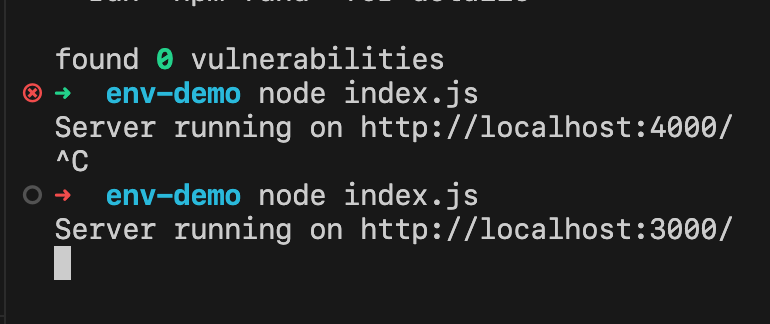
Now let us restart the server and go to localhost://3000 . Instead of running at 4000 our server is now running on port 3000 which it took from the .env file
you can also see this in the console
You have now successfully created and saved the env file on your machine
As another example you can access the DATABASE_URL like so
const dbUrl = process.env.DATABASE_URL;
// Use dbUrl to connect to your database
Here are all the files
index.js
const express = require('express');
require('dotenv').config()
const app = express();
const port = process.env.PORT || 4000;  // Read from .env if not available then defaults to 4000

app.get('/', (req, res) => {
    res.send('Hello World!')
  })

app.listen(port, () => {
  console.log(`Server running on http://localhost:${port}/`);
});
package.json
{
  "name": "env-demo",
  "version": "1.0.0",
  "description": "",
  "main": "index.js",
  "scripts": {
    "test": "echo \"Error: no test specified\" && exit 1"
  },
  "author": "",
  "license": "ISC",
  "dependencies": {
    "dotenv": "^16.3.1",
    "express": "^4.18.2"
  }
}.env
DATABASE_URL=sample-database-url
PORT=3000
SECRET_KEY=mysecretkey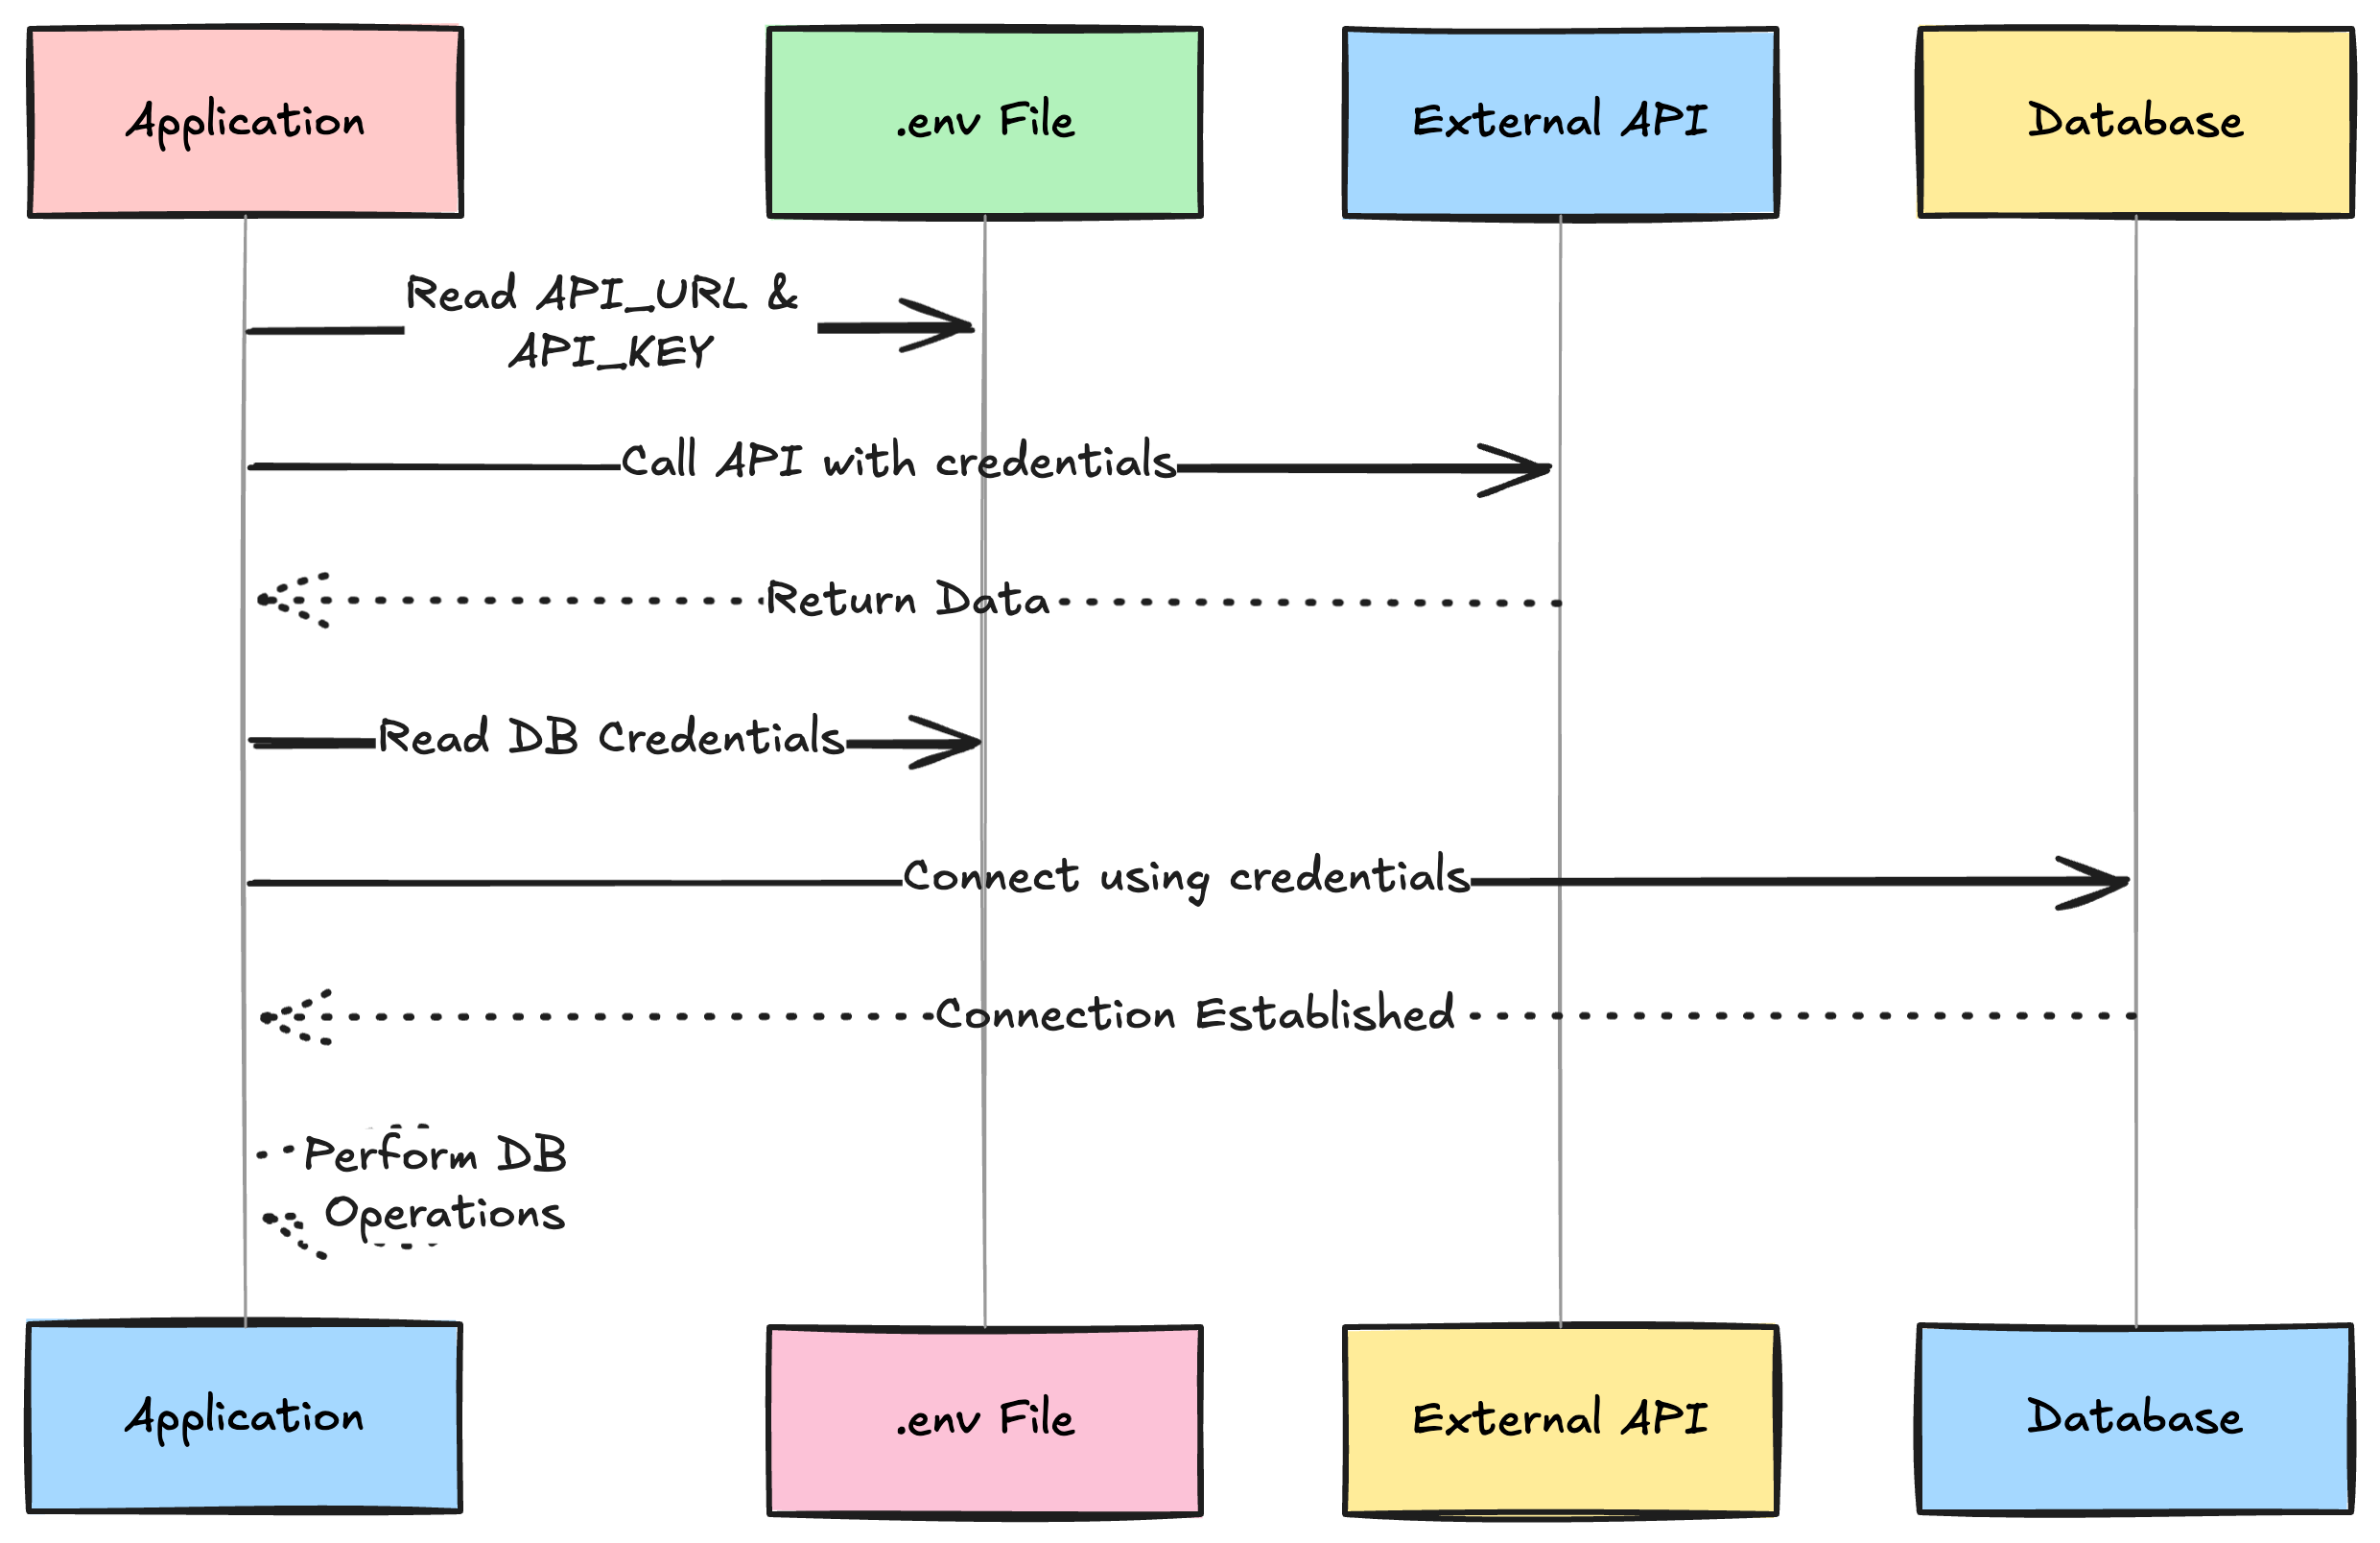
How to use env variables in async tasks
In this section we are going to discuss about how env variables can be used in async tasks like calling an API or database operations
Env variables are especially important in these tasks, because they can be used to store credentials and endpoints securely
Also, these variables can be automated because these change between different environment such as development, staging and production.
Step 1 Setting up the env variables
open your .env file and edit it like this
API_URL=https://jsonplaceholder.typicode.com/todos/1
API_KEY=sfjks4325
PORT=3000
Step 2 using async / await with env variables
Next, install the axios library to make calls to the remote server like
npm install axios --savethis will install the axios and save it as a dependency in your package.json file
the package.json file should look something like this
{
  "name": "env-demo",
  "version": "1.0.0",
  "description": "",
  "main": "index.js",
  "scripts": {
    "test": "echo \"Error: no test specified\" && exit 1"
  },
  "author": "",
  "license": "ISC",
  "dependencies": {
    "axios": "^1.5.1",
    "dotenv": "^16.3.1",
    "express": "^4.18.2"
  }
}
Next use the axios to make calls to the jsonplaceholder website and log them to the console
Type this code in your index.js file
const express = require('express');
require('dotenv').config();
const axios = require('axios');
const app = express();
const port = process.env.PORT || 4000;  // Read from .env if not available then defaults to 4000

const fetchData = async () => {
  const url = process.env.API_URL;
  const apiKey = process.env.API_KEY;

  try {
    const response = await axios.get(url, {
      headers: { 'Authorization': `Bearer ${apiKey}` }
    });
    console.log(response.data);
  } catch (error) {
    console.error(`Error fetching data: ${error}`);
  }
};


app.get('/', (req, res) => {
  fetchData()
    res.send('Hello World!')
  })

app.listen(port, () => {
  console.log(`Server running on http://localhost:${port}/`);
});
What are we doing here:
- We are importing the modules like express, dotenv, axios
- Then we are initalizing the app and the port using the env variables
- then we are creating the async function called
const fetchData = async ()=> (...) - In this function we are using the url and the apiKey from the
.envfile. Though I have to mention you do not need apiKey to call the jsonplaceholder website. I have just put that key there for demo purposes - we are logging the data to the console
- We are calling the
fetchData()method on the get route. So, everytime someone goes to the/the method gets called and the data gets logged to the console.
Using Async/await with env variables in Database operations
Let us look at another example, this time we are going to do database operations with env variables
step 1 set up the env variables
Open the .env file in your text editor and type the following
Copy code
DB_HOST=localhost
DB_PORT=5432
DB_NAME=mydatabase
DB_USER=username
DB_PASSWORD=passwordStep 2 Install the pg library
next step is to install the pg library like so
npm install pg --saveStep 3 Connect to the database and make the async query with .env file
write the following code to connect to the database and use the .env credentials that we just created
const { Pool } = require('pg');
require('dotenv').config();

const pool = new Pool({
  host: process.env.DB_HOST,
  port: process.env.DB_PORT,
  database: process.env.DB_NAME,
  user: process.env.DB_USER,
  password: process.env.DB_PASSWORD
});

const fetchUsers = async () => {
  try {
    const res = await pool.query('SELECT * FROM users');
    console.log(res.rows);
  } catch (err) {
    console.error(`Error fetching users: ${err}`);
  }
};

fetchUsers();we are not integrating this example into our regular codebase because it is an outlier and will not be useful further down the line in our tutorial
Advanced env variable manipulation in Node JS: Encoding, Validation and type conversion
There is more to env variable than just reading and storing them. With advanced env variable manupulation we are going to learn about
- Encoding
- Validation and
- Type conversion
1. Encoding:
Encoding is used for various purposes in environment variables. This could be used for security puposes. The most popular type of encoding is done using the base64
Encoding
const buffer = Buffer.from('This is a secret', 'utf-8');
const encodedData = buffer.toString('base64');
console.log(`Encoded: ${encodedData}`);
Decoding:
const decodedData = Buffer.from(encodedData, 'base64').toString('utf-8');
console.log(`Decoded: ${decodedData}`);
2. Validation
validation is used to check whether the code is valid or not. for example the url that you are going to use is valid url or not etc
or as in this example we are checking whether the port number is within the specified range or not
const validatePort = (port) => {
  const parsedPort = parseInt(port, 10);
  if (isNaN(parsedPort) || parsedPort < 1024 || parsedPort > 65535) {
    throw new Error('Invalid port number');
  }
  return parsedPort;
};

const port = validatePort(process.env.PORT);
3. Type conversion
env variables are always on the type : string. If often you need to use other data types as well such as int or booleans. Here type conversion helps
Integer example
const isProduction = process.env.NODE_ENV === 'production';
const retries = parseInt(process.env.RETRIES, 10) || 3;
Boolean example
const shouldLog = process.env.SHOULD_LOG === 'true';
Combination example
Here is an example combining all the advanced env manipulation available in the env variables
// Encoding and decoding
const apiKey = Buffer.from(process.env.API_KEY || '', 'base64').toString('utf-8');

// Validation
if (apiKey.length !== 32) {
  throw new Error('Invalid API key length');
}

// Type conversion
const maxUsers = parseInt(process.env.MAX_USERS, 10);
if (isNaN(maxUsers)) {
  throw new Error('MAX_USERS must be an integer');
}
Secrets Management and Security Best Practices with examples
In this section we are going to learn about secrets management and best practices with examples. Here are the steps that you can take to secure the env variable along with their examples
1. Never commit the `.env` files
Always ensure that the .env files are in the gitignore so they are never commited to the git repository
# Ignore dotenv environment variables file
.env
2. Hashing password
always hash the passwords, storing the passwords as plain text is a bad practice. You can use libraries like bcryt and others to hash the passwords
const bcrypt = require('bcrypt');
const saltRounds = 10;

async function hashPassword(plainPassword) {
  const hash = await bcrypt.hash(plainPassword, saltRounds);
  return hash;
}
3. Encoding the env variables
As a security measure always encode the secrets, the secrets are usually base-64 encoded
const buffer = Buffer.from(process.env.MY_SECRET, 'base64');
const decodedSecret = buffer.toString('utf-8');
4. Centralized secrets management
for large projects you can consider centralized secrets management services like hashicorp vault, AWS secrets manager and others
These offer advanced features like secret rotation, automated lease and rotation and audit logging
here is an example with node vault
const vault = require("node-vault")({
  endpoint: "https://vault-endpoint",
  token: process.env.VAULT_TOKEN,
});

async function getDatabaseCreds() {
  const data = await vault.read("path/to/secret");
  return {
    user: data.data.username,
    password: data.data.password,
  };
}
5. Least privilege principle
Always follow the principle of least privilege. The api which does not require write credentials should never be given write privileges

Common Pitfalls and How to avoid them
- Hardcoding Sensitive information
- Lack of validation
- Ignoring Environments
- Inadequate security
- Poor Documentation
- Fallback defaults
Need Chat API for your website or app
DeadSimpleChat is an Chat API provider
- Add Scalable Chat to your app in minutes
- 10 Million Online Concurrent users
- 99.999% Uptime
- Moderation features
- 1-1 Chat
- Group Chat
- Fully Customizable
- Chat API and SDK
- Pre-Built Chat
You might be interested in some of our other articles
- Sending emails in NodeJs with NodeMailer: The Comprehensive Guide
- Rest API with PostgreSQL and Node Js, Step-by-Step Tutorial
- Nodejs fetch API: The Complete Guide
- CSV files with Node and PapaParse: The Complete Guide
Conclusion
In this article we learned about env variable and how to use them in NodeJs the complete guide
We have covered the important topics related to env management in NodeJs and this should be enough for most of the use-cases for env variables management in Node js apps
I hope you liked the article and thank you for reading
Ready to Add Chat to Your Website?
Get started for free. No credit card required.
Start a Free Trial
![Webinar Chat: The Complete Guide to Engaging Your Audience [2026]](/blog/content/images/size/w600/2026/02/article-hero-webinar-chat.svg)
