
Dead Simple Chat allows you to add chat in minutes to your React Application with the powerful JavaScript Chat SDK and API.
Doing client-side form validation is essential in almost every web application. Form validation prevents the user from submitting invalid data to the server, and also entails presenting users with helpful error messages.
In this blog post, we will see how to use the library "React Hook Form" to easily add form validation in React applications.
What is React Hook Form?
React Hook Form is a React library that allows you to add form validation using the useForm custom Hook provided by the library.
It is an actively developed library and has more than 34K stars on Github and is used by 344k repositories and has over 258 active contributors.
It is very small, around 25 kb minified and only 9.1 kb minified + gzipped.
It supports React UI libraries and can be used with Schema validators like Joi, Yup, Zod etc.
How to use React Hook Form?
Let's look at a basic example using React Hook Form to build a simple signup form.
You first need to install the react hook form package, to install the package run the command:
npm install react-hook-formAfter the package is installed, let's import it into our application
import { useForm } from "react-hook-form";
Then, we will create a SignupForm component, the SignupForm component will call the useForm method and the method returns some more useful methods that we can use to add validation to our React applications.
Let's create our SignupForm component to hold our Signup form:
function SignupForm() {
    const { register,
           handleSubmit,
           watch,
           formState: { errors }
          } = useForm();

    //..
}registermethod is used to register the form elements with the react-use-form to allow state management and validationhandleSubmitis used to handle the form submission. You can callhandleSubmitand pass it a method that you would like to be called when the form is submitted.handleSubmitwill check if the form has any errors, if it has no errors then only it will call your onSubmit method.watchis a special method that is used to watch and input. You can pass it the name of the input, and you can retrieve the value of the input each time the input changes.errorobject contains details about the error when the form validation fails.
Let's continue building our component using react-use-form library:
import { useForm } from "react-hook-form";

function SignupForm() {
  const {
    register,
    handleSubmit,
    watch,
    formState: { errors }
  } = useForm();

  const formSubmit = (data) => {
    console.log("Form Submitted: ", data);
  };

  return (
    <form onSubmit={handleSubmit(formSubmit)}>
      <div>
        <label htmlFor="email">Email:</label>
        <input
          id="email"
          type="email"
          {...register("email", {
            required: "Email is required",
            pattern: {
              value: /^[A-Z0-9._%+-]+@[A-Z0-9.-]+\.[A-Z]{2,4}$/i,
              message: "Invalid email address"
            }
          })}
        />
        {errors.email && <span>{errors.email.message}</span>}
      </div>

      <div>
        <label htmlFor="password">Password:</label>
        <input
          id="password"
          type="password"
          {...register("password", {
            required: "Password is required",
            minLength: {
              value: 8,
              message: "Password must be at least 8 characters"
            }
          })}
        />
        {errors.password && <span>{errors.password.message}</span>}
      </div>

      <div>
        <label htmlFor="confirmPassword">Confirm Password:</label>
        <input
          id="confirmPassword"
          type="password"
          {...register("confirmPassword", {
            required: "Please confirm your password",
            validate: (value) =>
              value === watch("password") || "Passwords do not match"
          })}
        />
        {errors.confirmPassword && (
          <span>{errors.confirmPassword.message}</span>
        )}
      </div>

      <button type="submit">Register</button>
    </form>
  );
}

export default function App() {
  return (
    <div>
      <SignupForm />
    </div>
  );
}
In the above code example, we have created a form element, and passing the handleSubmit method to the onSubmit prop and passing our own formSubmit method to the handleSubmit.
When the form is submitted, the handleSubmit method from "react-use-form" will be called.
The handleSubmit method will check if the form has any validation errors, if there are no validation errors then handleSubmit will call the formSubmit method.
Let's look at our email field to understand how we are using the "react-use-form" to validate the email field:
      <div>
        <label htmlFor="email">Email:</label>
        <input
          id="email"
          type="email"
          {...register("email", {
            required: "Email is required",
            pattern: {
              // Regex to validate email
              value: /^[\w-]+(\.[\w-]+)*@[A-Za-z0-9-]+(\.[A-Za-z0-9]+)*(\.[A-Za-z]{2,})$/i,
              message: "Invalid email address"
            }
          })}
        />
        {errors.email && <span>{errors.email.message}</span>}
      </div>
We are creating an input element of type email to accept the email from the user, then we are calling the register(<field_name>, { <options> }) method to register the input field with the "react-use-form" library.
The register method takes the name of the field as a first argument, the name is used to fetch the errors for that field, retrieve its value or watch for changes. The <field_name> is the required parameter.
Then under options we pass an object, with key required, you can pass required a boolean of true or the message that you want to display to the user if the field is empty. Here we are setting the message "Email is required".
Next is the pattern object, it takes two keys value and message, the value field accepts a regex that you can specify to validate the field and a message to display if the validation fails.
Any validation errors will be saved in the errors object, to check if a field as errors, we use errors.<field_name_specified_in_register> .
In our case it is errors.email, if it is not null then we are displaying the error message:
{errors.email && <span>{errors.email.message}</span>}Here is the codesanbox to try out the validation example using react-hook-form
Deeper Look at the register method
The register method allows you to register the field with react-hook-form, lets's explore the most common options available that are available in the register method.
The register method allows to set the name of the input tag, when the form is submitted the name of the input tag is added as a key to the object and value is set to the value of the input tag.
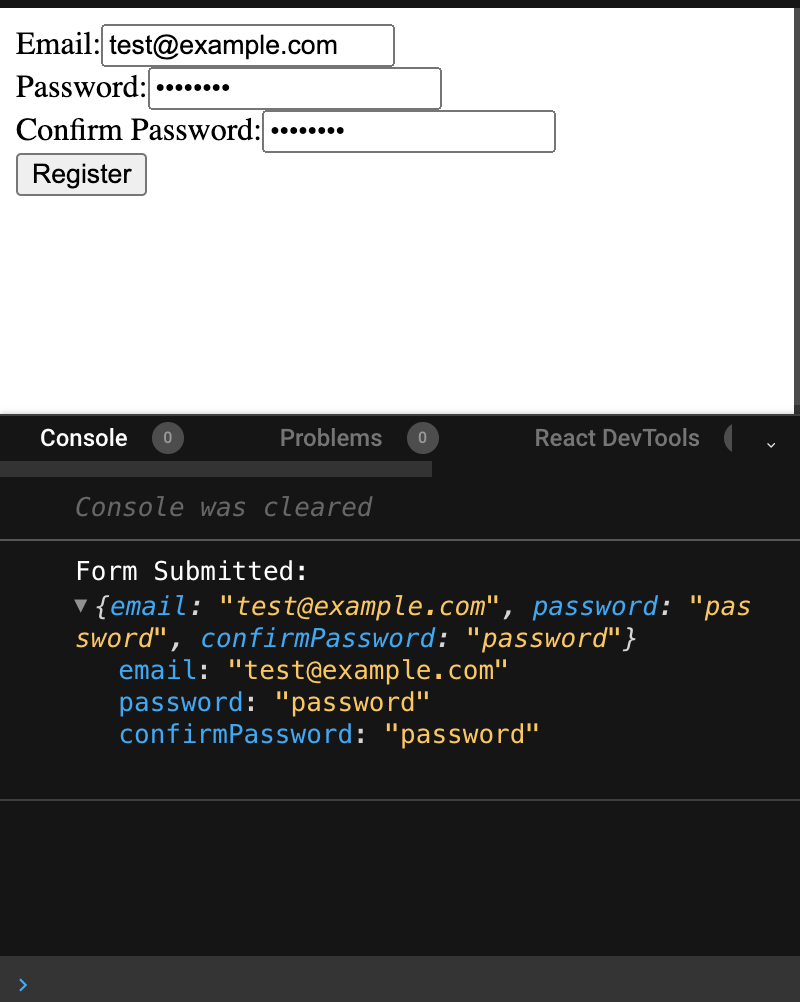
For e.g if we look at our example, when the SignupForm is submitted, the formSubmit method was called with the data variable as an argument to the formSubmit method.
The data variable would contain the following data:
Now if we want to tweak how the value is saved in the submit result, then we can change the name specified in the register method:
| Index | Input Name | Submit Result (Data) |
|---|---|---|
| 1 | register("firstName") |
{firstName: 'value'} |
| 2 | register("name.firstName") |
{name: { firstName: 'value' }} |
| 3 | register("name.firstName.0") |
{name: { firstName: [ 'value' ] }} |
If we look at the example at index 1 it is the same as our registration form example where we are specifying the name of the input and it is added as a key to the submitted result.
The second example, "name.firstName" create as an object inside our data object called as name and then set the value of the firstName as name.firstName.


Common options available in the register method
Now let's look at commonly used options available in the register method:
required (boolean/number)
You can set the required value to true to make the field required or you can add a return to return an error message:
Example 1:
<input {...register("firstName", { required: true }) } />Example 2:
<input {...register("firstName", { required: "Please enter first name" }) } />maxLength and minLength (number)
The maxLength and minLength properties are used the specify the maximum and minimum length of the input.
The fields can be used separately or together, let's see some examples:
Example 1:
<input {...register("password", { minLength: 8 }) } />Example 2:
<input {...register("tweet", { maxLength: 140 }) } />Example 3:
<input {...registerText("description", { minLength: 10, maxLength: 100 }) } />pattern (regex)
The pattern attribute accepts a regex pattern and validates the input, you can also pass and pattern an object, with keys value and message. The value field will contain the regex and the message field will contain a message to display when pattern doesn't match the input.
Let see some examples:
Example 1:
<input {...registerText("domainName", { pattern: /^([a-z\d]+(-[a-z\d]+)*\.)+[a-z]{2,}$/i }) } />In the above example, we called the registerText method and gave it a pattern to validate the domain name.
Example 2:
<input {...registerText("domainName", { pattern: { value: /^([a-z\d]+(-[a-z\d]+)*\.)+[a-z]{2,}$/i, message: "Invalid Domain Name" }) } />In the second example, we specified the pattern and a message when the pattern does not match.
validate (method)
The validate props take a method as an argument. You can use it to run custom validation.
Any method that you provide as value to the validate option will be called when the form is submitted.
The method will be called with two arguments, the first argument will contain the current value of the input, the second argument will contain formValues object with the all other values in the form.
Consider the example below:
<input {...register("zone", { validate: (value, formValues) => { return zones.indexOf(value) > -1 } }) } /> The value argument will contain the current value of the input and the formValues will contain the value of the complete form.
Integrating with Existing UI Libraries
Let's look at an example on how to integrate the React Hook Form with existing UI libraries.
Typically, the UI libraries give you components that you can use in your application.
So, for input tag, checkbox etc. there will be custom components that you add to your application and it will display and nicely formatted component on the screen.
But the React Hook Form uses ref to register the components and it is not guaranteed that the UI library would expose the ref.
Therefore when using React Hook Form you can use the Controller component to register the custom UI component with React Hook form.
Here is an example:
import "./styles.css";
import "react-datepicker/dist/react-datepicker.css";

import ReactDatePicker from "react-datepicker";
import { useForm, Controller } from "react-hook-form";

export default function App() {
  const { handleSubmit, control } = useForm();

  function onSubmit(value) {
    console.log(value);
  }

  return (
    <div className="App">
      <form onSubmit={handleSubmit(onSubmit)}>
        <Controller
          name="dateOfBirth"
          control={control}
          rules={{ required: true }}
          render={({ field }) => (
            <ReactDatePicker selected={field.value} onChange={field.onChange} />
          )}
        />
        <input type="submit" />
      </form>
    </div>
  );
}
In the above code, we are using the "react-datepicker" library with React Hook Form.
To use the library with custom components we have to use <Controller /> component by "react-hook-form" and pass it attributes: name control rules and render.
The name attribute specifies the name of the field, it is similar to the name value that we pass to the render method.
The control attribute requires the control that we get from the useForm() method.
rules are similar to the rules that we specify as an option to the register method, here we add rules like validate, required, minLength, maxLength etc.
Then the render prop we pass a method that returns the component from our UI library and using the field object we can bind the attributes of the custom component.
Check out the example in Code Sandbox:
Dead Simple Chat allows you to add chat in minutes to your React Application with the powerful JavaScript Chat SDK and API.
You might be interested in some of our other articles
- Formik: Building forms in react Step by Step
- React useRef: A complete guide with examples
- React useState: The Complete guide
- React useReducer and Reducer: Guide with Examples
Conclusion
In the blog post, we have learned how to use react-hook-form to easily add form validation to your react applications.
We have also seen how you can use react hook form with custom UI libraries, and add validation to the form field offered by the Custom UI libraries views as well.
Ready to Add Chat to Your Website?
Get started for free. No credit card required.
Start a Free Trial
![Webinar Chat: The Complete Guide to Engaging Your Audience [2026]](/blog/content/images/size/w600/2026/02/article-hero-webinar-chat.svg)
