
In this article we are going to learn how to handle CSV files on the backend with NodeJs and papaparse.
We are going to do this with the help of real life examples, so that you have an understand of how to work with CSVs
How to read CSV in Node.JS with Papaparse
- Prerequisites and setting up the development environment
- Basic CSV file parsing with PapaParse with example
- Handling large CSV files with Streams
- Uploading CSV files to the server and sending parsed data back with Express and NodeJs
- Error handling and data validation
- Loading parsed data into arrays or Objects
- Transforming data: adding, deleting or updating the records
- Working with Remote CSV files
- Using the
unparse()method to re-export the data - Conclusion
Prerequisites
To learn how to parse CSV files with Papaparse in NodeJs we assume you have the following knowledge and prerequisites
- Basic Knowledge of JavaScript
- Node Js installed on your machine
and that's it. That is all you need to know to get along with this tutorial


Setting up the development env
you already have the node installed on your computer. Now create a new directory called csv-papaparse-node and set up a new project with
npm init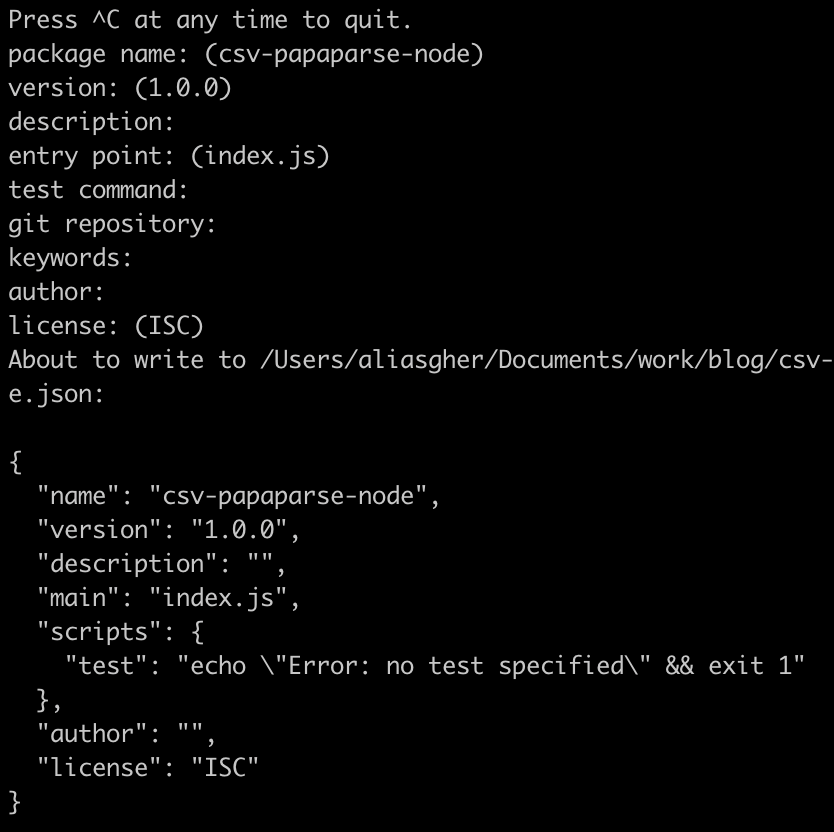
now open the project in your text editor. I am using VSCode, you can use anything you want
then install the papaparse like so
npm install papaparse --saveNow that we have installed the papaparse, we are going to parse a simple csv in the basic example below
If you are looking for a JavaScript chat SDK to build chat messaging, you can consider DeadSimpleChat JavaScript SDK
Basic CSV file parsing with PapaParse with example
In this section we are going to parse a simple CSV that is already in the local folder inside the server.
Note: In the sections after this we will look at how to create an expressjs server and send CSVs to the server parse them and send them back to the client.
Now, we need the sample CSV that we are going to parse. In the root folder create a csv file with the following contents
id,name,email
1,John,john@example.com
2,Jim,jim@example.comNow let us take it step by step.
Step 1: Create index.js file
In the root folder create a new file and name it index.js we are going to write the code to parse the csv in this file
Step 2 Importing the required Node modules
we are going to need the fs module and the papaparse module so import them in your file
const fs = require('fs');
const Papa = require('papaparse');
Step 2: Reading the file
Now read the file with the help of the fs module
const csvFile = fs.readFileSync('sample.csv', 'utf8');Step 3: parse the data
Now parse the data using the papaparse module
const parsedData = Papa.parse(csvFile, {
  header: true,
  dynamicTyping: true,
});
Step 4: log the data to the console
Lastly log the data to the console so that you can verify that the file has been parsed
console.log(parsedData.data);The complete index.js file looks like this
const fs = require('fs');
const Papa = require('papaparse');

const csvFile = fs.readFileSync('sample.csv', 'utf8');

const parsedData = Papa.parse(csvFile, {
  header: true,
  dynamicTyping: true,
});

console.log(parsedData.data);Running the file to parse the data
to run the code type the below command in your terminal
node index.jsand you can see the parsed data in your console like
[
  { id: 1, name: 'John', email: 'john@example.com' },
  { id: 2, name: 'Jim', email: 'jim@example.com' },
  { id: null }
]Handling large files with Streams
While handling large CSV files many problems can arise like application running out of memory or application crashing that might lead to loss of work
Streams are a NodeJs feature that allow you to read and write the files in chunks, thus minimizing memory usage and optimizing the processing of files
Now, using the above example to illustrate the point, open the index.js file and edit the papaparse code to use streams like
Papa.parse(csvFile, {
  header: true,
  step: function(result) {
    // Process each row of the csv as it is parsed
    console.log("data for each row:", result.data);
  },
  complete: function() {
    console.log("Data Parsing complete.");
  }
});The complete index.js code looks like
const fs = require('fs');
const Papa = require('papaparse');

const csvFile = fs.readFileSync('sample1.csv', 'utf8');

//old code
// const parsedData = Papa.parse(csvFile, {
//   header: true,
//   dynamicTyping: true,
// });

Papa.parse(csvFile, {
    header: true,
    step: function(result) {
      // Process each row as it is parsed
      console.log("Row data:", result.data);
    },
    complete: function() {
      console.log("Parsing complete.");
    }
  });

// console.log(parsedData.data);
you can run the code with the following code
node index.jsThis updated code with streams can now handle even large csv files. You can try this by downloading a large csv file from the internet
Uploading CSV files to the server and sending parsed data back with Express and NodeJs
In many real world scenarios we need to send the CSV to the server and need the parsed data back from the server.
In this section we are going to achieve this. To do this we are going to build a express js server and use Postman to send and receive the data back from the server.
Step 1 Installing required dependencies and importing them
Let us install the express server and the multer package to handle multipart form data
npm install express multerthen import the dependencies like
const express = require('express');
const multer = require('multer');
const fs = require('fs');
const Papa = require('papaparse');

const app = express();
const upload = multer({ dest: 'uploads/' });
Here we have specified the destination folder as well where the files will be stored
Step 2 Creating routes
Now let us create a POST route where we will send the csv to be parsed, we are naming the csv csvFile
app.post('/upload', upload.single('csvfile'), (req, res) => {
  // File processing logic here
});
Step 3 Adding the file Parse logic to the POST route
Now we will add the parse logic to the POST endpoint to parse the incoming csv file
app.post('/upload', upload.single('csvfile'), (req, res) => {
  const filePath = req.file.path;

  const readStream = fs.createReadStream(filePath);
  let parsedData = [];

  Papa.parse(readStream, {
    header: true,
    step: function(result) {
      parsedData.push(result.data);
    },
    complete: function() {
      res.json(parsedData);
    }
  });
});
Step 4: Adding the code to start the server
write this code at the end of index.js to start the server
const PORT = 3000;
app.listen(PORT, () => {
  console.log(`Server running on port ${PORT}`);
});
The complete code looks like this:
const express = require ('express');
const fs = require('fs');
const Papa = require('papaparse');
const multer = require('multer');


const app = express();
const upload = multer({ dest: 'uploads/' });

app.post('/upload', upload.single('csvFile'), (req, res) => {
    const filePath = req.file.path;

    const readStream = fs.createReadStream(filePath);
    let parsedData = [];

    Papa.parse(readStream, {
      header: true,
      step: function(result) {
        parsedData.push(result.data);
      },
      complete: function() {
        res.json(parsedData);
      }
    });
  });


const PORT = 3000;
app.listen(PORT, () => {
  console.log(`Server running on port ${PORT}`);
});Step 5 Running the code
to run the code simply open the terminal and type the below code
node index.jsyou will see the : server running on port 3000 on your console
Testing with data
In this section we are going to test with postman whether the code is properly parsing the csv and sending the data to the client or not.
Step 1: Open the Postman app
Open the postman app and create a POST request to send to this url
http://localhost:3000/uploadStep 2 Select the body tag
Now, select the body tag and set the content type to multipart/form-data and then set the key to csvFile then set the value to the file that you are going to send to the server.
this looks something like
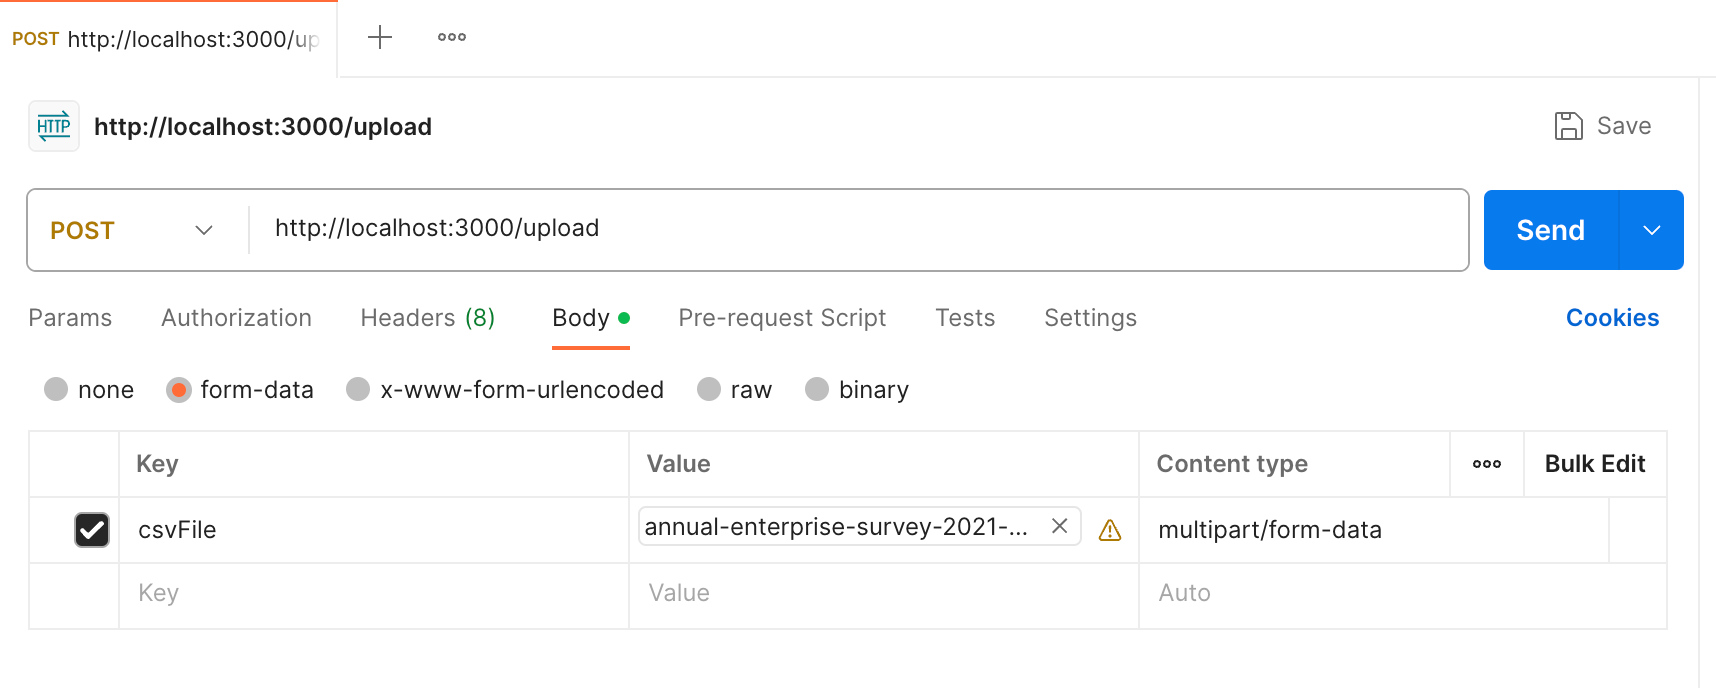
Now press the send button this will send the csv file to our local server and the server will return the parsed data back to the postman app
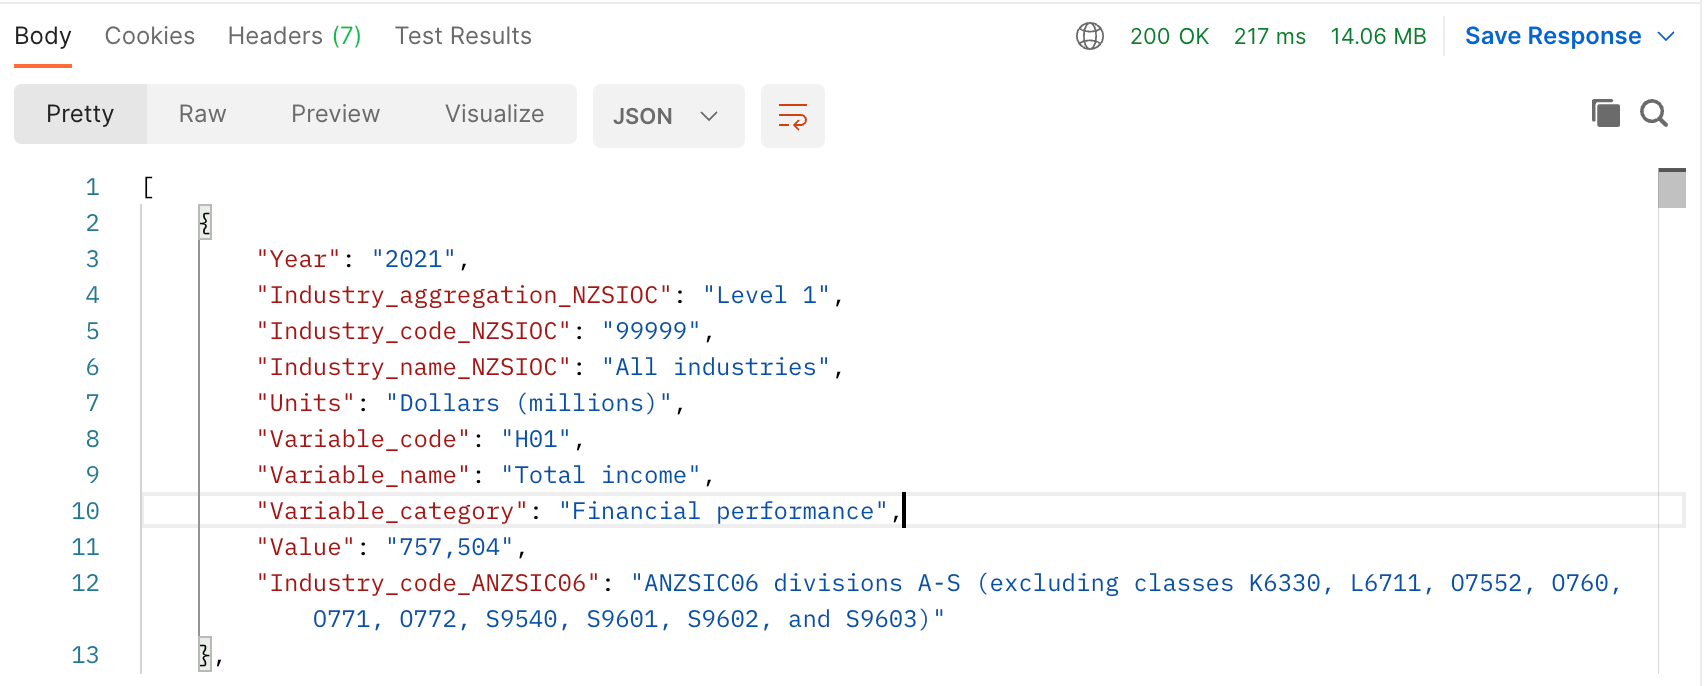
You can also check the files being stored in the /uploads directory.
We have covered all the basic here. Now, let us look at some of the advanced topics below.
Error Handling and Data Validation in NodeJs with PapaParse
Error handling and data validation is an integral part of any software development.
In handling csvs many things can go wrong and this could lead to server crashes and other things
Here in this section we are going to learn a few basic error handling mechanisms and data validation that is a must for any software
Step 1 Check if file exists
It is important to check if the client is sending the file or not before parsing it or even attempting to read it
if (!fs.existsSync(filePath)) {
  return res.status(400).json({ error: "File not found" });
}Step 2 Handling error in stream
Add an error event listner inside a read stream to catch any errors which might arise while reading the file
readStream.on('error', (err) => {
  return res.status(500).json({ error: "Error reading the file" });
});
Step 3 Checking the file for parsing error
In this section we are looking if the file can be parsed or not. Sometime the file is corrupted or has some other error and cannot be parsed
We can check for this type of error using the below code
the completed code looks like this
Papa.parse(readStream, {
  // ...
  error: function(error) {
    return res.status(400).json({ error: "CSV Parsing Error" });
  }
});
the complete code looks like
const express = require ('express');
const fs = require('fs');
const Papa = require('papaparse');
const multer = require('multer');


const app = express();
const upload = multer({ dest: 'uploads/' });

app.post('/upload', upload.single('csvFile'), (req, res) => {
    const filePath = req.file.path;

    if (!fs.existsSync(filePath)) {
        return res.status(400).json({ error: "File not found" });
      }

    const readStream = fs.createReadStream(filePath);
    readStream.on('error', (err) => {
        return res.status(500).json({ error: "Error reading the file" });
      });

    let parsedData = [];

    Papa.parse(readStream, {
      header: true,
      step: function(result) {
        parsedData.push(result.data);
      },
      complete: function() {
        res.json(parsedData);
      },
      error: function(error){
        return res.status(400).json({error: "CSV parsing error has occured"})
      }
    });
  });


// console.log(parsedData.data);

const PORT = 3000;
app.listen(PORT, () => {
  console.log(`Server running on port ${PORT}`);
});Step 4 Validating data in PapaParse (optional)
In this section we are going to validate the data within the step function
If our data fails to meet the criteria
Papa.parse(readStream, {
  header: true,
  step: function(result, parser) {
    // Perform validation, for example, check if an 'email' field exists and is valid
    if (!result.data.email || !validateEmail(result.data.email)) {
      parser.abort();
      return res.status(400).json({ error: "Invalid email in CSV" });
    }
    parsedData.push(result.data);
  },
  // ...
});
This is specific to the data that you are looking to parse. Like for example if we are looking for an email address in the csv data we can do the data validation like above
Data validation depends upon the data that you are looking to validate
Transforming Parsed Data: Adding, Deleting and Updating data in Arrays and Objects
Adding Records to array
you can easily pushed parsed data into an Array by using the JavaScript built in method of push
parsedDataArray.push(result.data);Adding Records to Object
add a new key value pair to the Object like
step: function(result) {
  // Assume 'id' is a unique field in your data
  const id = result.data.id;
  parsedDataObject[id] = result.data;
}
Returning the parsed data back to client
you can return the parsedData to the client like
complete: function() {
    res.json(parsedData);
},
Thus you can return the data back to the client.
Working with Remote CSV files
In this section we are going to learn how to work with files that are situated on another remote server. That server could be in the cloud or another server or anywhere it is accessible through an api
Step 1 Fetching the remote file
We are going to use the Axios HTTP client to make requests to fetch the remote CSV file
We are also going to stream the files in case some files are large and needed to be streamed
const axios = require('axios');
const response = await axios.get(remoteFileURL, { responseType: 'stream' });Step 2 Piping the stream
you can easily pipe the Axios res stream directly to Papaparse
const readStream = res.data;Step 3 Parsing the CSV and storing the data
In this section we are going to parse the data.
let parsedDataArray = [];

Papa.parse(readStream, {
  header: true,
  step: function(result) {
    parsedData.push(result.data);
  },
  complete: function() {
	res.send(parsedData)
  }
});
Here what the complete code looks like
const axios = require('axios');
const Papa = require('papaparse');

app.get('/fetch-remote-csv', async (req, res) => {
  try {
    const remoteFileURL = 'https://coolwebsite.com/data.csv';
    const response = await axios.get(remoteFileURL, { responseType: 'stream' });

    let parsedDataArray = [];

    Papa.parse(response.data, {
      header: true,
      step: function(result) {
        parsedDataArray.push(result.data);
      },
      complete: function() {
        res.json(parsedDataArray);
      }
    });
  } catch (error) {
    console.error('An error occurred:', error);
    res.status(500).json({ error: 'Could not fetch and parse remote CSV file' });
  }
});

Need Chat API for your website or app
DeadSimpleChat is an Chat API provider
- Add Scalable Chat to your app in minutes
- 10 Million Online Concurrent users
- 99.999% Uptime
- Moderation features
- 1-1 Chat
- Group Chat
- Fully Customizable
- Chat API and SDK
- Pre-Built Chat
You can consider reading our other articles on NodeJS:
- Data Fetching with getServerSideProps and getStaticProps Next.js
- Environment Variables in NodeJs
- File Upload using Nodejs, Multer, Express
- Node.JS MongoDB: The Complete Guide
Conclusion
In this article we learned about how to parse csvs using NodeJs and PapaParse.
I hope you liked the article and thank you for reading
Ready to Add Chat to Your Website?
Get started for free. No credit card required.
Start a Free Trial
![Webinar Chat: The Complete Guide to Engaging Your Audience [2026]](/blog/content/images/size/w600/2026/02/article-hero-webinar-chat.svg)
