React DnD is a react library for building drag and drop interfaces. It uses Redux internally
The basic concept behind React DnD is that it uses data and not the views as the source of truth
Which means that when something is being dragged on the screen it is not the component or a DOM node that is being dragged but rather the data that is being dragged
The react DnD keeps the components decoupled and unaware of each other by describing the dragged data as simple Objects
Let us learn more about the core concepts of React Dnd and after that we will look at some examples
Dead Simple Chat offers Javascript Chat API and SDK to add in-app chat to your React applications in minutes. Dead Simple Chat is a highly customizable chat solution and can be used for any chat use case.
Items and types
items
Items are plain javascript Object describing what is being dragged.
Like for example in a game of chess when a player picks out a piece, you say {from cell 'd4', peice 'king'}. this comprise of an item
type
A type is a String or a Symbol that uniquely identifies a class of items in your application
For example in chess you can have a piece type that signifies all pieces like for example
Queen is a piece, So is a King , So is a Rook
the piece string signifies a whole class of items
Use the types for compatibility
The types lets you specify which drag sources and drop targets are compatible with each other.
You do not want all drop targets to react with new items being introduced into the application as your application starts to grow
This is achieved by having an enumeration of type constants, similar to how you may have an enumeration of Redux action types
Dead Simple Chat offers Javascript Chat API and SDK to add in-app chat to your React applications in minutes. Dead Simple Chat is a highly customizable chat solution and can be used for any chat use case.
Monitors
Monitors are small wrappers around the internal state storage. They are needed because Drag and Drop operation involve a change in state
Because there can be a drag and drop operation taking place or not or there could be a current type or a current item or not
There needs to be a state and it needs to be managed
The monitors update the current props in response to the change in drag and drop state
To track the drag and drop state you can define a collecting function.
the Collecting function retrieves the bits form the monitors and the react dnd then provides these bits to the components props
If you want to highlight the chess cells being dragged the collecting function might look like
function highlighter(monitor) {
    return {
        highlighted: monitor.canDrop(),
        hovered: monitor.isOver()
    }
}
Connectors
The backend handles the logic related to the DOM events like drag and drop. The components in the font end handle the view logic that describes the DOM
Connectors bridge the gap between the two.
There are three pre defined roles and connectors help you assign them to the DOM nodes within your render function
these roles are
- Drag source
- Drop target
- Drag preview
Let us learn more about connectors using an example
In this example we will see how we can use the connector to specify a drop target using the connecting function
function collect(connect, monitor) {
  return {
    highlighted: monitor.canDrop(),
    hovered: monitor.isOver(),
    connectDropTarget: connect.dropTarget()
  }
}
In the components render function we can access both
- The data obtained from the monitor
- The function obtained from the connector
render() {
  const { highlighted, hovered, connectDropTarget } = this.props;

  return connectDropTarget(
    <div className={classSet({
      'Cell': true,
      'Cell--highlighted': highlighted,
      'Cell--hovered': hovered
    })}>
      {this.props.children}
    </div>
  );
}
The connectDropTarget tells the react DnD that the root DOM of our node is a valid target for the hover and drop events and should be handled by the backend
Internally a callback ref is attached to the reacrt element. the connector returned function is memorized so the shouldComponentUpdate does not break
Drag and Drop targets
Drag and Drop functionality requires the drag and drop targets to work in react DND
Drag and Drop targets help connect the
- types
- items
- side effects and
- collecting functions
with components
Whenever you want to make a component draggable you need to wrap it in a drag source declaration
Every drag source implements a method that produces an item from the components props
It can also specify few others methods specifying, the collecting function for a given component
1. Let us create a chess piece and make it a draggable component
class ChessPiece extends React.Component {
    // ...
}2. Define Drag source for the piece component
  const SourceOfThePiece = {
    beginDrag(props) {
      return {
        fromCell: props.cellId,
        piece: props.pieceType,
      };
    },
  };
Her the beginDrag function returns a items fromCell containing cellId and piece containing pieceType making the piece draggable
3. specifying the collection function to inject the props
  function collect(connect, monitor) {
    return {
      connectDragSource: connect.dragSource(),
      isDragging: monitor.isDragging(),
    };
  }
the collect function injects the props next we will wrap the component in higher order component
4. Wrapping the component in higher order component
const CanBeDragged = DragSource("piece", pieceSource, collect)(Piece);Dead Simple Chat offers Javascript Chat API and SDK to add in-app chat to your React applications in minutes. Dead Simple Chat is a highly customizable chat solution and can be used for any chat use case.
Backend
React DnD depends upon the HTML 5 drag and drop API which is a good default because it screenshots the DOM node and uses it as a Drag preview
The HTML5 API however does not work in touch screen and has limited functionality in IE browsers
For touch screen you can use the touch backend of DnD. The HTML5 api is implemented in a pluggable way so you can remove it and use the touch backend for mobile devices, mouse events are also available as an alternative
Hooks
Hooks are a new react feature released in 16.8 version. Hooks have replaced the Higher Order functions with the hooks pattern
Hooks are a awesome way to manage stateful applications like react dnd
React Dnd also provides hooks that you can use to connect your components to react dnd
Now that we have learnt the basics let us move on towards an example on how to implement the react dnd library for drag and drop functionality
Dead Simple Chat offers Javascript Chat API and SDK to add in-app chat to your React applications in minutes. Dead Simple Chat is a highly customizable chat solution and can be used for any chat use case.
Installation
In your computer create a new directory called the react-dnd and open your terminal and create a new react application by typing
npx create-react-app react-dnd
then open it in your text editor I am using visual studio code
then type the below command to install the react dnd library
npx create-react-app react-dndnpm install react-dnd react-dnd-html5-backendThis installs the react dnd library and also the html5 backend
Now let us move on to the coding the app
Example
In this tutorial we will be creating an image drag and drop functionality with the react dnd library
Let us create two components called the Image and ImageContainer. Create these two components in their separate files inside the src folder
Image Component
Open the image.js file and paste the below code in it
import React from 'react';
import { useDrag } from 'react-dnd';

const Image = ({ id, url }) => {
  const [{ isDragging }, drag] = useDrag(() => ({
    type: 'image',
    item: { id },
    collect: (monitor) => ({
      isDragging: monitor.isDragging(),
    }),
  }));

  const opacity = isDragging ? 0.5 : 1;

  return (
    <img
      ref={drag}
      src={url}
      alt={`Image-${id}`}
      width="100"
      height="100"
      style={{ opacity }}
    />
  );
};

export default Image;
Here we are defining what an image would look like:
we have imported the useDrag from the react-dnd library
The image gets two properties an id and a url property, then useDrag hook is used to create dragging functionality
The useDrag hook is configured to return two elements
isDraggingproperty and the- drag function
The useDrag options object has the following three properties
- Type: image
- item it is an object that has the id of the image, used to identify which image is being dragged
- collect which has the monitor function which observes whether the image is being dragged or not
We have also set the opacity of the image based on whether it is being dragged or not
When the image is being dragged the opacity is 0.5 otherwise it is 1
Image Container component
Next, let us create the image container component inside the ImageContainer.js file
import React from 'react';
import { useDrop } from 'react-dnd';

const ImageContainer = ({ children, onDrop }) => {
  const [{ isOver }, drop] = useDrop(() => ({
    accept: 'image',
    drop: (item, monitor) => onDrop(item.id),
    collect: (monitor) => ({
      isOver: monitor.isOver(),
    }),
  }));

  const backgroundColor = isOver ? 'red' : 'white';

  return (
    <div
      ref={drop}
      style={{
        width: '100%',
        height: '100%',
        backgroundColor,
        display: 'flex',
        justifyContent: 'center',
        alignItems: 'center',
      }}
    >
      {children}
    </div>
  );
};

export default ImageContainer;Now let us work on the image container component
the image container component is the component where the images will be dropped
Here is how the imageContainer component has been build out
The images container component has 2properties namely
children and onDrop
The useDrop hook returns an object with 2 properties namely isOver stores whether the drop functionality is over or not and
drop function
drop function has an item which indicates which image is being dropped in the image container and a monitor function which checks if the image has been dropped or not
The backgroundcolor variable is set to become red which a images hovers over it and by default it is white
The component returns a div box where images can be dropped
Updating the App.js file
Now, let us update the App.js file. Write the below code in the App.js file
import React, { useState } from "react";
import { DndProvider } from "react-dnd";
import { HTML5Backend } from "react-dnd-html5-backend";
import Image from "./Image";
import ImageContainer from "./ImageContainer";

const App = () => {
  const [images, setImages] = useState([
    { id: 1, url: "https://via.placeholder.com/100" },
    { id: 2, url: "https://via.placeholder.com/100/0000FF" }
  ]);

  const handleImage = (id) => {
    setImages((prevImages) => prevImages.filter((img) => img.id !== id));
  };

  return (
    <DndProvider backend={HTML5Backend}>
      <div className="app">
        <div className="photo-list">
          {images.map((img) => (
            <Image key={img.id} id={img.id} url={img.url} />
          ))}
        </div>
        <ImageContainer onDrop={handleImage}>
          <p>Image Container: You can drop images here</p>
        </ImageContainer>
      </div>
    </DndProvider>
  );
};

export default App;
In the app.js file we are using the useState to manage the state of the images. The state contains two properties of images namely
id and url
The handleimage function accepts an id and updates the images state with the id provided as the parameter
The handleImage function is called when someone drops and image in the imageContainer drop box
Now we can add some styling in the styles.css file
.app {
  display: flex;
  justify-content: space-between;
  padding: 3rem;
}

.image-list {
  display: flex;
  flex-wrap: wrap;
  gap: 10rem;
}Now, let us run the application on
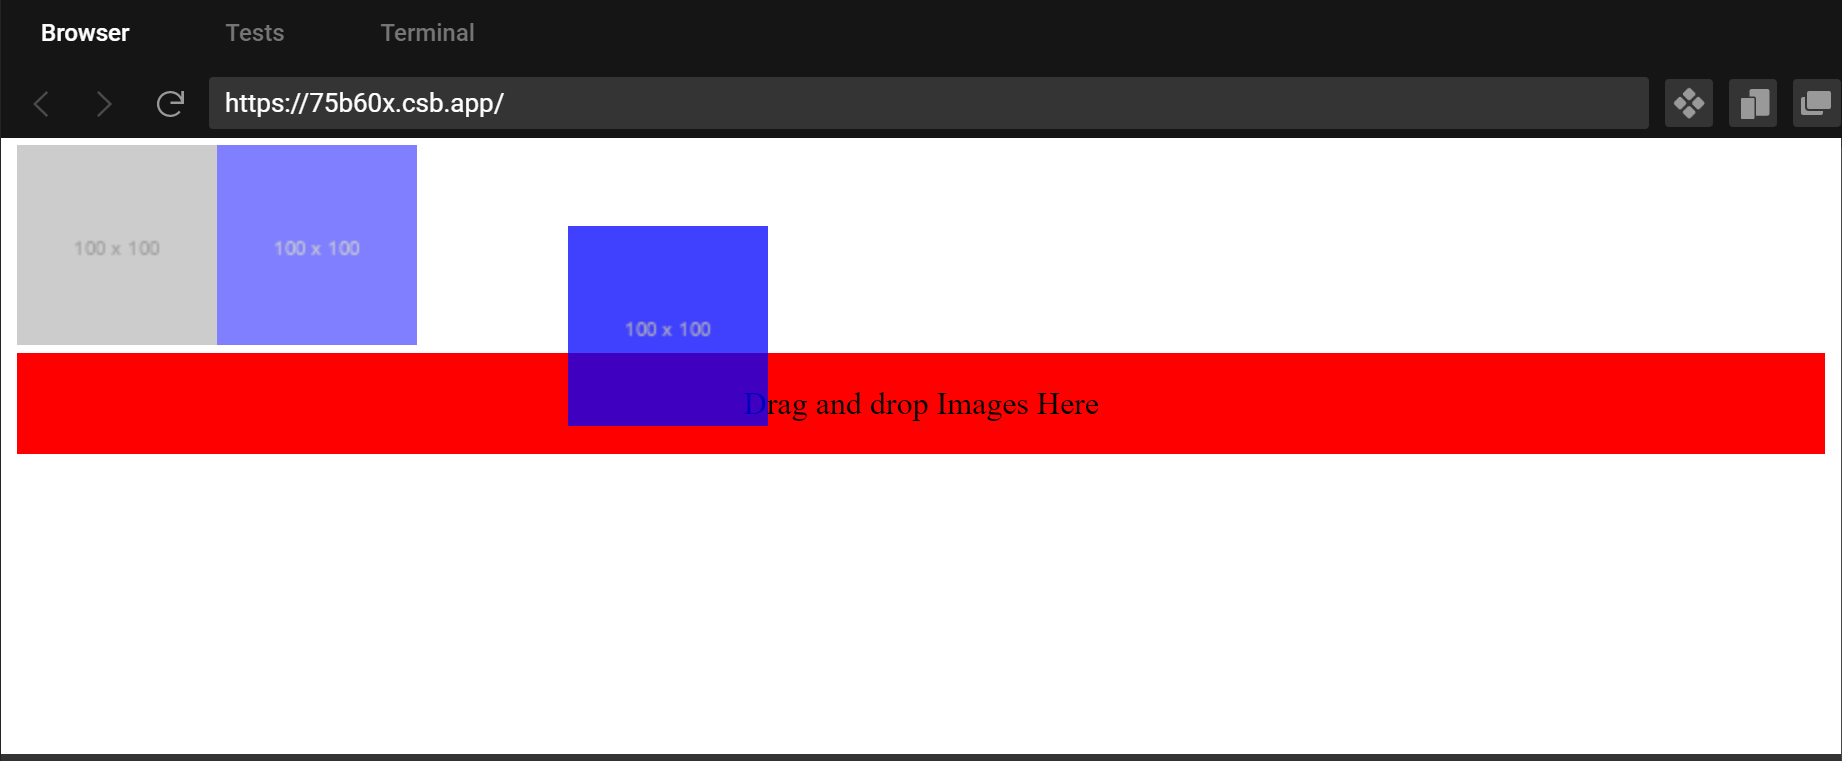
npx run startVisit the http://localhost:3000 you should see a list of Images and a ImageContainer
You can drop the images on the container and they would disappear.
the application looks like this:
You might be interested in some of our other articles
- React useRef: A complete guide with examples
- React useState: The Complete guide
- Top 4 Best React Animation Libraries for 2023
- React useReducer and Reducer: Guide with Examples
Conclusion
In this article we have learnt about the react dnd library. which is a very good library for handling drag and drop interfaces
We have learnt about the core concepts of the react dnd library we also looked at some of the examples on how react dnd can help us build real world applications like image drag and drop.
React Dnd can also be integrated for touch devices using the touch library.
I hope you find the article helpful
thank you for reading
Ready to Add Chat to Your Website?
Get started for free. No credit card required.
Start a Free Trial
![Webinar Chat: The Complete Guide to Engaging Your Audience [2026]](/blog/content/images/size/w600/2026/02/article-hero-webinar-chat.svg)
