Dead Simple Chat offers prebuilt Chat that can be added in minutes to any app or website. Can be completely customized and offers powerful API and SDK.
YouTube is one of the largest platform to live stream your video. Live Streaming is one of the best ways to interact with your audience in real time
You can add chat along with the Live Stream to let your participants interact with you in real time and let you know their feedback, also increase the engagement.
This is a complete Step By Step Guide to YouTube Live Steaming. We are going to learn the following
Table of Contents
1.What is a YouTube Live?
2. How to Enable Live Streaming on YouTube
3. Visibility
4. YouTube Live using Mobile devices
5. Moderation
6. Tools
7. Some Tips and Tricks
8.Monetization
9. Conclusion
DeadSimpleChat
DeadSimpleChat is a Chat solution for live streaming. You can add DeadSimpleChat on your website along with your live stream.
DeadSimpleChat is built for live streaming and allows you to keep your visitors on your website.
With features like
- 10 million concurrent users
- Moderation
- Customization to suit your website
- and many more
Be sure to check our DeadSimpleChat by creating a free account and adding it to your website : https://deadsimplechat.com/
What is YouTube Live?
YouTube live is a live streaming platform, where you can live stream and build, engage and create your audiences.
You can also monetize the Live stream. After Twitch YouTube is the second most popular Live Streaming destination in the world
Every minutes thousands of minutes of video is uploaded on YouTube
Today, in this guide we will learn
How to get started with Live Streaming on YouTube in a Step By Step way
So, lets get started
How to enable Live Streaming On YouTube
Getting set up to Live stream
First you need an account with YouTube to start streaming, if you don't have one create and you need to verify you YouTube Channel and set it up for Live Streaming
You can check whether you are already verify you going to
`` YouTube.com/verify``
To Enable Live Streaming Simply go to YouTube.com and click on the video button then click on the go live button to set up a live stream


On the next page there is a welcome screen there are two options to choose from
- Do you want to live stream Right now
- Do you want to live stream at a later date
Lets us select right now cause we want to live stream right now

On the next screen again there are two options, we can use our built in web cam in the computer or we can stream through an encoder or a streaming software
We can also stream using mobile devices like Phone or a tablet but that requires you to have at least 1000 subscribers.
Note: There are third party software that let you stream through mobile devices even if you don't have a 1000 subscribers like
Going live with webcam is the easiest way to live stream to YouTube.
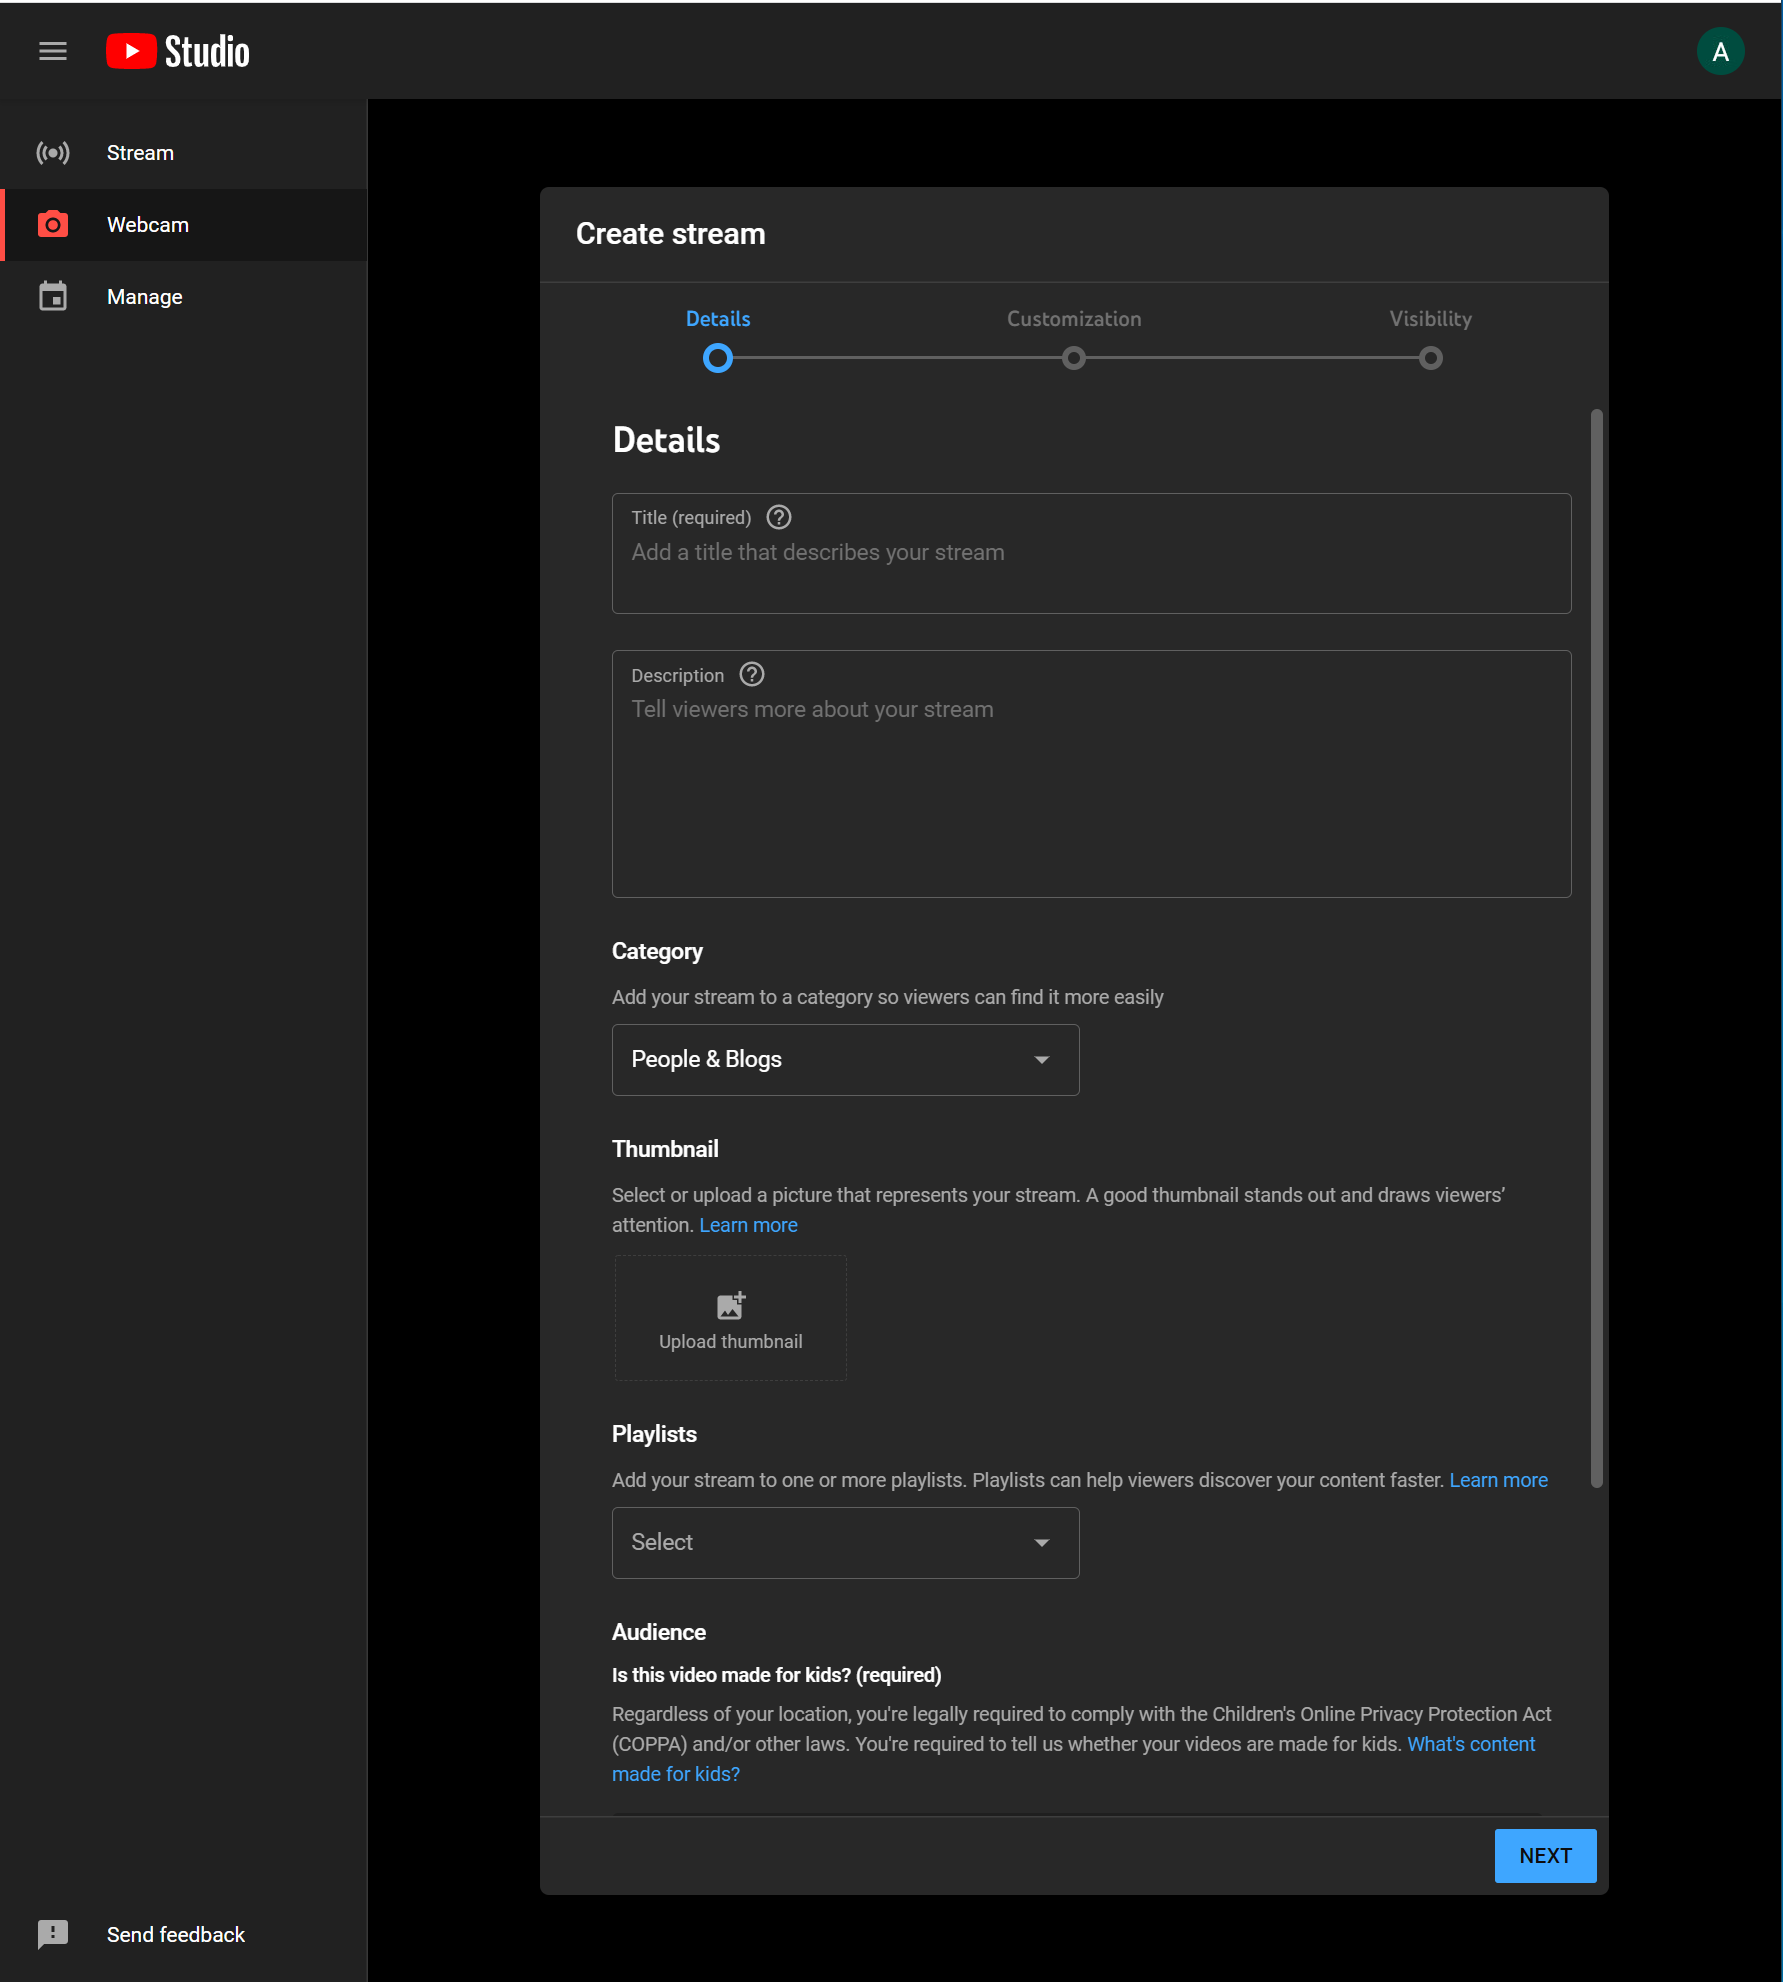
On the details page fill out the details
- Title: give a title to your live stream, give it something catchy that you attract attention of the users and make them interest to watch your stream
- Description: Give a detailed description of you live stream. You can also create a table of contents detailing what audience can expect when watching your live stream
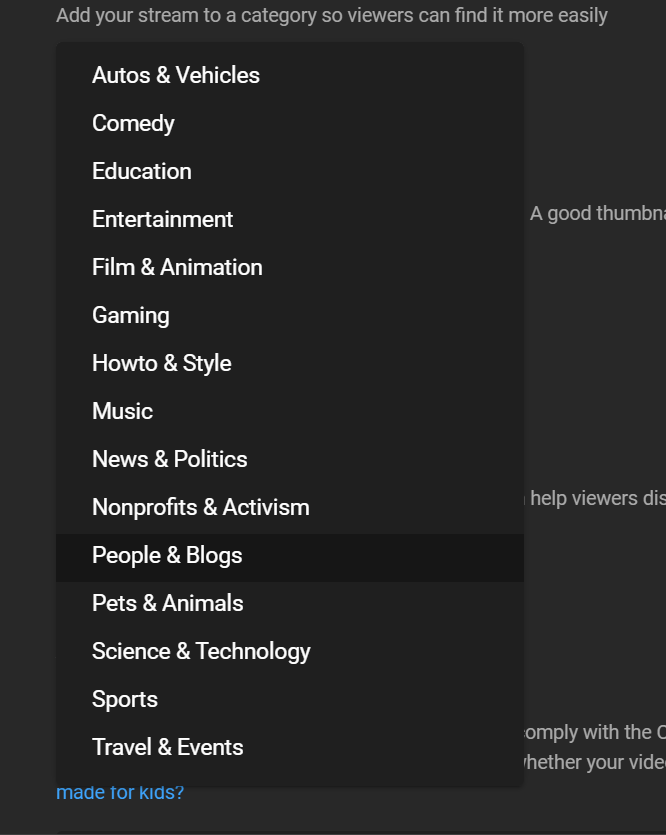
- Category: There are a host of categories to choose from, refer to the image below. Choose a category that best describes your video
4. Thumbnail: Create an interesting thumbnail to attract the audience to your video. You can just pose a funny pose or create custom thumbnails using software on the internet
Thumbnails are a way to make your video unique and they are like an advertisement on the uses YouTube page. Make them click on your ad
5. Playlist: You can also add your video to the playlist. playlists make it easier for your audiences to find your video
6. Audience: Let YouTube know if you video is made for kids. Our video is not for kids so just click on the No its not made for kids
7. Paid Promotion: Let YouTube know if your video has paid promotion or not
8. Automatic chapters: YouTube creates chapters automatically for you. Chapters make it easy for viewers to watch the video.
You can also create chapters manually
9. Tags: You can also add tags to your live stream if you want to
10. Language and captions: Select what language your live stream will be in and whether your stream appear on U.S television. If yes you will have to provide captions if not you can skip this
11. Recording location: You can add where the location of your recording is
12. License: You can choose from the standard YouTube license or a creative commons attribution
13. Allow embedding: You can choose whether to allow your live stream to be embedded on third party websites. If you choose people would be able to embed your YouTube live stream on their websites
You can also embed the live stream on your website
14. Comments and rating: Allow poeple to comment on your video or not. hold comments for review and there are other options as well
You can also enable to show how many viewers like your video stream
Customization
The next setting after the details is the customization
You can have a live chat along with your youtube live stream
This is a good idea having a live chat increases engagement and participation on your video
You can get the feedback directly from your audiences.
If you thinking of embedding the YouTube Live stream on your website then having a chat of your own is a good idea because
- YouTube does not let you add YouTube chat on your website.
- You want your website visitors on your website and not on YouTube
You can consider adding DeadSimpleChat along with YouTube Live stream
DeadSimpleChat is a chat for Live Streaming and virtual events. It has features specifically designed for live stream engagement
You can create a free account and test out all the features here: https://deadsimplechat.com/live-streaming-chat
Participant modes
You can set the participants modes there are two
a. Anyone can send messages
b. Only subscribers can send messages
There is a Message delay feature as well. You can set a delay between when message is sent and when it appears on your live stream
The third and last setting is the Visibility
Visibility
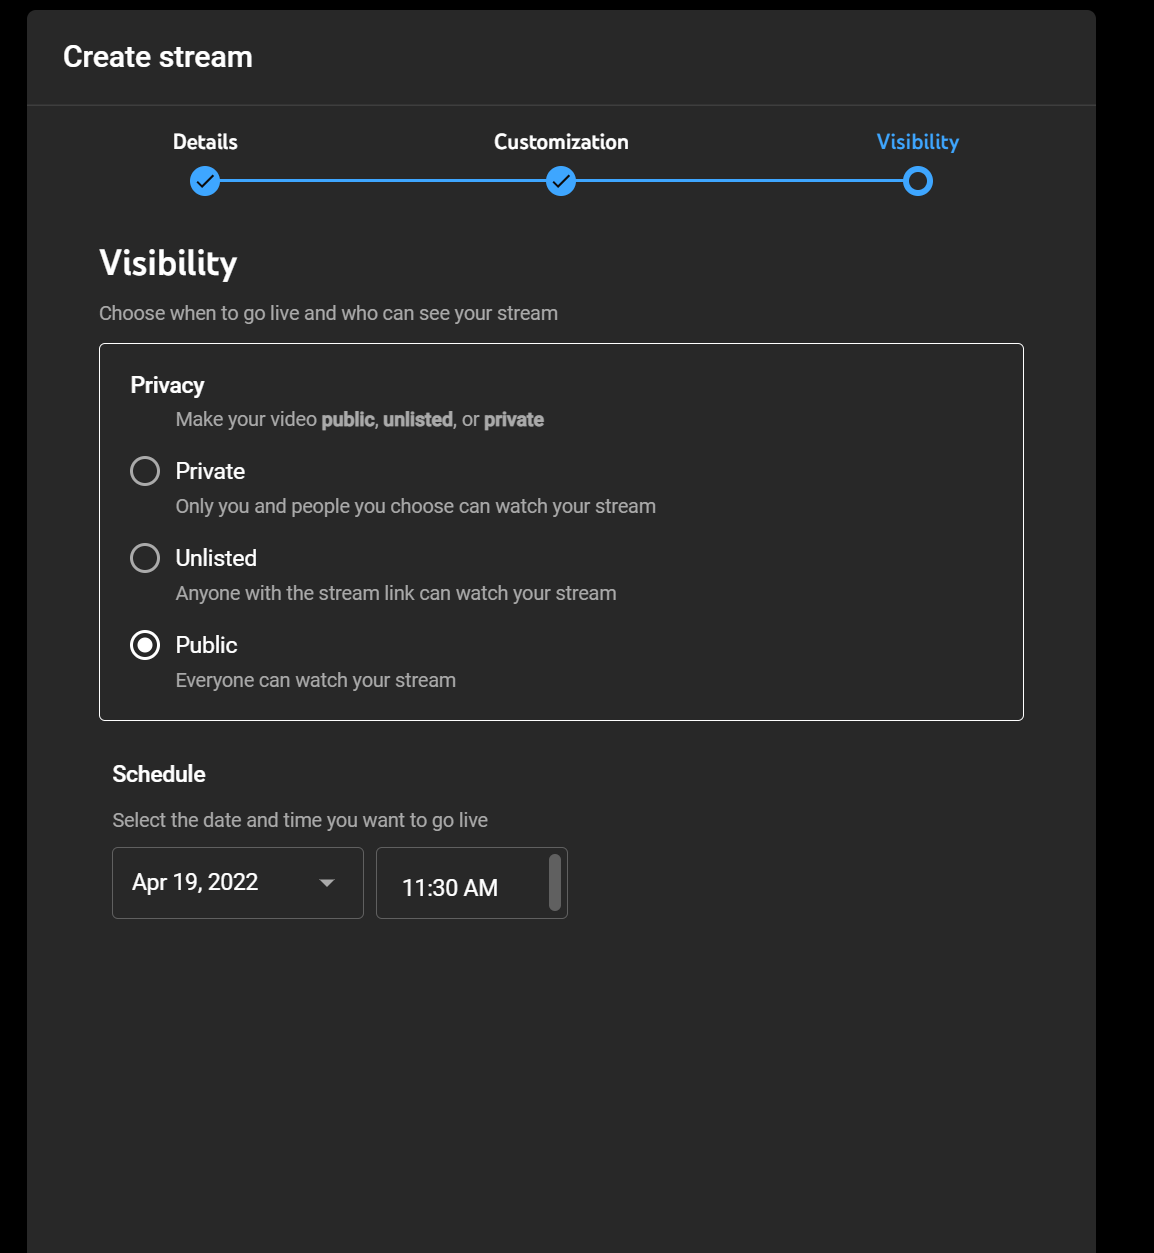
You can choose when your video goes live and do you wan to make the video
- Private: Only people you allow will be able to watch the video
- Unlisted: Anyone with the link can watch the video
- Public: Everyone can watch the video
I have set it to Private
On the next page you can see the stream preview with things like
the title of the stream and category and the time it is scheduled to go live
your selected camera and microphone.
You can take a Photo for your thumbnail or upload from your computer. I have chosen to upload an image from my computer
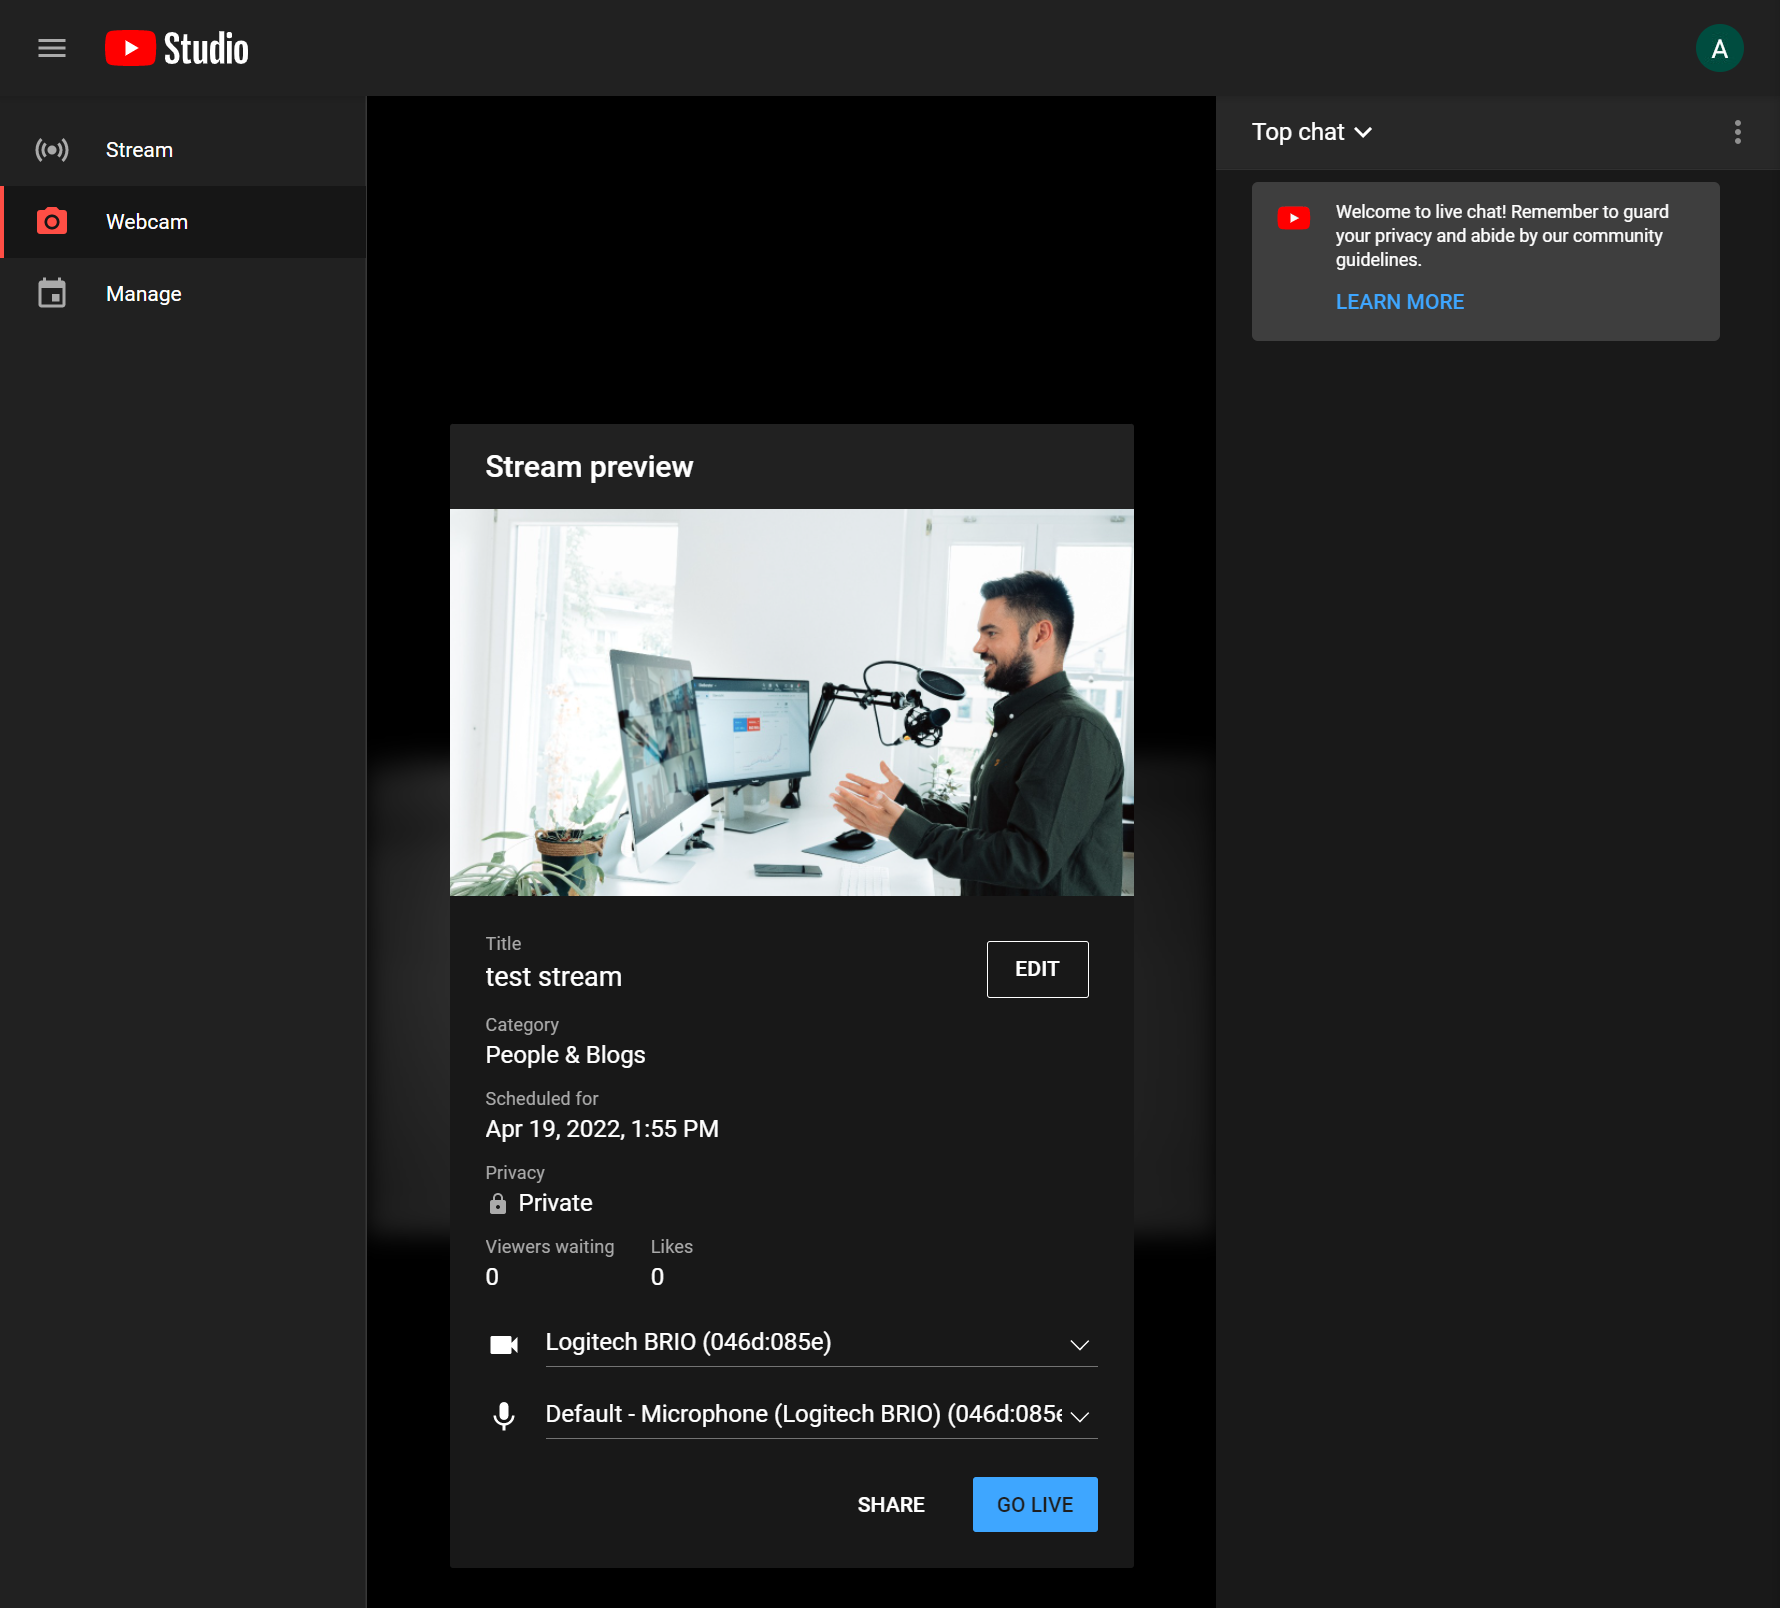
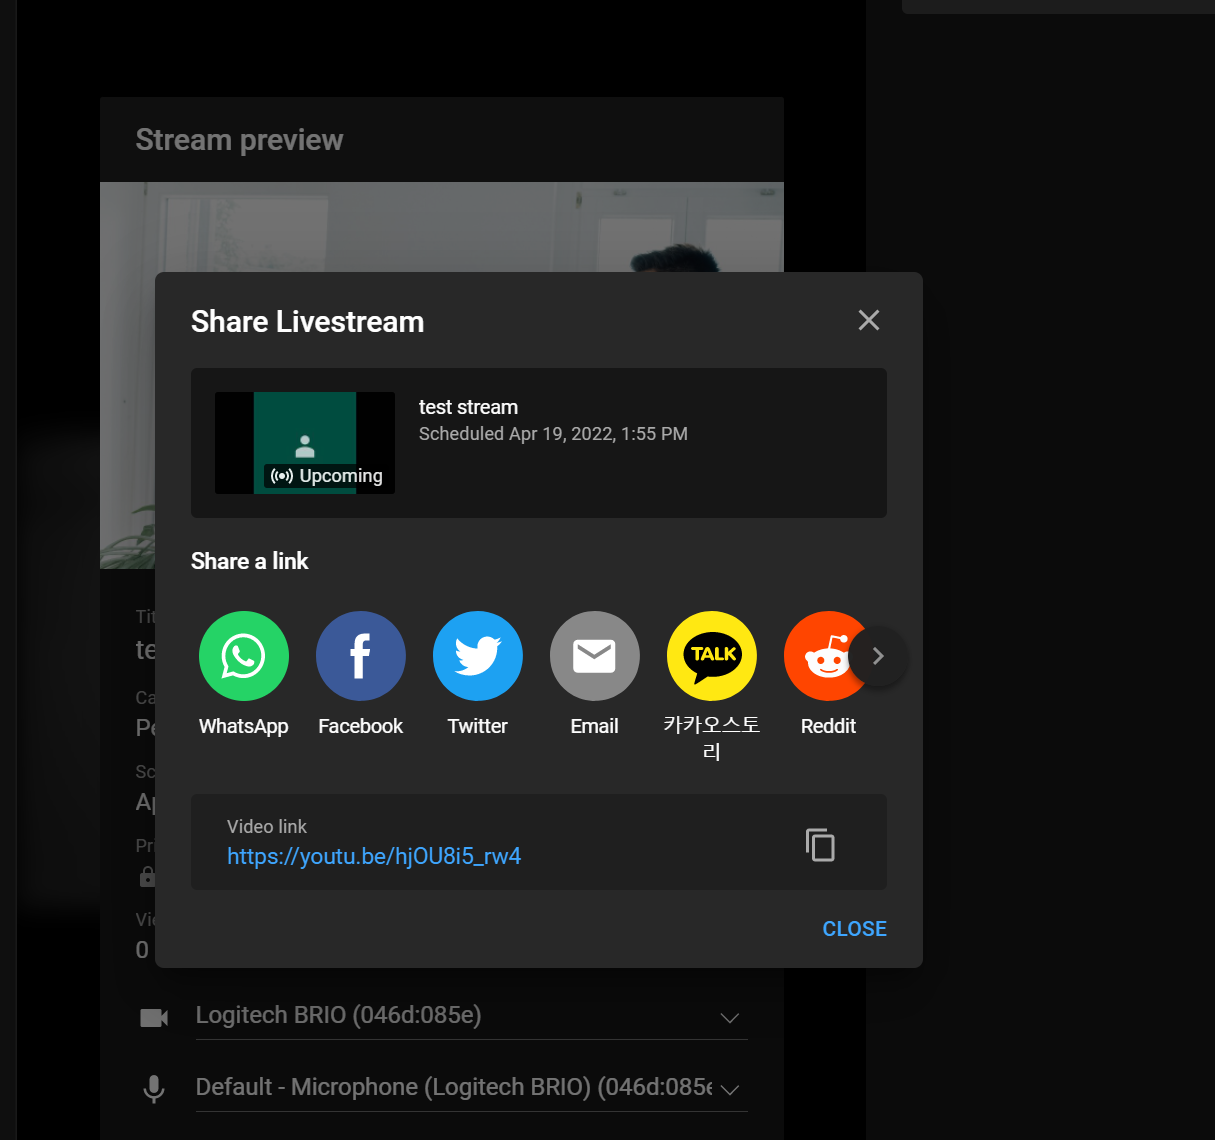
Click on the share button to share your video to your audiences ther eare various options to share the video as shown in the image below
When you click on the go Live button you are live.
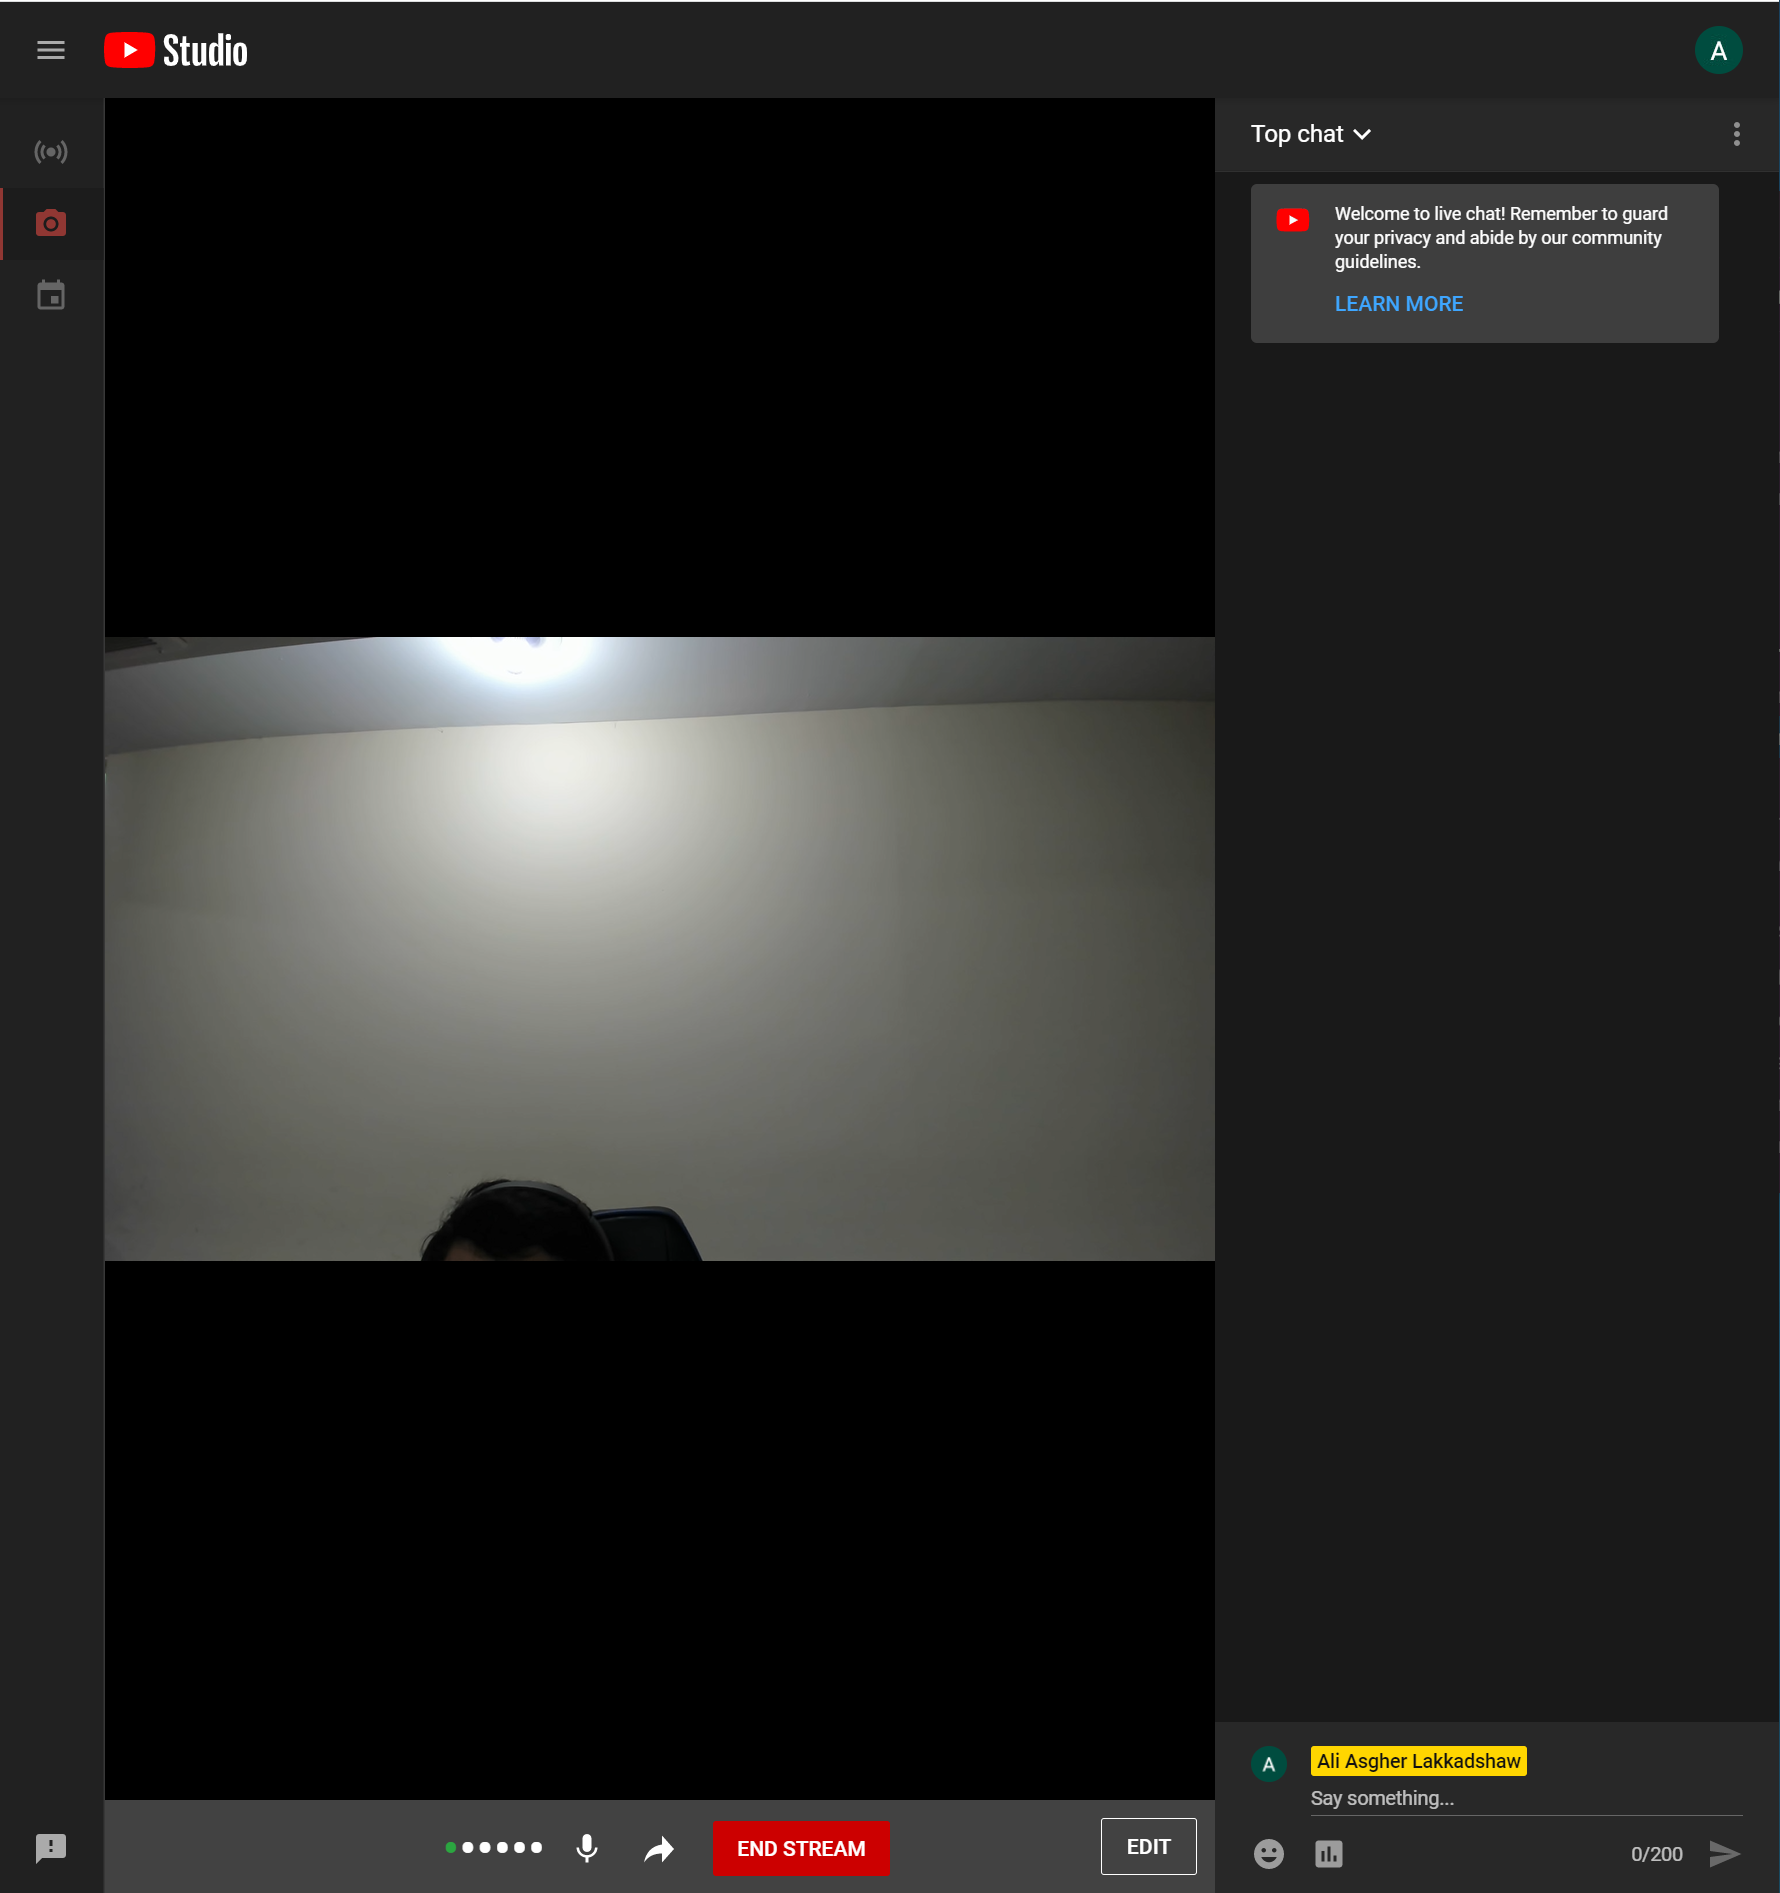
Now you have the chat on the side, and now you are live on YouTube
This is the easiest way to Live Stream on YouTube.
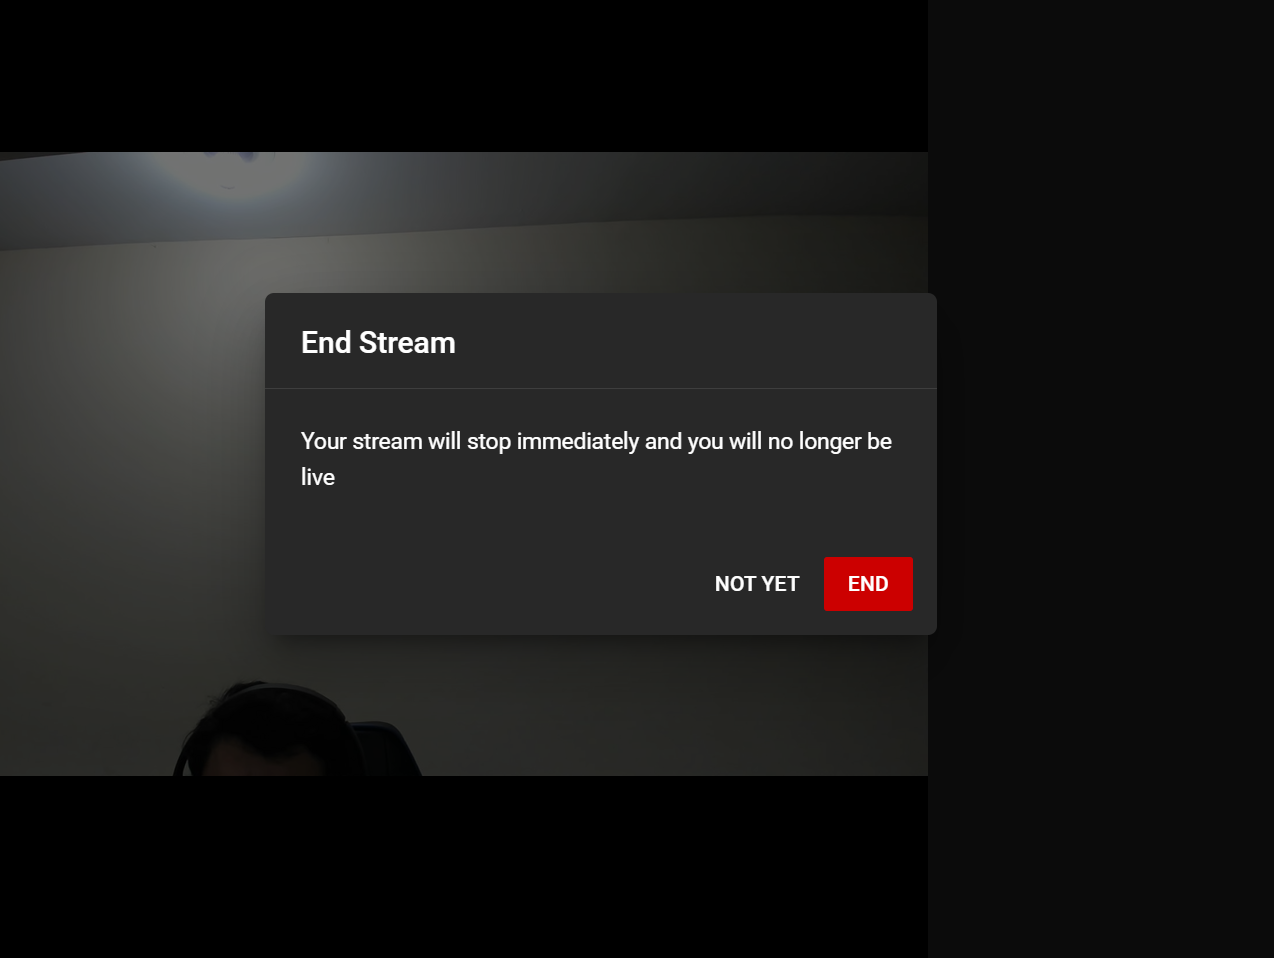
To end the stream click on the end stream button at the bottom.
After the streaming has been done. You get the stream finished section
It shows you stats like the number of views, the peak connections, total watch time, chat rate and the average view suration and the average duration
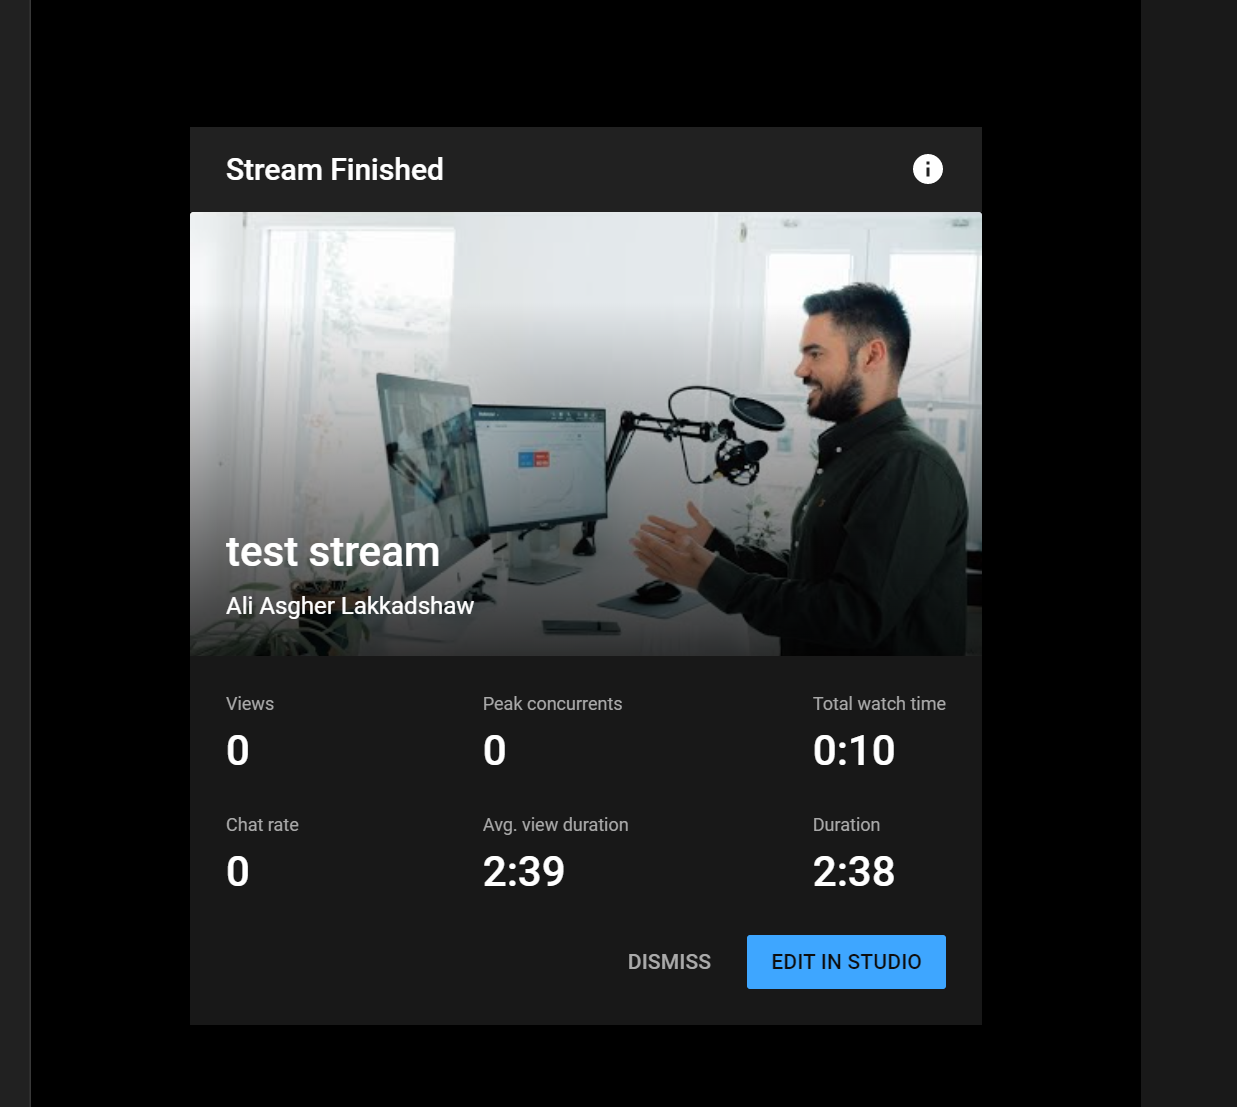
Click on the edit in studio button will take you to the studio where you can edit your video in various ways
In the YouTube studio you can
- edit your video and
- customize your video also there are
- analytics which are useful
In the YouTube studio there are various options on the left hand side.
- Details
- Stream Customization
- Analytics
- Video Editor
- Video Comments
- Subtitles
Details
In the details section there are the titles and description and thumbnails that you can edit.
You can change the visibility of the live stream from private to public, add restrictions sub titles and end screen and cards
Stream Customization
There is much to do here you can just toggle the LIve Chat replay. If you toggle it to yes the chat would replay if some one watches the video at a later point in time
Videos Analytics
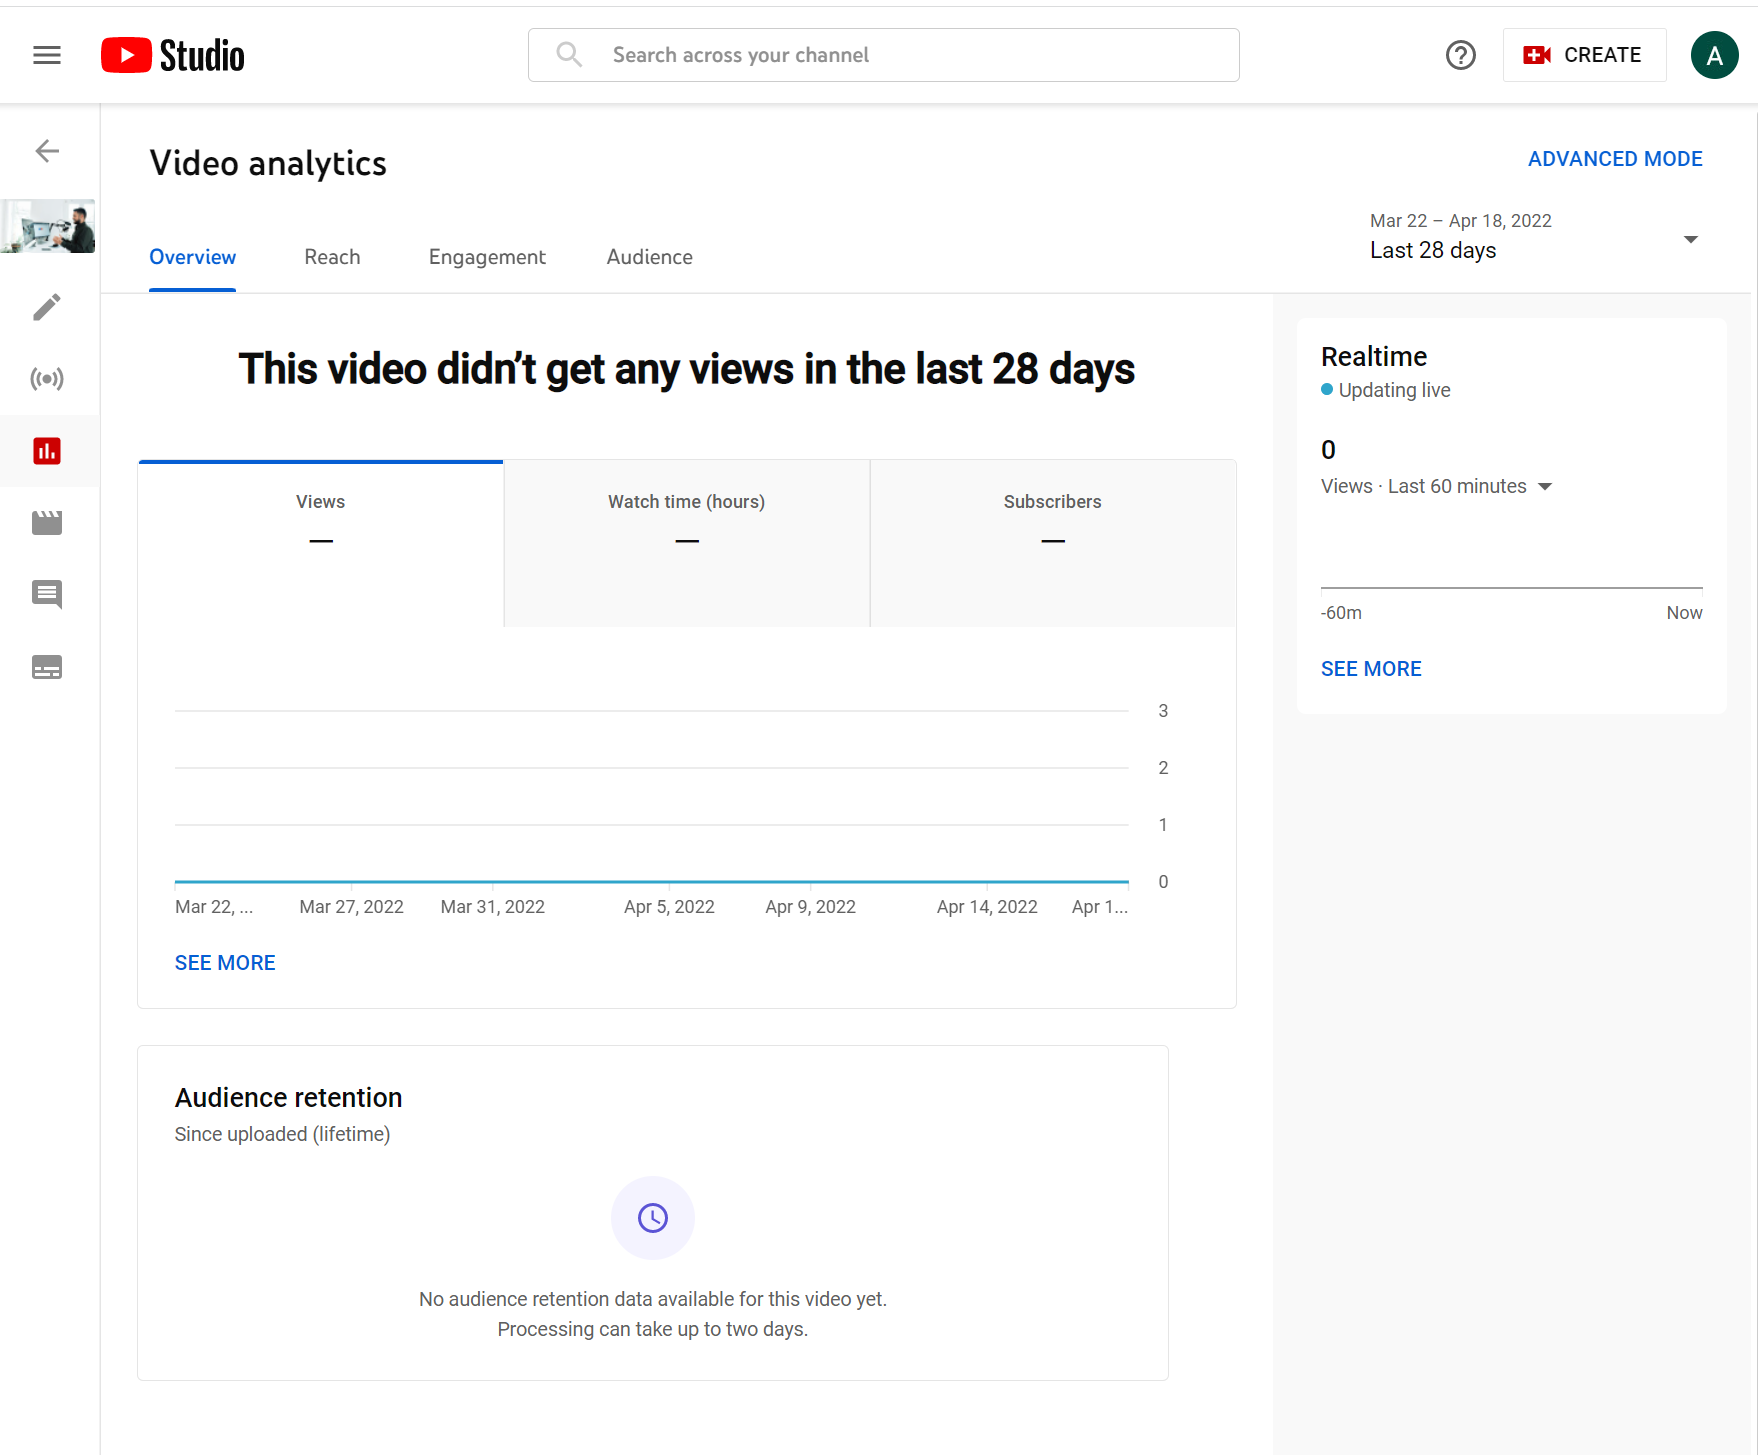
Video Analytics has 4 sections
- Overview
- Reach
- Engagement
- Audience
In the overview section you will get the
- Views
- Watch Time in hours
- and Subscribers
also audience retention since upload time.
If you click on the see more button at the bottom you can see details about your audiences like
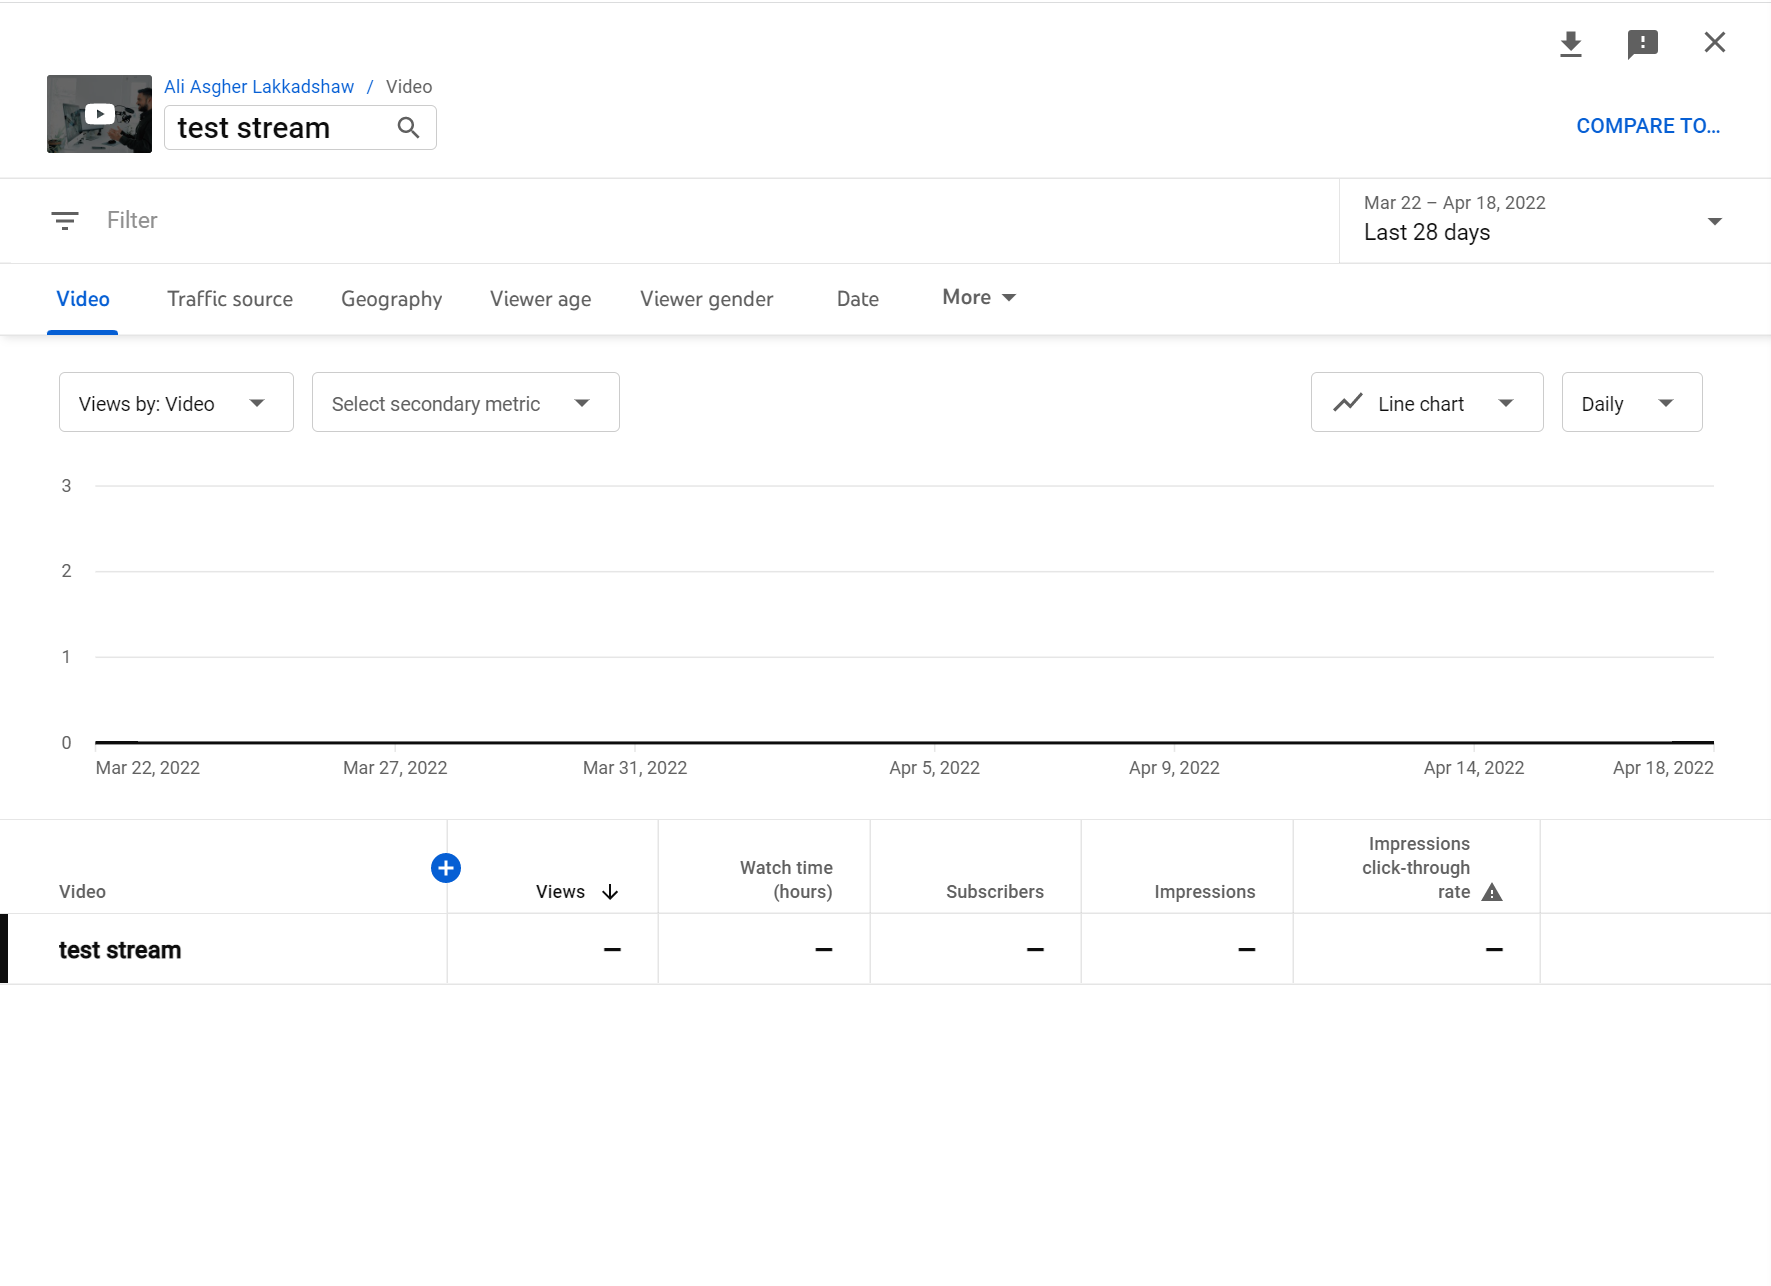
- Views by video
- traffic source
- Geography
- Viewer age
- Viewer gender and
- date
In the reach section you can see the
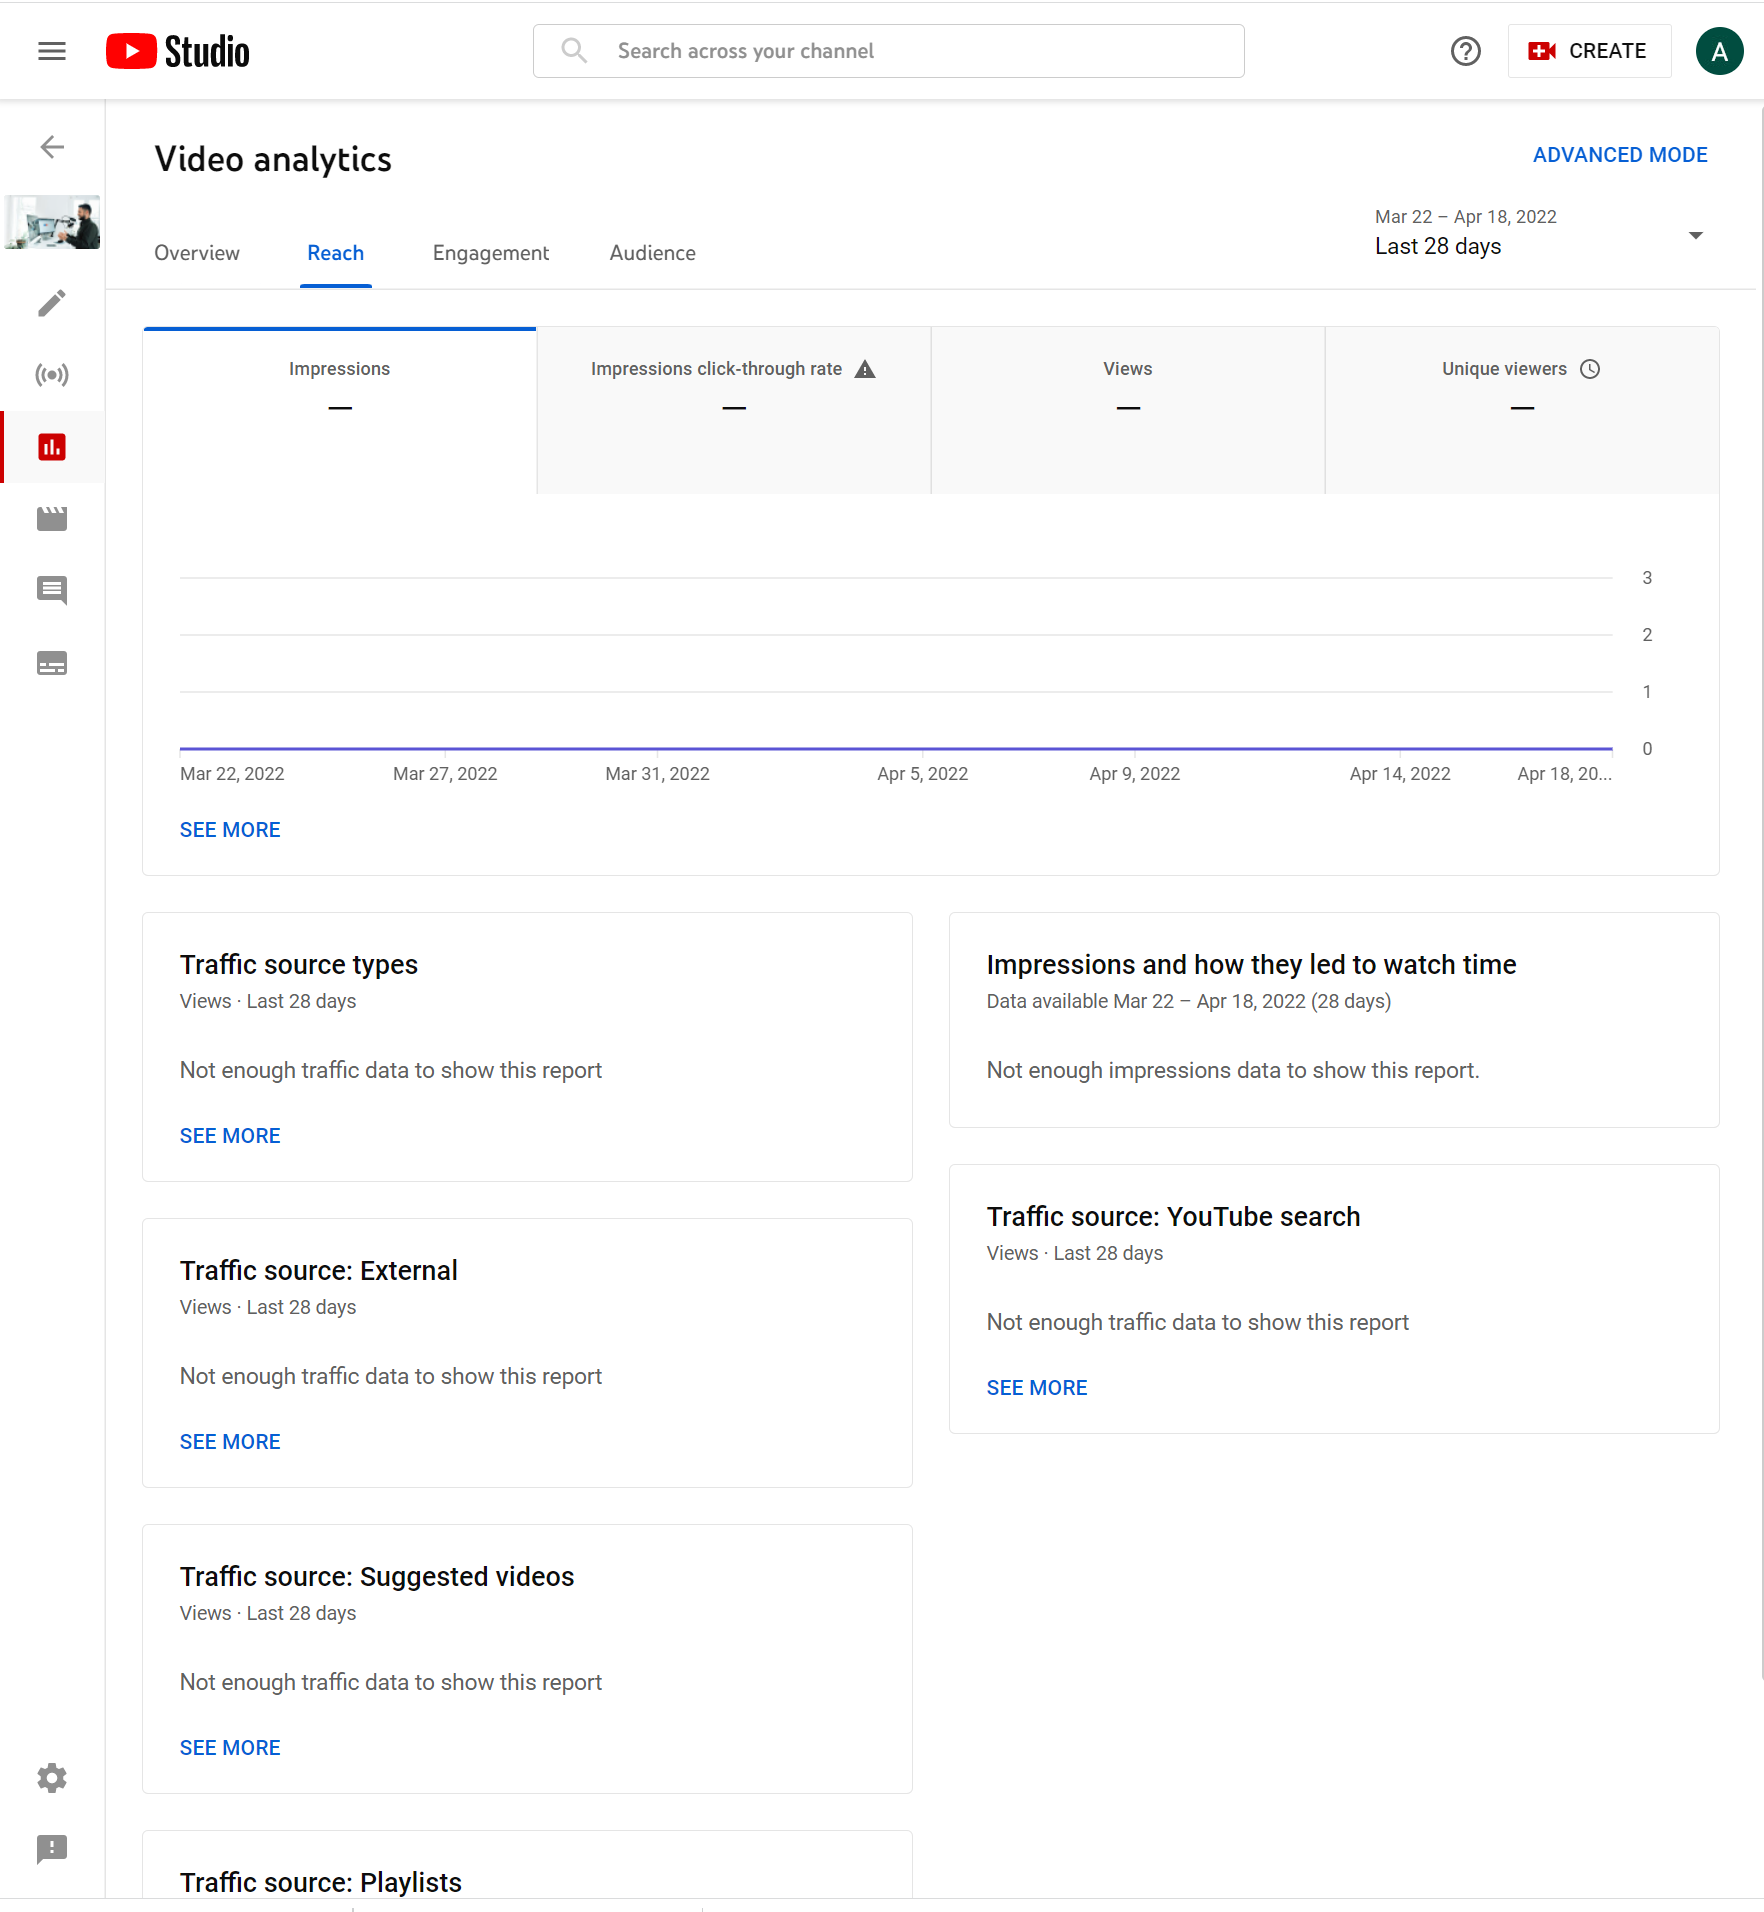
- Impressions
- click through rate
- views
- and Unique visitor
There are various other metrics as well like
- Traffic source types
- Traffic sources external
- Traffic sources: Suggested videos
- Traffic sources: Playlists
- Traffic sources: search
- Impressions and how they led to watch time
The next section that we move on to is the engagement section
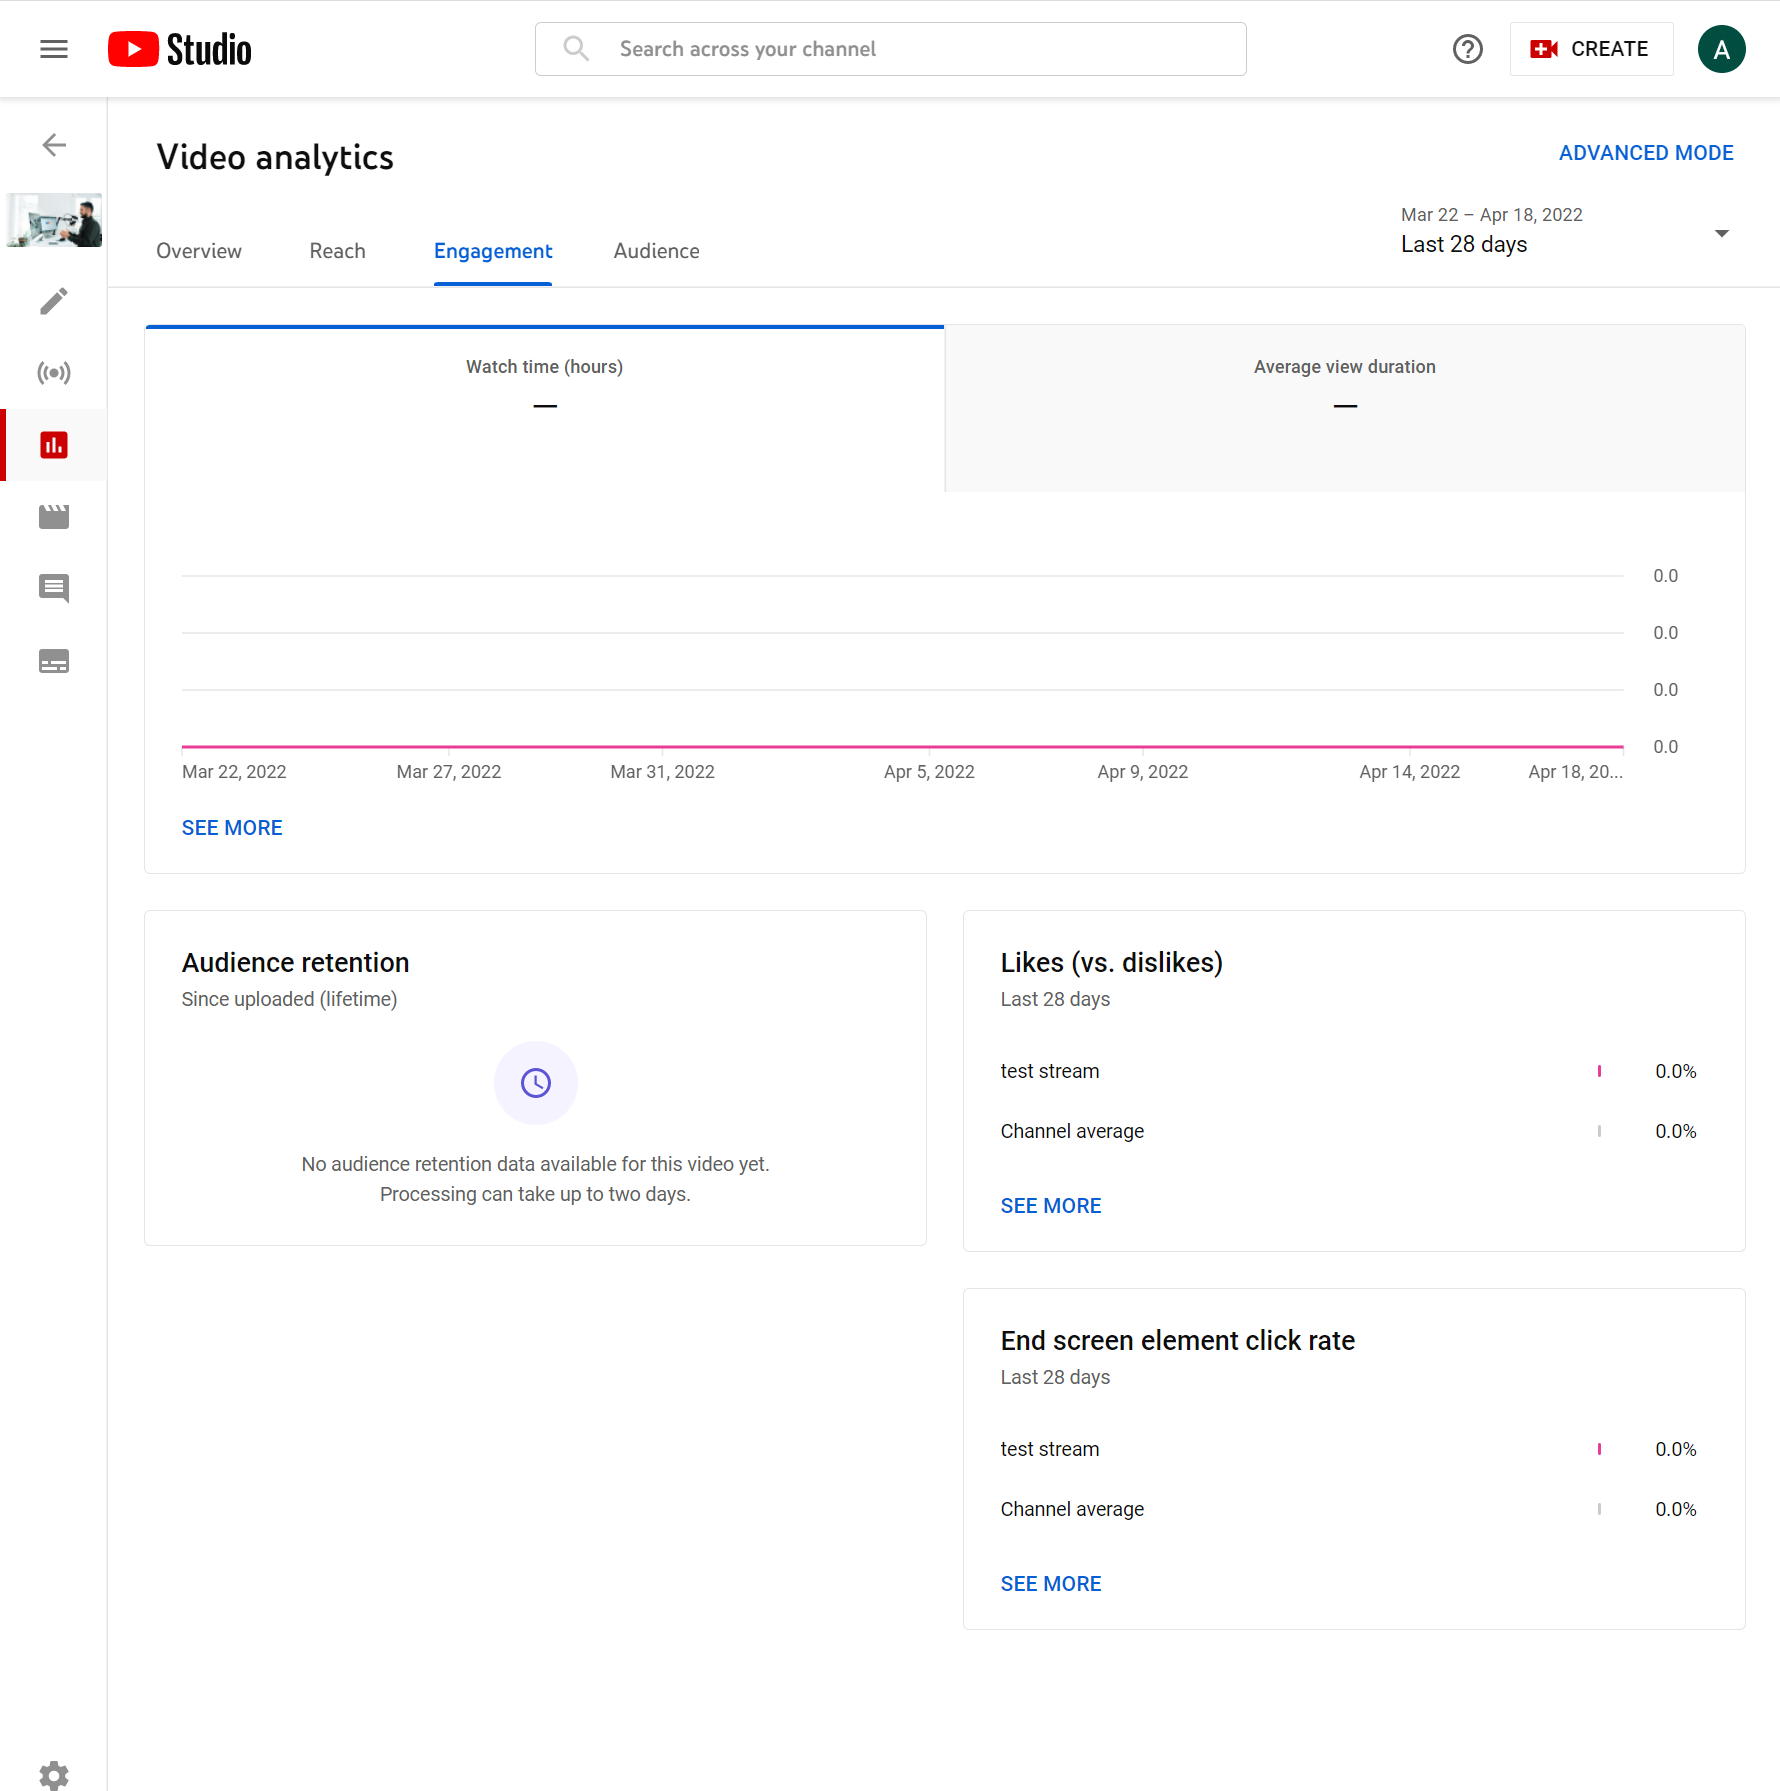
here we find the following
- Watch time
- Average view duration
- Audience retention
- likes vs dislikes
- end screen element click rate
The next sub section is audience.
Here we have options like
- Returning visitors
- Unique Visitors
- subscribers
- watch time for subscribers
- Age and gender
- Top geographies
- Top subtitles and cc languages
Video Editor
In the Video's editor you can trim the video and split the video and these are just some of the basic editing that you can do in the YouTube editor
Video Comments
In the Video comments section you can see the live comments that the people are making while you live stream
If you have held the comments for review then you can either approve or disapprove the comments on the video here.
Subtitles
lastly there is the subtitles section. In this section you can set the subtitles for the video
You can also set the default language of the subtitle that you want to use.
Using YouTube Video using just your computer webcam is the easiest way to live stream to your audience but there are some disadvantages to this as well
- There is less control over the things in the video
- There is no screen sharing
- No adding titles on to your screen
- No ability to change cameras
- No bringing in additional guests or other people to join you while you are live
YouTube Live Using Mobile devices
To live stream to YouTube using mobile devices simple download and open the YouTube app and click on the go live button
The video opens in portrait mode you can make it landscape before you go live
there are similar settings as in the desktop app
- choose a title
- make it unlisted or public
- set your location
- mark it if its made for kids or not
That's it click on next then upload a thumbnail or pose and smile and take a photo for thumbnail
Then click on the go live button to go live
Note: You need to have at least one thousand subscribers to be able to go live through mobile devices
However, you can use third party apps like prism live studio to go live on mobile devices and to get around the YouTube restriction
Moderation
You can moderate the YouTube live chat with the following features.
Note: All these features are also available with DeadSimpleChat
- Subscribers Only Chat
- Assign Moderators
- Block messages containing certain words
- Hold potentially inappropriate messages for review
and many more
Tools: Advanced Streaming
- Live streaming softwares
- OBS
- ECAMM Live
- BeLive
- StreamYard
- WireCast
- vMix
Giving support for multiple cameras, adding animations, adding titles on screen, using green screen ability to bring people in for an interview ability to share stuff on screen
How to enable live streaming with streaming software
Now, in the YouTube studio instead of clicking on the Webcam click on the Stream button
Here you can send your video directly from your streaming software to go live
There are some settings that you can adjust
- Stream Settings
- the stream key
- stream URL
You can also set the stream latency to
- normal latency
- low latency
- ultra low latency
You can add the stream URL and the stream key directly into your streaming software and you can adjust the settings from there.
Some Tips and Tricks
- Creating an Highlight of the video
- Creating a trailer of your live stream
highlights are a shorter edited version of the live stream that you can use to attract users to your live stream
To create a highlight add stream markers to the live stream video when something happens while you are live streaming
You will see stream markers on the timeline
You can also create a trailer that can help you get more audiences for your live stream
Here are the steps to create a trailer
- Make your trailer and upload it as unlisted on the YouTube live
- Click on the scheduled stream in your content area or click on the create icon at the top of the stream and then click on the go live (As you normally would if you want to go live)
- Now once you see your scheduled stream click on that and then click on the edit button
- Click on the customization section and on the left hand side scroll down to the bottom you will see the add button under the trailer heading click on it and
- Select the video you want to use as a trailer, you can also search for it.
- select the video and click on save.
Now you have a trailer for your Live Stream
Monetizing the YouTube Live Video
You can earn money in live streaming by enabling ads and using Super Chat
Some Channels have access to channel memberships
To show ads you must have at least 1000 subscribers and 4000 views on your videos
If your channel is eligible and enabled for monetization then YouTube will trigger ads to server on your content
Here are some other articles that are a good read
- Virtual Conference in 2023: The Complete Guide
- How to Add/Embed Stream Chat to OBS Studio | Jan 2023
- Top 7 Best Secure Messaging Apps for 2023
- How to add Embedded chat box widget on your website
Conclusion
This is how you can start live streaming on YouTube. I hope this article helps you. Let me know what you think in the comment section below.
If you found this article useful feel free to share it with your friends
Ready to Add Chat to Your Website?
Get started for free. No credit card required.
Start a Free Trial
![Webinar Chat: The Complete Guide to Engaging Your Audience [2026]](/blog/content/images/size/w600/2026/02/article-hero-webinar-chat.svg)
