Websockets are a communication protocol that provides a full-duplex communication channels over a single, long-held TCP connection.
Using web sockets you can create a persistent, two way interaction between a client and a server.
In this article we are going to learn the following, you can click on a click to move to that particular section of the article
- What are WebSockets?
- HTTP req-res Model vs Websockets
- Real World Advantages and use-cases of Websockets
- Why NodeJs is the recommended platform for using WebSockets?
- Step by Step Tutorial Building a real time Chat App with WebSockets and Node JS
- Creating the backend
- Step 1: Environment SetUp
- Step 2: Installing Dependencies
- Step 3: Creating the Back-end server
- Testing the Back-end server
- Building the front-end/Client side
- Step 4: Creating the Public Directory
- Step 5: Creating the UI of the Chat App
- Step 6: Implementing the websocket on the client side
- Bonus: Sending chat message to all connected clients
What are websockets?
as explained above, Websockets are a communication protocol that provides a full-duplex communication channels over a single, long-held TCP connection.
Here is how the websockets work
1. Establishing the connection:
To establish a websocket connection, a handshake between the client and server happens.
This handshake is initiated by the client and includes a special kind of HTTP header called and ' Upgrade' header
Which signifies that client wants to establish a websocket connection
2. Upgrading to WebSocket Protocol:
If the server supports the websocket connection then it replies with 'Upgrade' header in its response which signifies and confirms that the connection is swiched from HTTP to websocket
3. Persistent, two way communication:
Once the handshake is complete the connection is swicthed from HTTP to websocket connection.
which is a persistent two way communication channel where each party in the connection that is the client as well as the server can send data to each other any time
HTTP req-res Model vs Websockets
HTTP unique features
- Stateless Protocol
HTTP is a stateless protocol, what it means is that it operates in a request response model
Each request from the client requires a seprate HTTP request and the server responses to that request and the connection is closed
for example: client request data to load a page, server response with the data and the connection is closed
- One way Communication:
In HTTP the connection is unidirectional, client sends a request and the server recieves the request then responses to that request. This makes it less efficent in use cases where there is need for contineous exchange of data
- Overhead
Each HTTP request contains headers and other meta data which makes a HTTP request heavy as compared to a websocket connection
WebSocket unique features
- Full-Duplex communication
Websockets allow for full duplex communication, which means that the data can go through any direction that allows for real time interaction
- Reduced Overhead
Websockets do not contain additional meta data like HTTP headers which reduces data overload and improves performance especially over slow networks and allows for smooth flow of data
- Stateful Protocol
Unlike HTTP, the websocket protocol is stateful, which means the server and client knows that they are connected to each other and the connection remains open until it is closed
Real World Advantages and use-cases of Websockets
Here are some of the real world applications and advantages of WebSockets.
Real world use cases and apps
- Chat Application: Real time chat app can be easily created using websockets
- Gaming: Online gaming where fast bi directional data transfer is required to play games. Especially fast paced games
- Financial trading platforms: Financial trading platforms where real time fast data transfers is required such as stock prices and fat execution of trades
- Live Sports Updates: Sporting events are good and drives real time data transfer is neessory for the viewer to be engaged in sports
- Collaboration Tools: Real time collaboration tools such as whiteboard and document sharing require websockets to function
- Notification Services: Instant notification and alerts can be made using websockets
Advantages
- Real Time interaction
- Efficient Performance
- Scalability
- Flexibility
What is Node Js and why NodeJs is the recommended platform for using WebSockets?
Node JS is an open source cross platform JavaScript runtime environment, using which you can run JavaScript on the server side.
Node JS is built on the V8 runtime environment of Chrome that allows developers to use JavaScript outiside the browser
- JavaScript everywhere: NodeJS extends javascript to the server as well. Before javascript was only used inside the browser
- Event-Driven architecture: Node JS has an event driven architecture and non blocking I/O based model that makes it lightweight for your applications
- NPM Node Version Manager: Node Js comes with an enourmous library of packages that are managed through NPM. NPM makes it easy to incorporate various tools and packages into your application
- Async and Non Blocking: Node JS is Async and non blocking by nature, which means it can continue to process other requests while waiting for the completion of tasks like reading a file etc
- Scalable: Node Js has a lightweight arhitecture and can scale to thousands of connections
Why Node Js is preferred to be used with WebSockets
- Handling concurrent connections
- Real Time performance
- Unified Javascript Development
- Vast Ecosystem and Community Support
- Efficient handling of Binary Data
- Easy integration with Web technologies
Step By Step Tutorial: Building a Real time chat app
In this section we are going to build a real time chat application in a step by step format
- Environment setup:
- Creating the server with NodeJs and WebSockets
- Creating the client
- Handling client server communication
- Running the app
- Optional Enhancing the Application
- User Auth
- Storing messages
- Adding rooms and channels
- UI improvements
Creating the backend
Step 1: Environment Set up
Create a new project directory in your machine and and name it real-time-chat-app and cd into it like so
mkdir real-time-chat-app
cd real-time-chat-app
then initalize the node js project with npm init to create a package.json file
npm initStep 2: Installing Dependencies
next step is to install the dependencies for our project. We will be needing the express js and the ws websocket library to set up the server for our real time chat application
install the express js like
npm install expressinstall the ws websocket library like
npm install wsStep 3: Creating the Back-End servers
Create a index.js file in your project then write the below code to setup an express js server
const express = require('express');
const app = express();
const PORT = process.env.PORT || 3000;

app.get('/', (req, res) => {
    res.send('Hello World!');
});

app.listen(PORT, () => {
    console.log(`Server running on port ${PORT}`);
});
This is a simple express js server which listens on the port 3000 and returns the hello world of the / endpoint
next step is to add the ws library to the index.js file and setup the websocket server running independently on some other port
Add the below code to the index.js file:
const WebSocket = require('ws');

// We are creating a new websocket server here and running it on port 8181
const wss = new WebSocket.Server({ port: 8181 });

wss.on('connection', function connection(ws) {
    ws.on('message', function incoming(message) {
        console.log('received: %s', message);
    });

    ws.send('This is a message');
});What are we doing in this code
- We are importing the websocket library
ws - we are running the websocket server on
port 8181. This server is running independently of the HTTP expressjs server which means that it does not share the same port or connection as the HTTP server - We are handling the websocket connections
wss.on('connection', function connection(ws) {
 //.....
});
here we are listning for new websocket connections. When a client connects to the server via websockets the callback method is triggered
the ws parameter here represents the connected websocket client.
4. Then inside the callback function we are setting up another listener that listens to any messages that the client is sending to the server. Whenever a message is recieved we are logging that message to the console for now. Later we can send this message back to the client or do whatever we want to do with the message
ws.on('message', function incoming(message) {
    console.log('received: %s', message);
});
5. Lastly, we are sending a sample message back to the client.
ws.send('This is a message');Testing the Back-end server
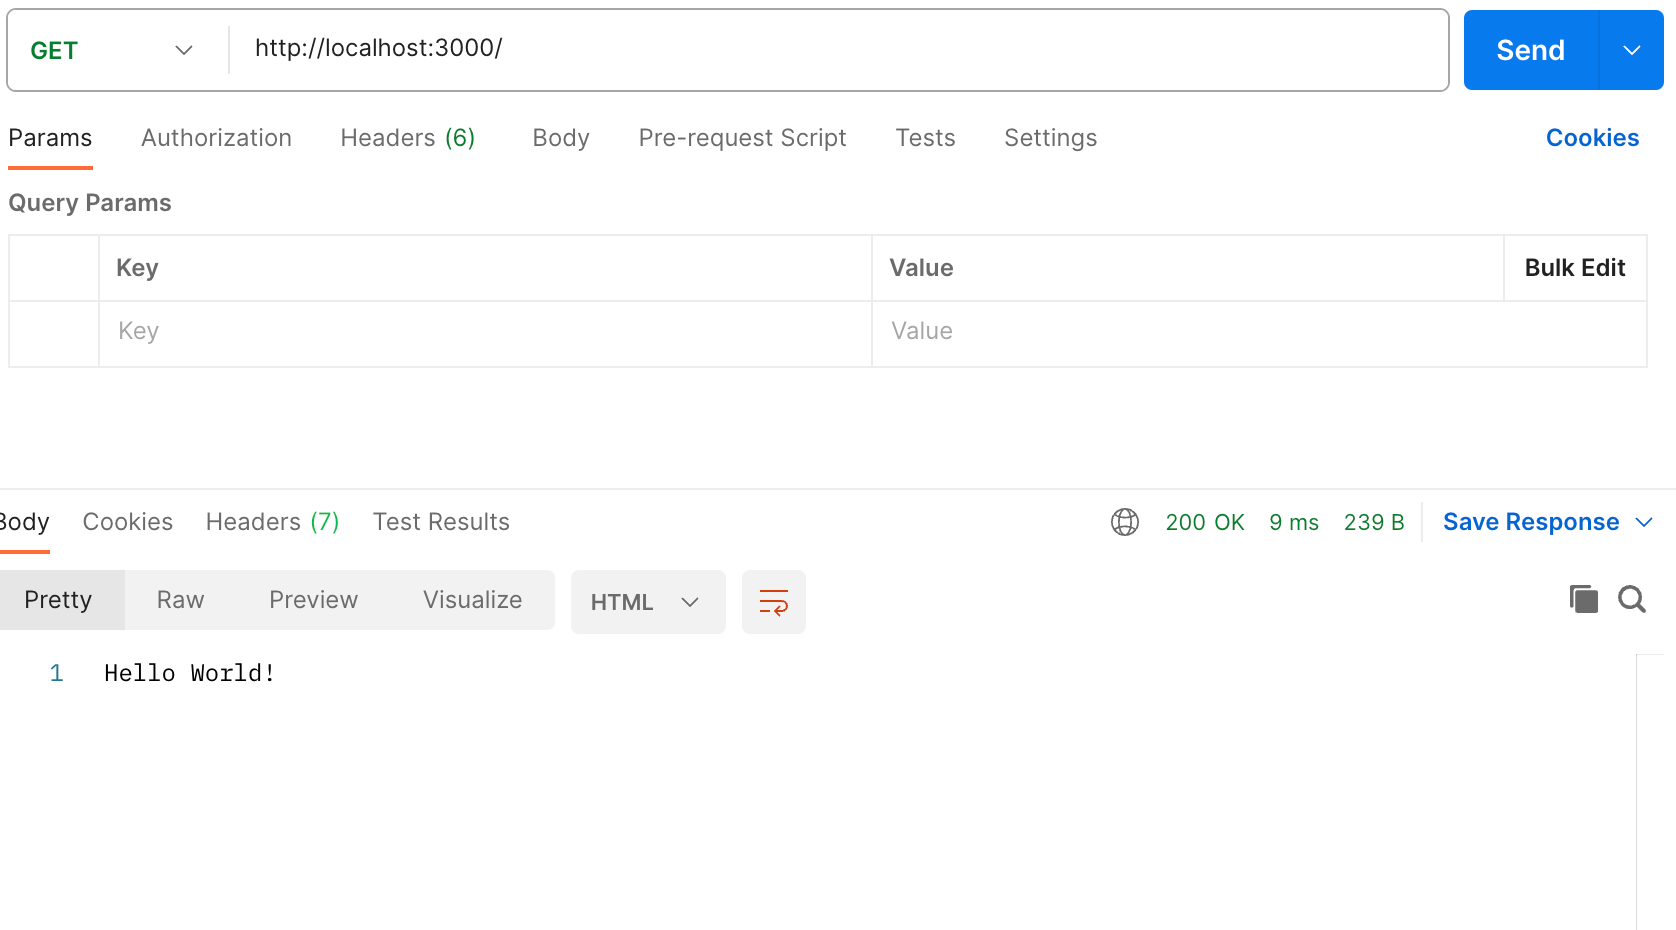
Now that we have created our simple express js and websocket servers. We can test them.
It is quite easy to test these servers, we are going to use third party tools such as Postman to do this.
Testing the express js server
paste the localhost:300 and send a GET request to the expressjs server and you will get a hello world response
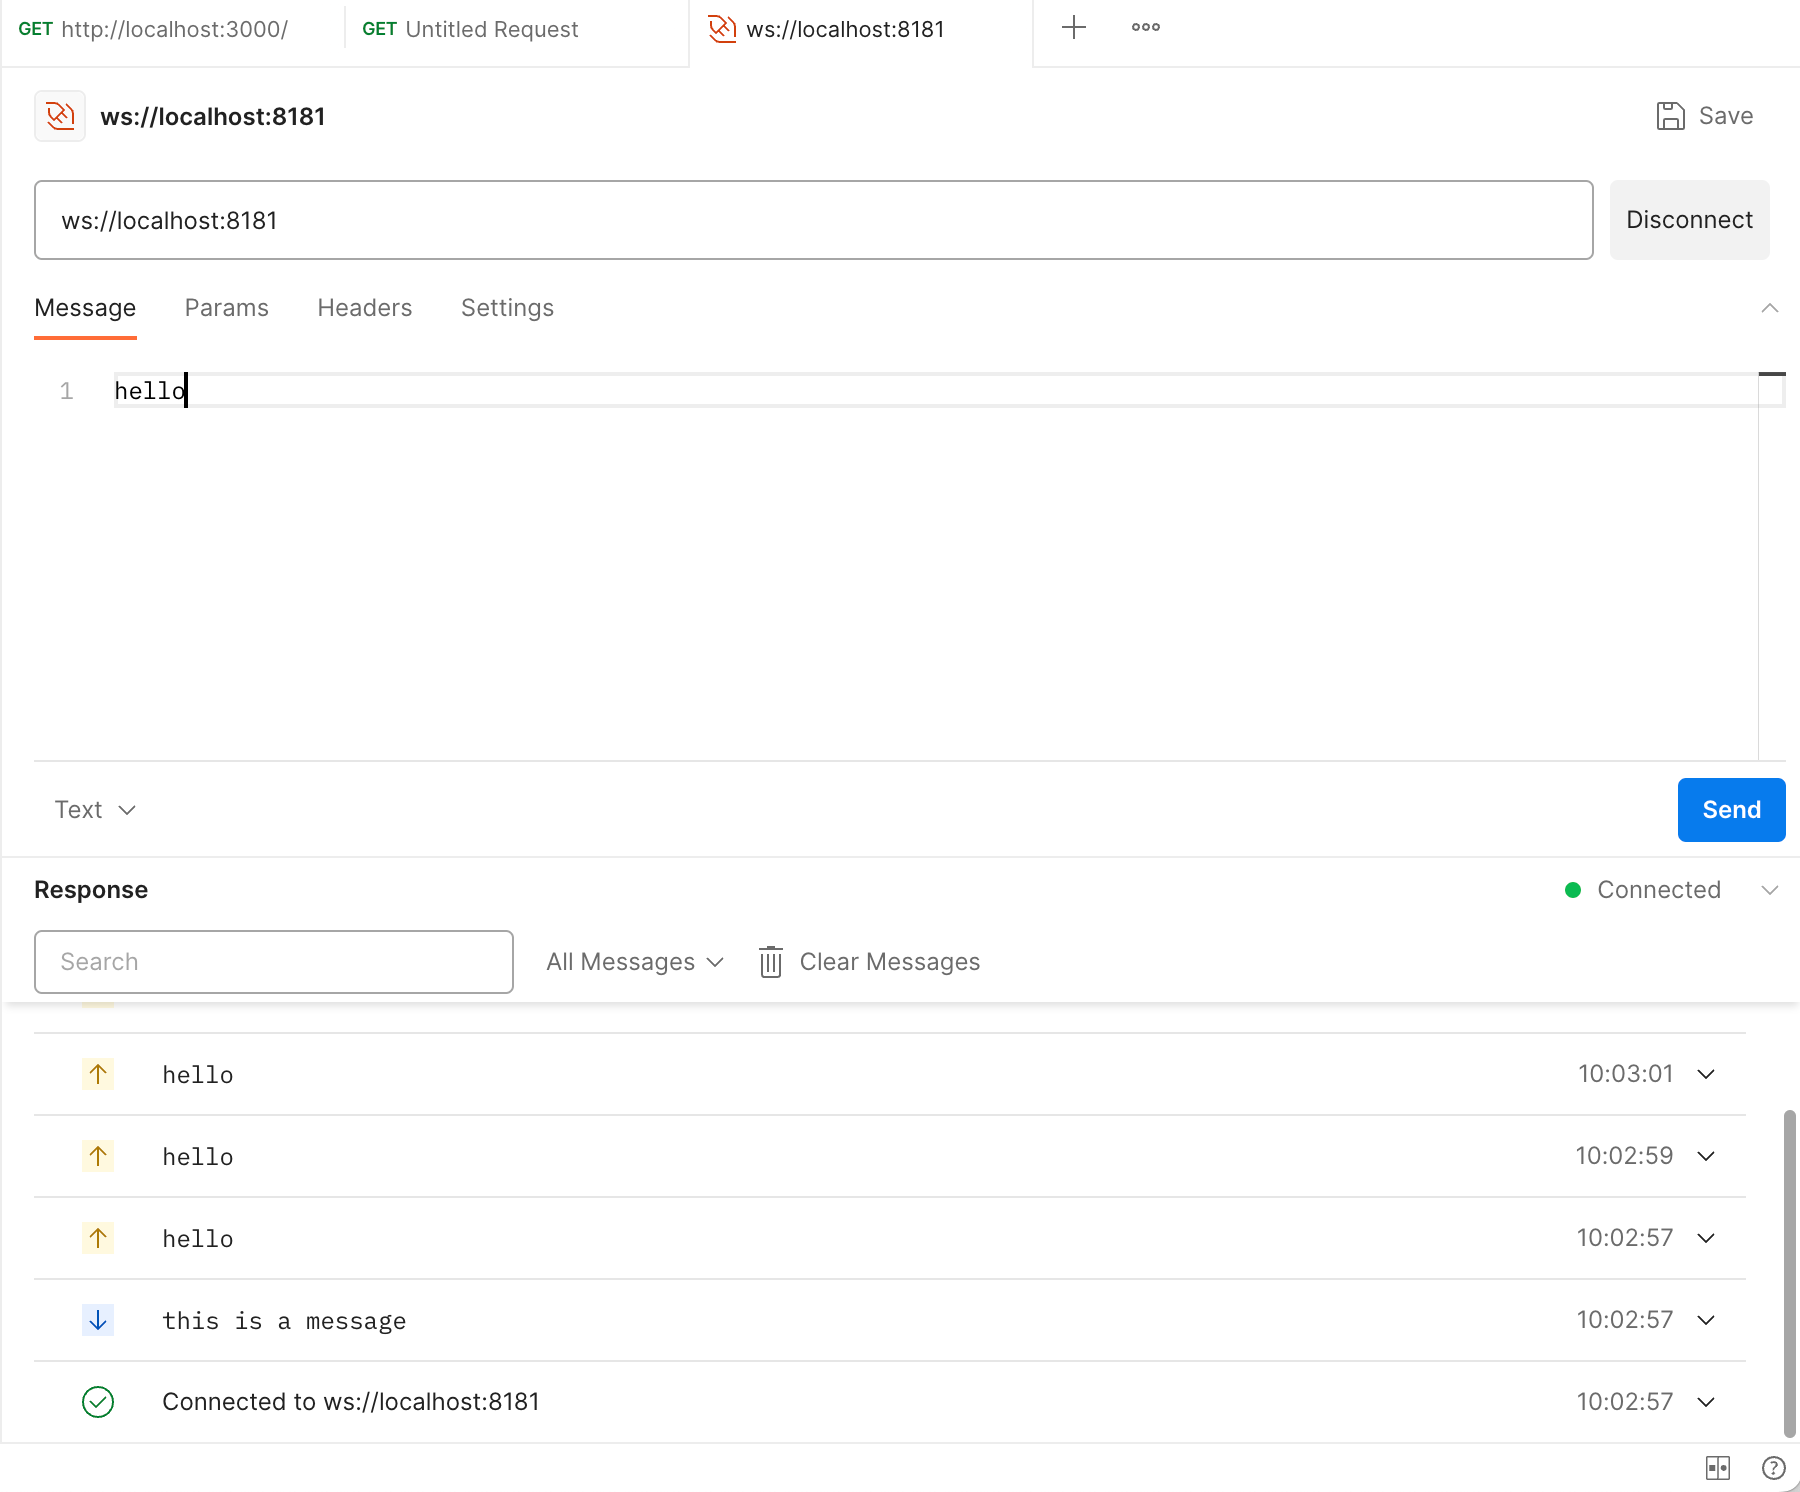
Testing the websocket server
to create a websocket request on the postman sidebar click new and then click on websocket
then paste the websocket server url and create a connection ws://localhost:8181
click on the connect button to connect to the websocket server and type a message in the message section and click on the send button to send the message
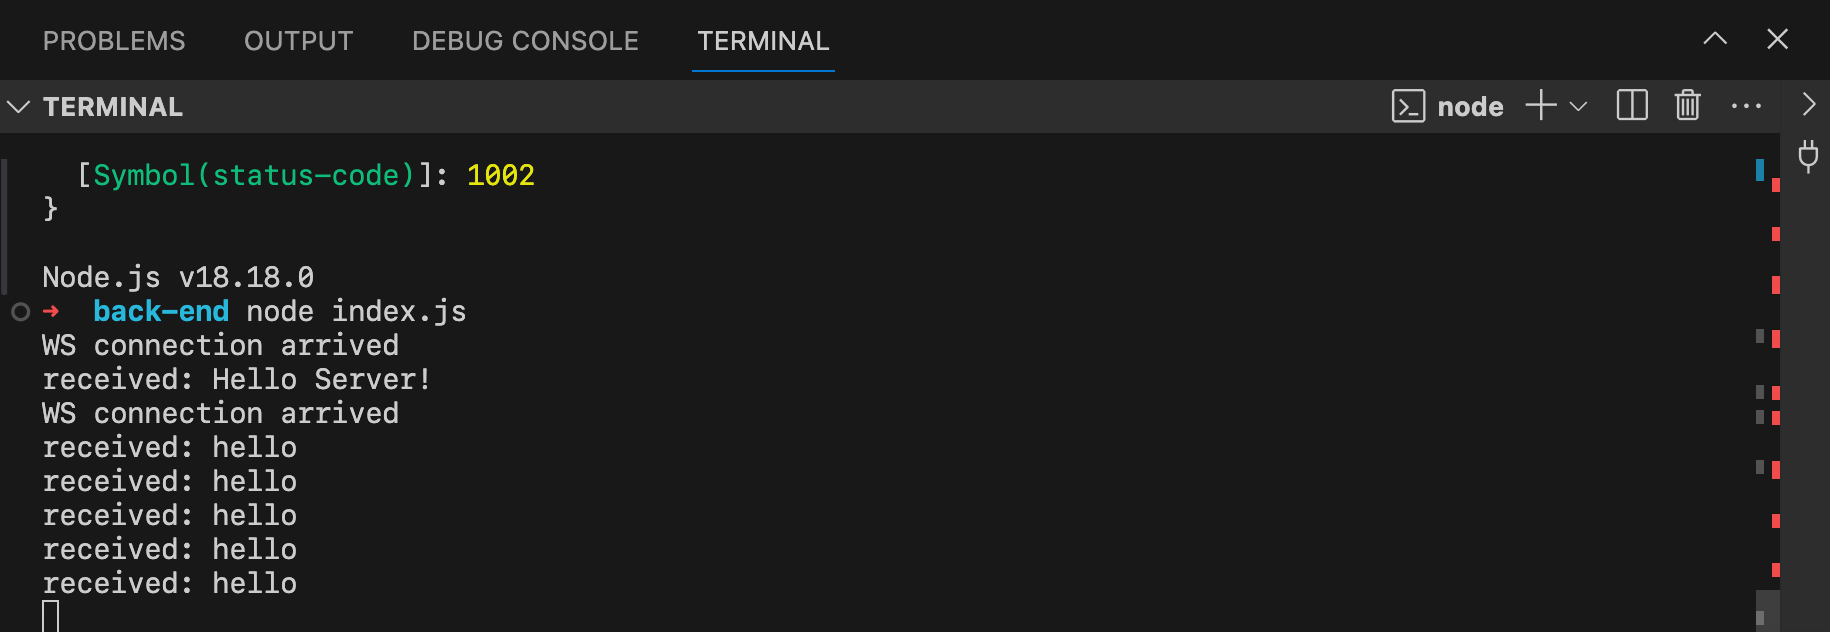
You can see the connection established in the postman response section also the message that was sent from the websocket server.
Also, you can see the message logged to the server on the server console log
Here is how the complete back-end code looks like
const express = require('express');
const app = express();
const PORT = process.env.PORT || 3000;

const WebSocket = require('ws');

// Create a WebSocket server completely detached from the HTTP server.
const wss = new WebSocket.Server({ port: 8181 });

wss.on('connection', function connection(ws) {
    console.log("WS connection arrived");
    ws.on('message', function incoming(message) {
        console.log('received: %s', message);
    });

    ws.send('this is a message');
});


app.get('/', (req, res) => {
    res.send('Hello World!');
});

app.listen(PORT, () => {
    console.log(`Server running on port ${PORT}`);
});
Now we have created a simple server and tested the basic functionality. Our server doesn't do much except send a basic message back to the client.
We want the server to take the messages from a single client and send it back again to the sender client.
Let us edit the server code to add that functionality.
const express = require('express');
const http = require('http');
const WebSocket = require('ws');
const path = require('path');

const app = express();
const PORT = process.env.PORT || 3000;

// Serve static files from a 'public' directory
app.use(express.static(path.join(__dirname, 'public')));

// Create HTTP server by passing the Express app
const server = http.createServer(app);

// Integrate WebSocket with the HTTP server
const wss = new WebSocket.Server({ server });

wss.on('connection', function connection(ws) {
    console.log("WS connection arrived");

    ws.on('message', function incoming(message) {
        console.log('received: %s', message);
        // Echo the message back to the client
        ws.send(`Echo: ${message}`);
    });

    // Send a welcome message on new connection
    ws.send('Welcome to the chat!');
});

// Default route can be removed if you are serving only static files
// app.get('/', (req, res) => {
//     res.send('Hello World!');
// });

// Start the server
server.listen(PORT, () => {
    console.log(`Server running on port ${PORT}`);
});
What are we doing here
- we have edited the express code to send files from the public directory. We are going to build the front-end of our chat app and send the html and js files for the front end from the public directory
- In the websocket we are sending the message that we are recieving back to the client
- We can also broadcast the message to all the client connected to the websocket server. We are going to do this later on in the article as a bonus content

Building the front end / Client side
Next we are going to be building the front end of our real time chat application.
Step 4 : Creating the Public Directory
In the root folder of your application create a new directory called the public directory
there create two new files
index.html: Here we will write the UI of the chat appapp.js: Here we will write the front end logic of the chat app
Step 5 : Create the UI of the chat app
Open the index.html file and paste the following code in it.
<!DOCTYPE html>
<html lang="en">
<head>
<meta charset="UTF-8">
<meta name="viewport" content="width=device-width, initial-scale=1.0">
<title>Chat App</title>
<link href="https://cdn.jsdelivr.net/npm/tailwindcss@2.0.1/dist/tailwind.min.css" rel="stylesheet">
</head>
<body class="bg-gray-100">
<div class="container mx-auto p-4">
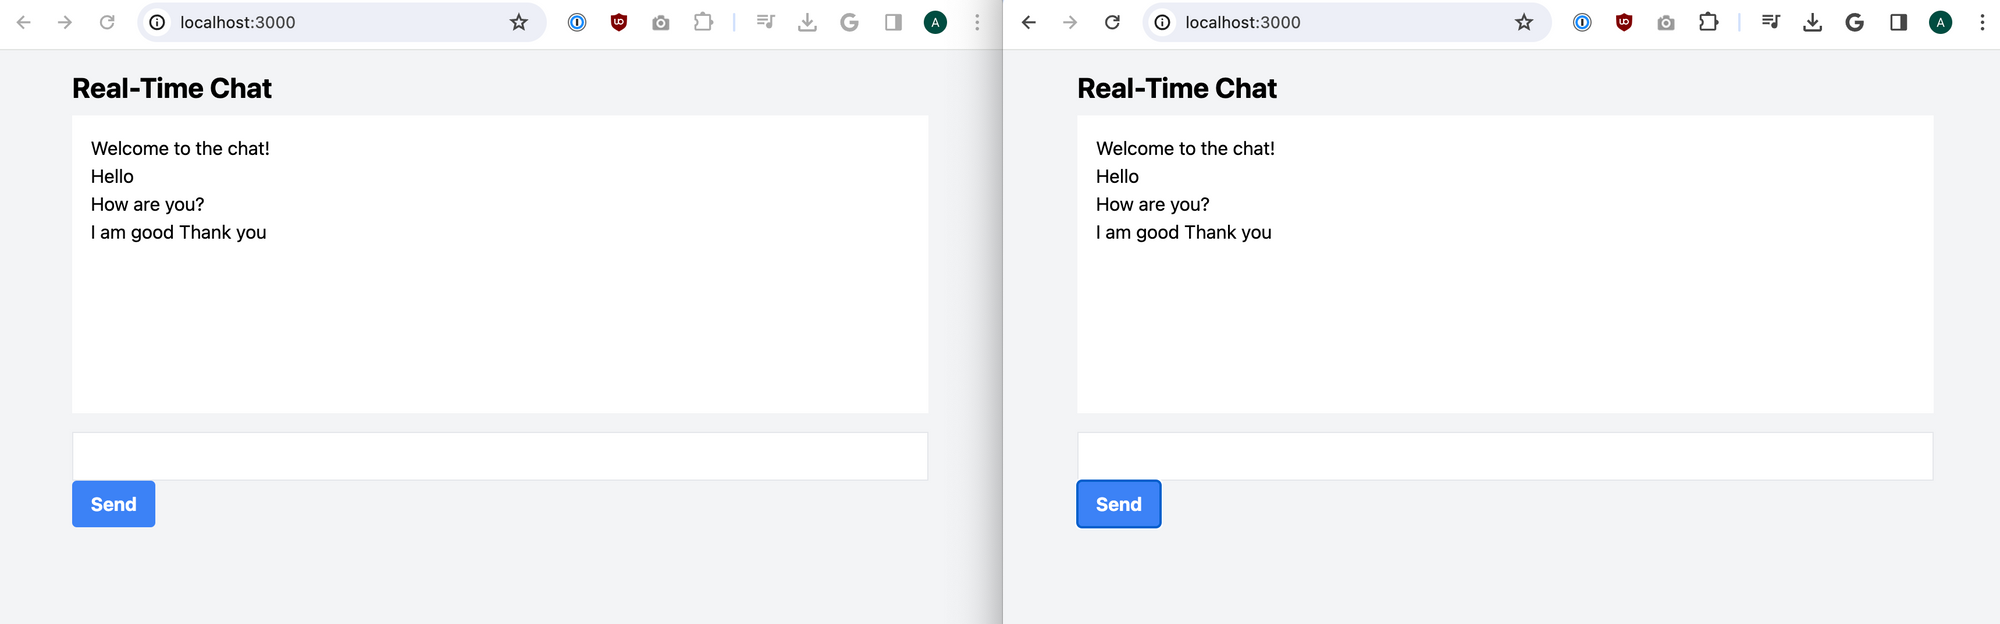
<h2 class="text-2xl font-bold mb-2">Real-Time Chat</h2>
<div id="messages" class="bg-white p-4 h-64 overflow-auto mb-4"></div>
<input type="text" id="messageInput" class="border p-2 w-full">
<button id="sendButton" class="bg-blue-500 hover:bg-blue-700 text-white font-bold py-2 px-4 rounded">
Send
</button>
</div>
<script src="app.js"></script>
</body>
</html>
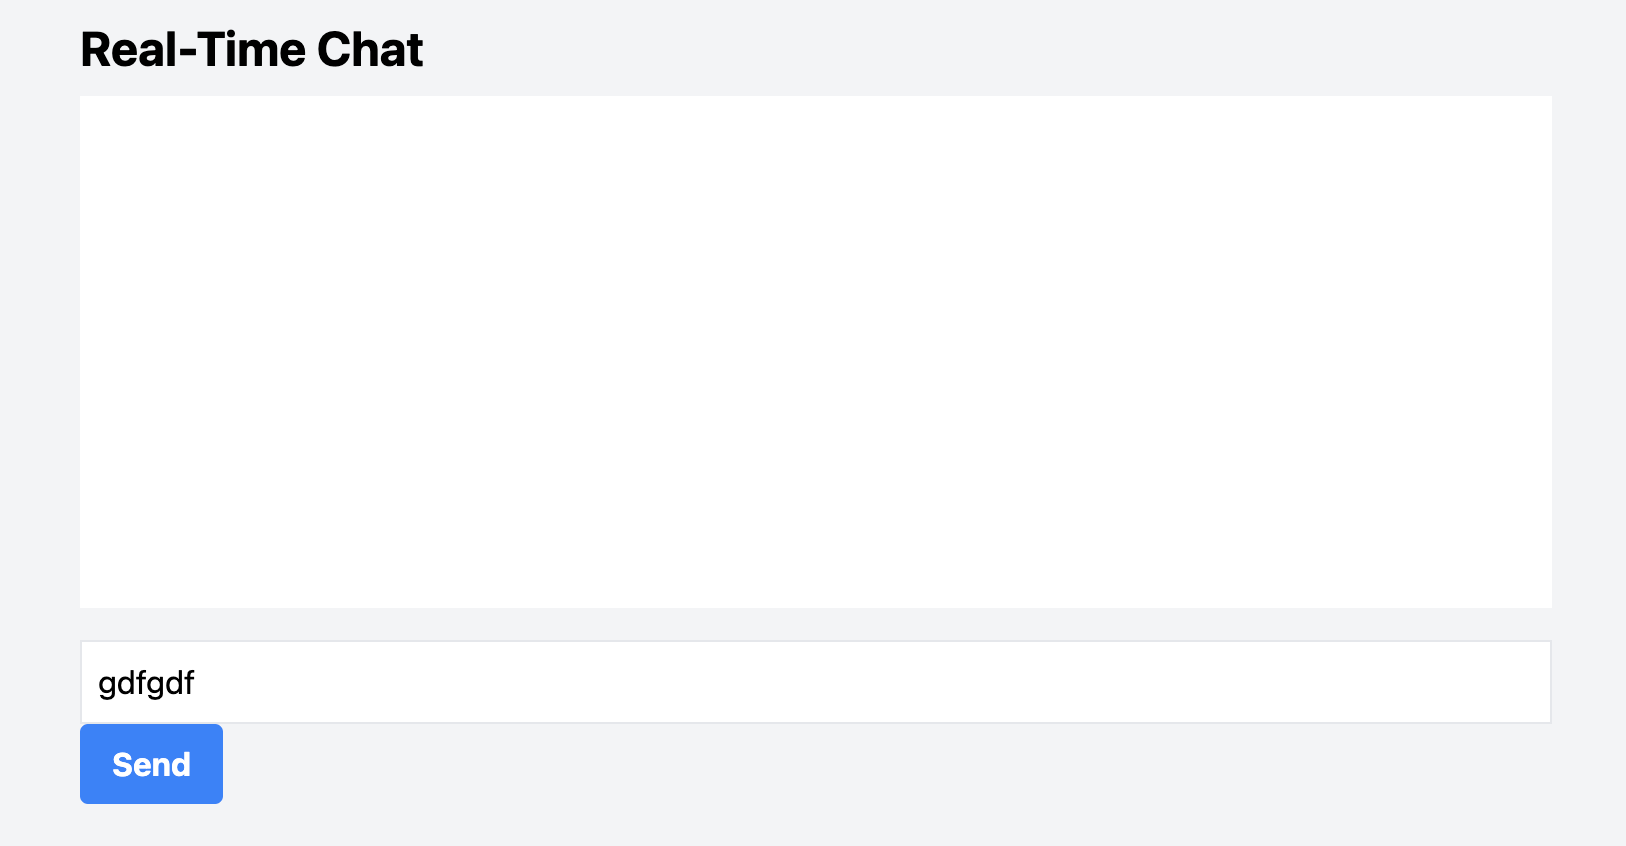
this is basically creating a chat interface and styling it with tailwind css. You can open the file in the browser and it looks something like this
Step 6 : Implementing websocket on the client side
Next we are going to create a javascript file and name it app.js on the client side
const ws = new WebSocket(`ws://${window.location.host}`);
const messages = document.getElementById('messages');
const messageInput = document.getElementById('messageInput');
const sendButton = document.getElementById('sendButton');

ws.onopen = () => {
    console.log('Connected to the server');
};

ws.onmessage = (event) => {
    const message = document.createElement('div');
    message.textContent = event.data;
    messages.appendChild(message);
};

ws.onerror = (error) => {
    console.error('WebSocket error:', error);
};

ws.onclose = () => {
    console.log('Disconnected from the server');
};

sendButton.onclick = () => {
    const message = messageInput.value;
    ws.send(message);
    messageInput.value = '';
};
This file handles the connection on the client side, receiving messages and sending messages clearing the message box updating the HTML interface.
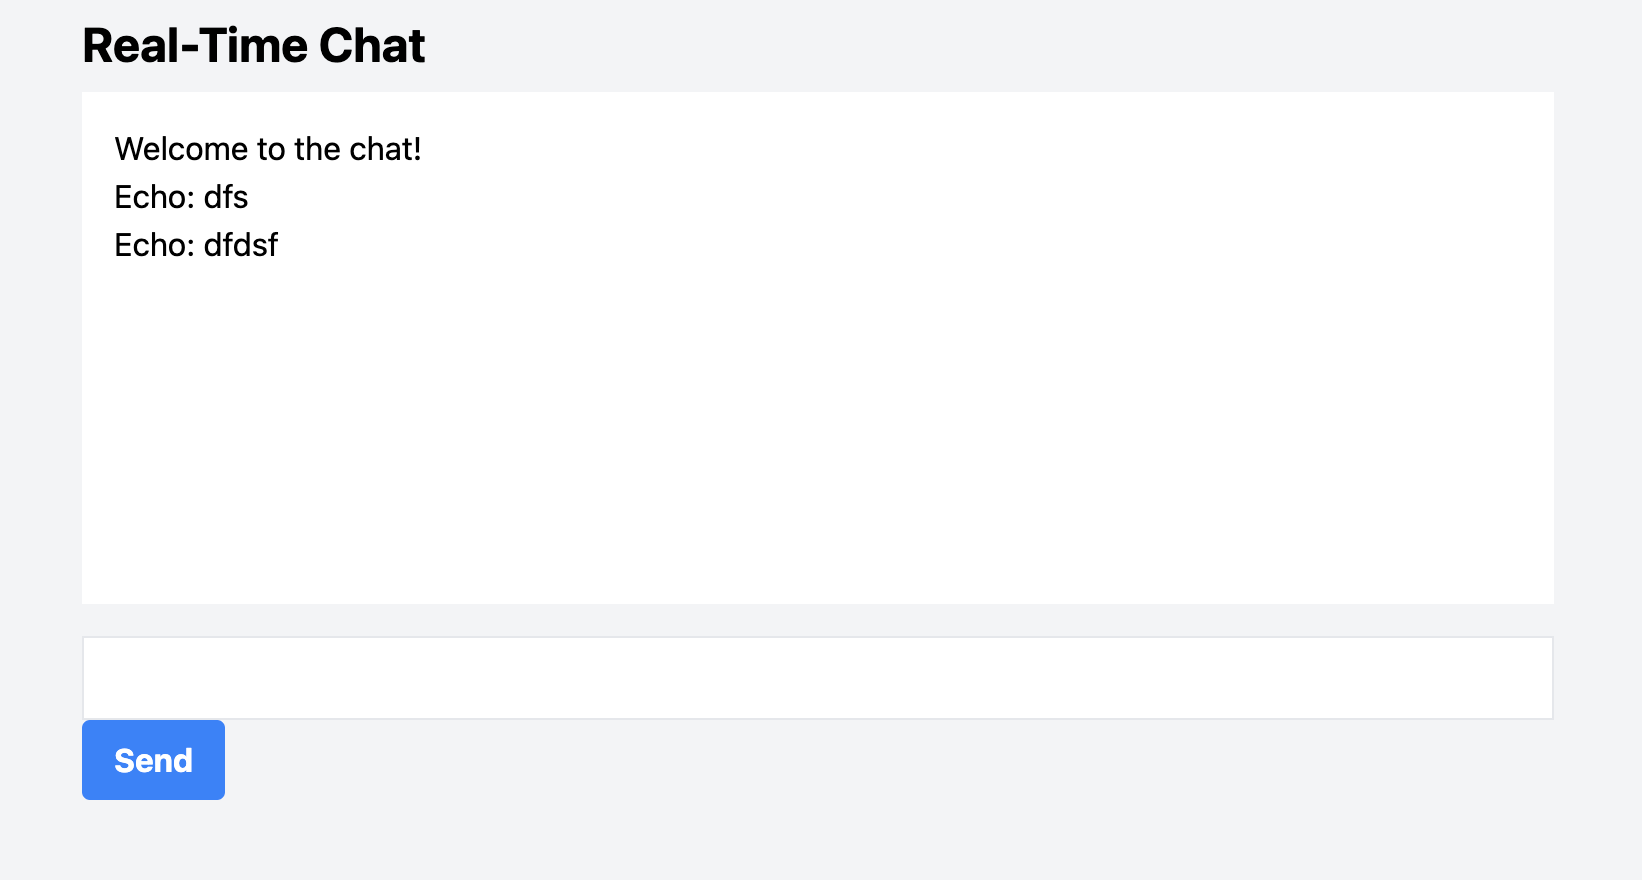
If you go to the Localhost://3000 you can see the chat interface and if you send the message you can see it in the chat box
Need JavaScript Chat API for your website or app
DeadSimpleChat is an Chat API provider
- Add Scalable Chat to your app in minutes
- 10 Million Online Concurrent users
- 99.999% Uptime
- Moderation features
- 1-1 Chat
- Group Chat
- Fully Customizable
- Chat API and SDK
- Pre-Built Chat
Bonus: Sending chat message to all the connected clients
In this section we are going to change the server code to send the message to all the connected clients instead of just the sender.
for this first we need to create an arry to store all the clients that are currently connected to the websocket server
// Array to store all the connected clients
const clients = [];
then edit the websocket code to
- add a client to the array whenever a new client is connected
wss.on('connection', function connection(ws) {
    console.log("WS connection arrived");

    // Add the new connection to our list of clients
    clients.push(ws);
    //...
- Broadcast the message to all the connected clients
    ws.on('message', function incoming(message) {
        console.log('received: %s', message);

        // Broadcast the message to all clients
        clients.forEach(client => {
            if (client.readyState === WebSocket.OPEN) {
                client.send(message.toString());
            }
        });
    });
- when the connection closes remove the client from the clients Array
    ws.on('close', () => {
        // Remove the client from the array when it disconnects
        const index = clients.indexOf(ws);
        if (index > -1) {
            clients.splice(index, 1);
        }
    });
here is how the complete server code looks like:
const express = require('express');
const http = require('http');
const WebSocket = require('ws');
const path = require('path');

const app = express();
const PORT = process.env.PORT || 3000;

// Serve static files from a 'public' directory
app.use(express.static(path.join(__dirname, 'public')));

// Create HTTP server by passing the Express app
const server = http.createServer(app);

// Integrate WebSocket with the HTTP server
const wss = new WebSocket.Server({ server });

// Array to keep track of all connected clients
const clients = [];

wss.on('connection', function connection(ws) {
    console.log("WS connection arrived");

    // Add the new connection to our list of clients
    clients.push(ws);

    ws.on('message', function incoming(message) {
        console.log('received: %s', message);

        // Broadcast the message to all clients
        clients.forEach(client => {
            if (client.readyState === WebSocket.OPEN) {
                console.log("message",message.toString())
                client.send(message.toString());
            }
        });
    });

    ws.on('close', () => {
        // Remove the client from the array when it disconnects
        const index = clients.indexOf(ws);
        if (index > -1) {
            clients.splice(index, 1);
        }
    });

    // Send a welcome message on new connection
    ws.send('Welcome to the chat!');
});

// Start the server
server.listen(PORT, () => {
    console.log(`Server running on port ${PORT}`);
});
Source Code
index.js
const express = require('express');
const http = require('http');
const WebSocket = require('ws');
const path = require('path');

const app = express();
const PORT = process.env.PORT || 3000;

// Serve static files from a 'public' directory
app.use(express.static(path.join(__dirname, 'public')));

// Create HTTP server by passing the Express app
const server = http.createServer(app);

// Integrate WebSocket with the HTTP server
const wss = new WebSocket.Server({ server });

// Array to keep track of all connected clients
const clients = [];

wss.on('connection', function connection(ws) {
    console.log("WS connection arrived");

    // Add the new connection to our list of clients
    clients.push(ws);

    ws.on('message', function incoming(message) {
        console.log('received: %s', message);

        // Broadcast the message to all clients
        clients.forEach(client => {
            if (client.readyState === WebSocket.OPEN) {
                console.log("message",message.toString())
                client.send(message.toString());
            }
        });
    });

    ws.on('close', () => {
        // Remove the client from the array when it disconnects
        const index = clients.indexOf(ws);
        if (index > -1) {
            clients.splice(index, 1);
        }
    });

    // Send a welcome message on new connection
    ws.send('Welcome to the chat!');
});

// Start the server
server.listen(PORT, () => {
    console.log(`Server running on port ${PORT}`);
});
index.html
<!DOCTYPE html>
<html lang="en">
<head>
    <meta charset="UTF-8">
    <meta name="viewport" content="width=device-width, initial-scale=1.0">
    <title>Chat App</title>
    <link href="https://cdn.jsdelivr.net/npm/tailwindcss@2.0.1/dist/tailwind.min.css" rel="stylesheet">
</head>
<body class="bg-gray-100">
    <div class="container mx-auto p-4">
        <h2 class="text-2xl font-bold mb-2">Real-Time Chat</h2>
        <div id="messages" class="bg-white p-4 h-64 overflow-auto mb-4"></div>
        <input type="text" id="messageInput" class="border p-2 w-full">
        <button id="sendButton" class="bg-blue-500 hover:bg-blue-700 text-white font-bold py-2 px-4 rounded">
            Send
        </button>
    </div>
    <script src="app.js"></script>
</body>
</html>
app.js
const ws = new WebSocket(`ws://${window.location.host}`);
const messages = document.getElementById('messages');
const messageInput = document.getElementById('messageInput');
const sendButton = document.getElementById('sendButton');

ws.onopen = () => {
    console.log('Connected to the server');
};

ws.onmessage = (event) => {
    const message = document.createElement('div');
    message.textContent = event.data;
    messages.appendChild(message);
};

ws.onerror = (error) => {
    console.error('WebSocket error:', error);
};

ws.onclose = () => {
    console.log('Disconnected from the server');
};

sendButton.onclick = () => {
    const message = messageInput.value;
    ws.send(message);
    messageInput.value = '';
};
Metered TURN servers
- Global Geo-Location targeting: Automatically directs traffic to the nearest servers, for lowest possible latency and highest quality performance. less than 50 ms latency anywhere around the world
- Servers in 12 Regions of the world: Toronto, Miami, San Francisco, Amsterdam, London, Frankfurt, Bangalore, Singapore,Sydney (Coming Soon: South Korea, Japan and Oman)
- Low Latency: less than 50 ms latency, anywhere across the world.
- Cost-Effective: pay-as-you-go pricing with bandwidth and volume discounts available.
- Easy Administration: Get usage logs, emails when accounts reach threshold limits, billing records and email and phone support.
- Standards Compliant: Conforms to RFCs 5389, 5769, 5780, 5766, 6062, 6156, 5245, 5768, 6336, 6544, 5928 over UDP, TCP, TLS, and DTLS.
- Multi‑Tenancy: Create multiple credentials and separate the usage by customer, or different apps. Get Usage logs, billing records and threshold alerts.
- Enterprise Reliability: 99.999% Uptime with SLA.
- Enterprise Scale: With no limit on concurrent traffic or total traffic. Metered TURN Servers provide Enterprise Scalability
- 50 GB/mo Free: Get 50 GB every month free TURN server usage with the Free Plan
- Runs on port 80 and 443
- Support TURNS + SSL to allow connections through deep packet inspection firewalls.
- Support STUN
- Supports both TCP and UDP
Ready to Add Chat to Your Website?
Get started for free. No credit card required.
Start a Free Trial
![Webinar Chat: The Complete Guide to Engaging Your Audience [2026]](/blog/content/images/size/w600/2026/02/article-hero-webinar-chat.svg)