Embedding Chat on Your Website
A Dead Simple Chat room is a page on the internet, and putting it on your site is a copy-and-paste job. There are two shapes it can take, and the dashboard writes the code for both:
- Embed Chat Frame — a panel of chat sitting in the page, like an embedded video. It is an
<iframe>. - Embed Chat Bubble — a circular button pinned to the corner of the page that opens a chat panel
over the top of your content. It is a pair of
<script>tags.
Everything else on this page is the detail: where the code comes from, how to size it, and which of the two to reach for.
Where the embed code lives
Open the Dead Simple Chat dashboard, go to Chat Rooms, click the room you want, and open the Embed Info tab. The panel is headed Embed Instructions.
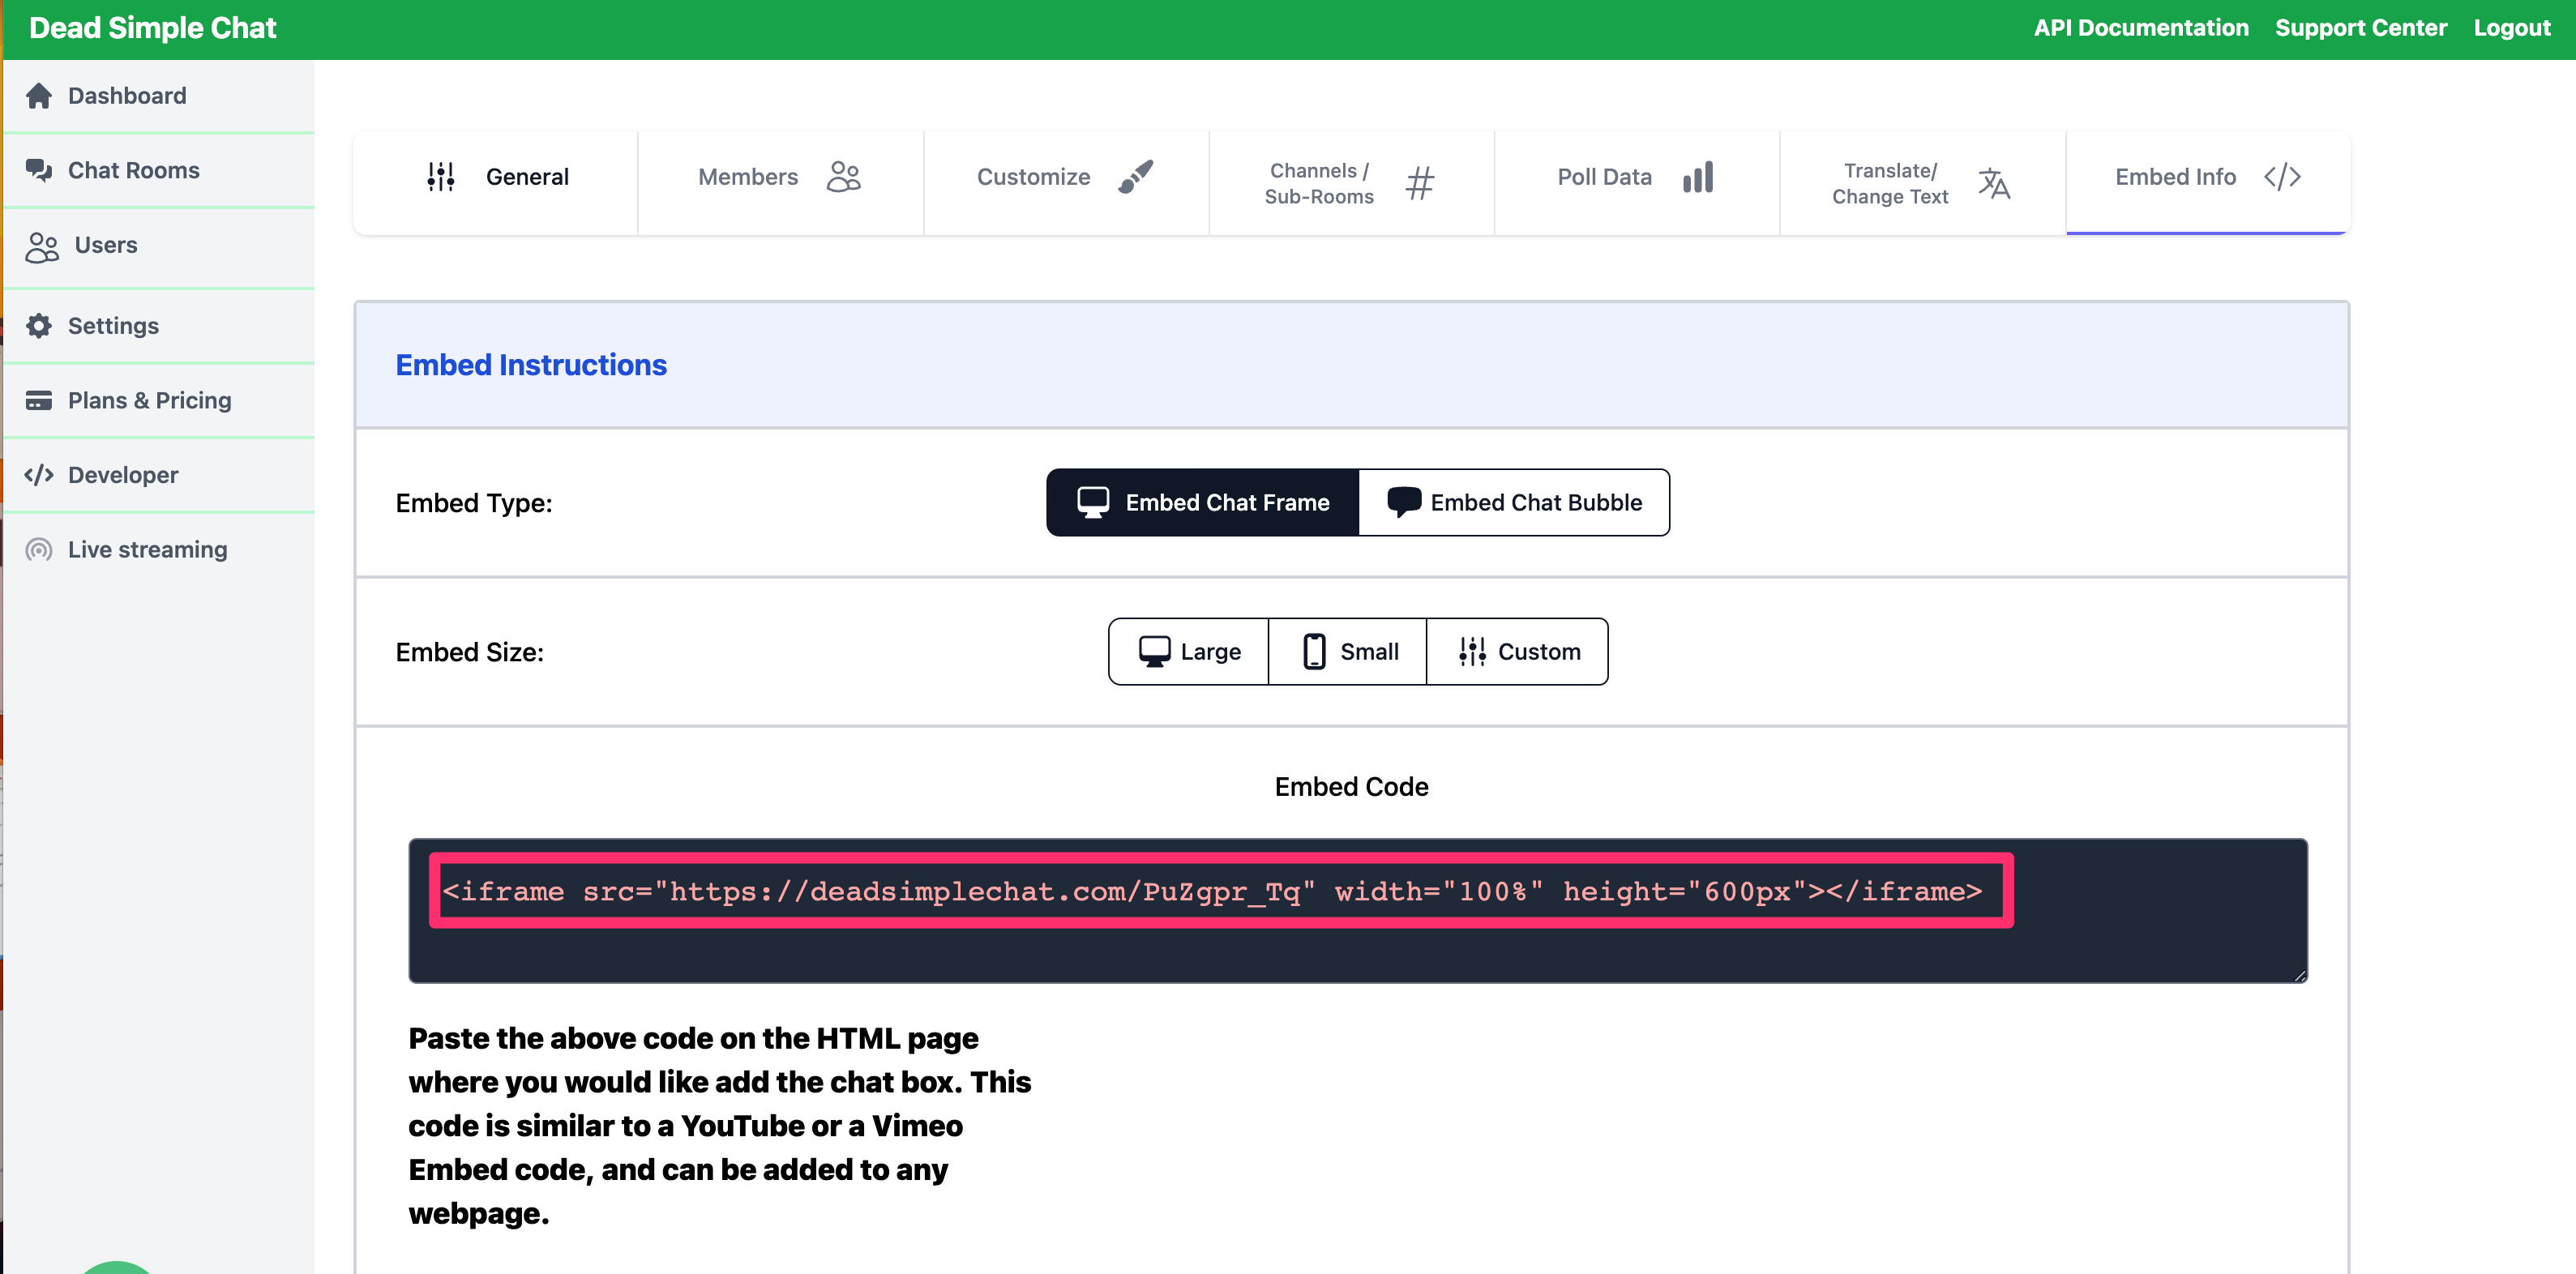
Three controls sit above the code, and the code under them rewrites itself as you change them:
| Control | Choices | Applies to |
|---|---|---|
| Embed Type | Embed Chat Frame, Embed Chat Bubble | both |
| Embed Size | Large, Small, Custom | both |
| Chat Bubble State | Default Open, Default Closed | the bubble only |
Chat Bubble State appears only once Embed Chat Bubble is selected. Selecting the bubble also moves Embed Size to Small, which is the sensible size for a corner panel — change it afterwards if you want something else.
Below the controls is the Embed Code box, and below that a live preview of what those choices produce — the room at the size you picked, or a working bubble in its chosen state — so you can see what a visitor will get before you paste anything anywhere.
Nothing on this tab is a saved setting. It is a code generator: the choices shape the snippet it writes out, and the snippet is then yours. Changing Embed Size here does not resize a chat you embedded last week — you would change the numbers in the code on your own page.
Which one should I use?
| Chat frame | Chat bubble | |
|---|---|---|
| What the visitor sees | A panel in the flow of the page | A button in the corner, opening over the page |
| What you paste | One <iframe> tag | Two <script> tags |
| Takes up page space | Yes, wherever you put it | No |
| Can start open | It is always visible | Your choice — Default Open or Default Closed |
| Works with the JavaScript SDK | Yes | No |
Needs <script> to be allowed on the page | No | Yes |
Choose the chat frame when the chat is part of the page: a live event next to the player, a
support room on a contact page, a community room that is the reason the page exists. It is also the
one to choose when you plan to drive the chat from your own code, because the
JavaScript SDK attaches to an <iframe> you have placed on the page and
given an id to.
Choose the chat bubble when the chat is an offer rather than the content: a help channel that should be available on every page of a site without claiming any of the layout. It is also the easier fit for a site whose page templates you do not want to redesign.
Choose both if it suits you. They are just two ways of loading the same room, so a bubble on every page of your site and a frame on the one page that is really about the conversation will put everyone in the same room.
Some site builders and content editors strip <script> tags out of page content. Where that is the
case the chat frame still works and the bubble does not — see
Embedding chat in WordPress and
Embedding chat in Wix.
Embed Size
Embed Size means different things to the two embed types, because a panel in the page and a panel that opens over the page are sized differently.
Custom reveals Enter Width and Enter Height boxes, each with a unit next to it — px, rem or %.
Sizing the chat frame
The size becomes the width and height of the <iframe>:
| Embed Size | Generated size |
|---|---|
| Large | width="100%" height="600px" |
| Small | width="400px" height="600px" |
| Custom | the width and height you type, with the unit you pick |
Large is the usual choice: a full-width chat that takes its width from whatever container you drop it into, and a fixed 600 px of height. Small is a fixed-width column, useful beside something else.
Whatever you pick under Custom goes straight into those two attributes, and the width and
height attributes of an <iframe> are read as pixels or as a percentage — so px and % land
as typed. To size a frame in rem, or to make the height respond to the viewport, set it in CSS
instead and drop the attributes:
<iframe src="https://deadsimplechat.com/YOUR_ROOM_ID"
        style="width: 100%; height: 70vh; border: 0;"></iframe>
That is also the place to remove the default frame border, which the generated snippet leaves alone.
Sizing the chat bubble
The closed bubble is always the same: a small circle fixed 20 px from the bottom-right corner of the window. Embed Size decides how big the panel is when somebody opens it:
| Embed Size | Panel when open |
|---|---|
| Small | about 450 x 680 px |
| Large | about 850 x 680 px |
| Custom | exactly the width and height you give |
On a narrow screen — 600 px wide or less — Small and Large both open the panel full screen, so a phone gets a usable chat rather than a postage stamp of one.
The bubble reads width and height as quoted strings ending in px, so a custom bubble snippet
should read width: "800px", height: "600px". A bubble panel is a fixed overlay rather than part of
your layout, so percentages and rem have nothing to be relative to; pick Small, Large, or
pixels.
The chat frame
Set Embed Type to Embed Chat Frame, choose a size, and the Embed Code box gives you a single tag:
<iframe src="https://deadsimplechat.com/YOUR_ROOM_ID" width="100%" height="600px"></iframe>
YOUR_ROOM_ID is the room's Room ID, which is also shown on the room's General tab — see
Chat Room Settings Reference. It is the only part
of the snippet that is specific to your room, which means you can write the tag by hand once you
know it.
Paste it into the HTML of your page wherever the chat should appear. It behaves like a YouTube or Vimeo embed: no other tags, no stylesheet, no build step.
Give it an id if you plan to use the SDK. The JavaScript SDK finds the
frame by id and talks to it from there:
<iframe id="chat-frame" src="https://deadsimplechat.com/YOUR_ROOM_ID"
        width="100%" height="600px"></iframe>
The same room can be embedded in as many places as you like. Every frame pointing at the same Room ID is the same conversation, so a chat on your homepage and a chat on your event page share one room, one history and one set of participants. To keep conversations apart, use separate rooms — or one room with channels.
The chat bubble
Set Embed Type to Embed Chat Bubble and the Embed Code box gives you two script tags instead: one that loads the bubble, and one that starts it with your settings.
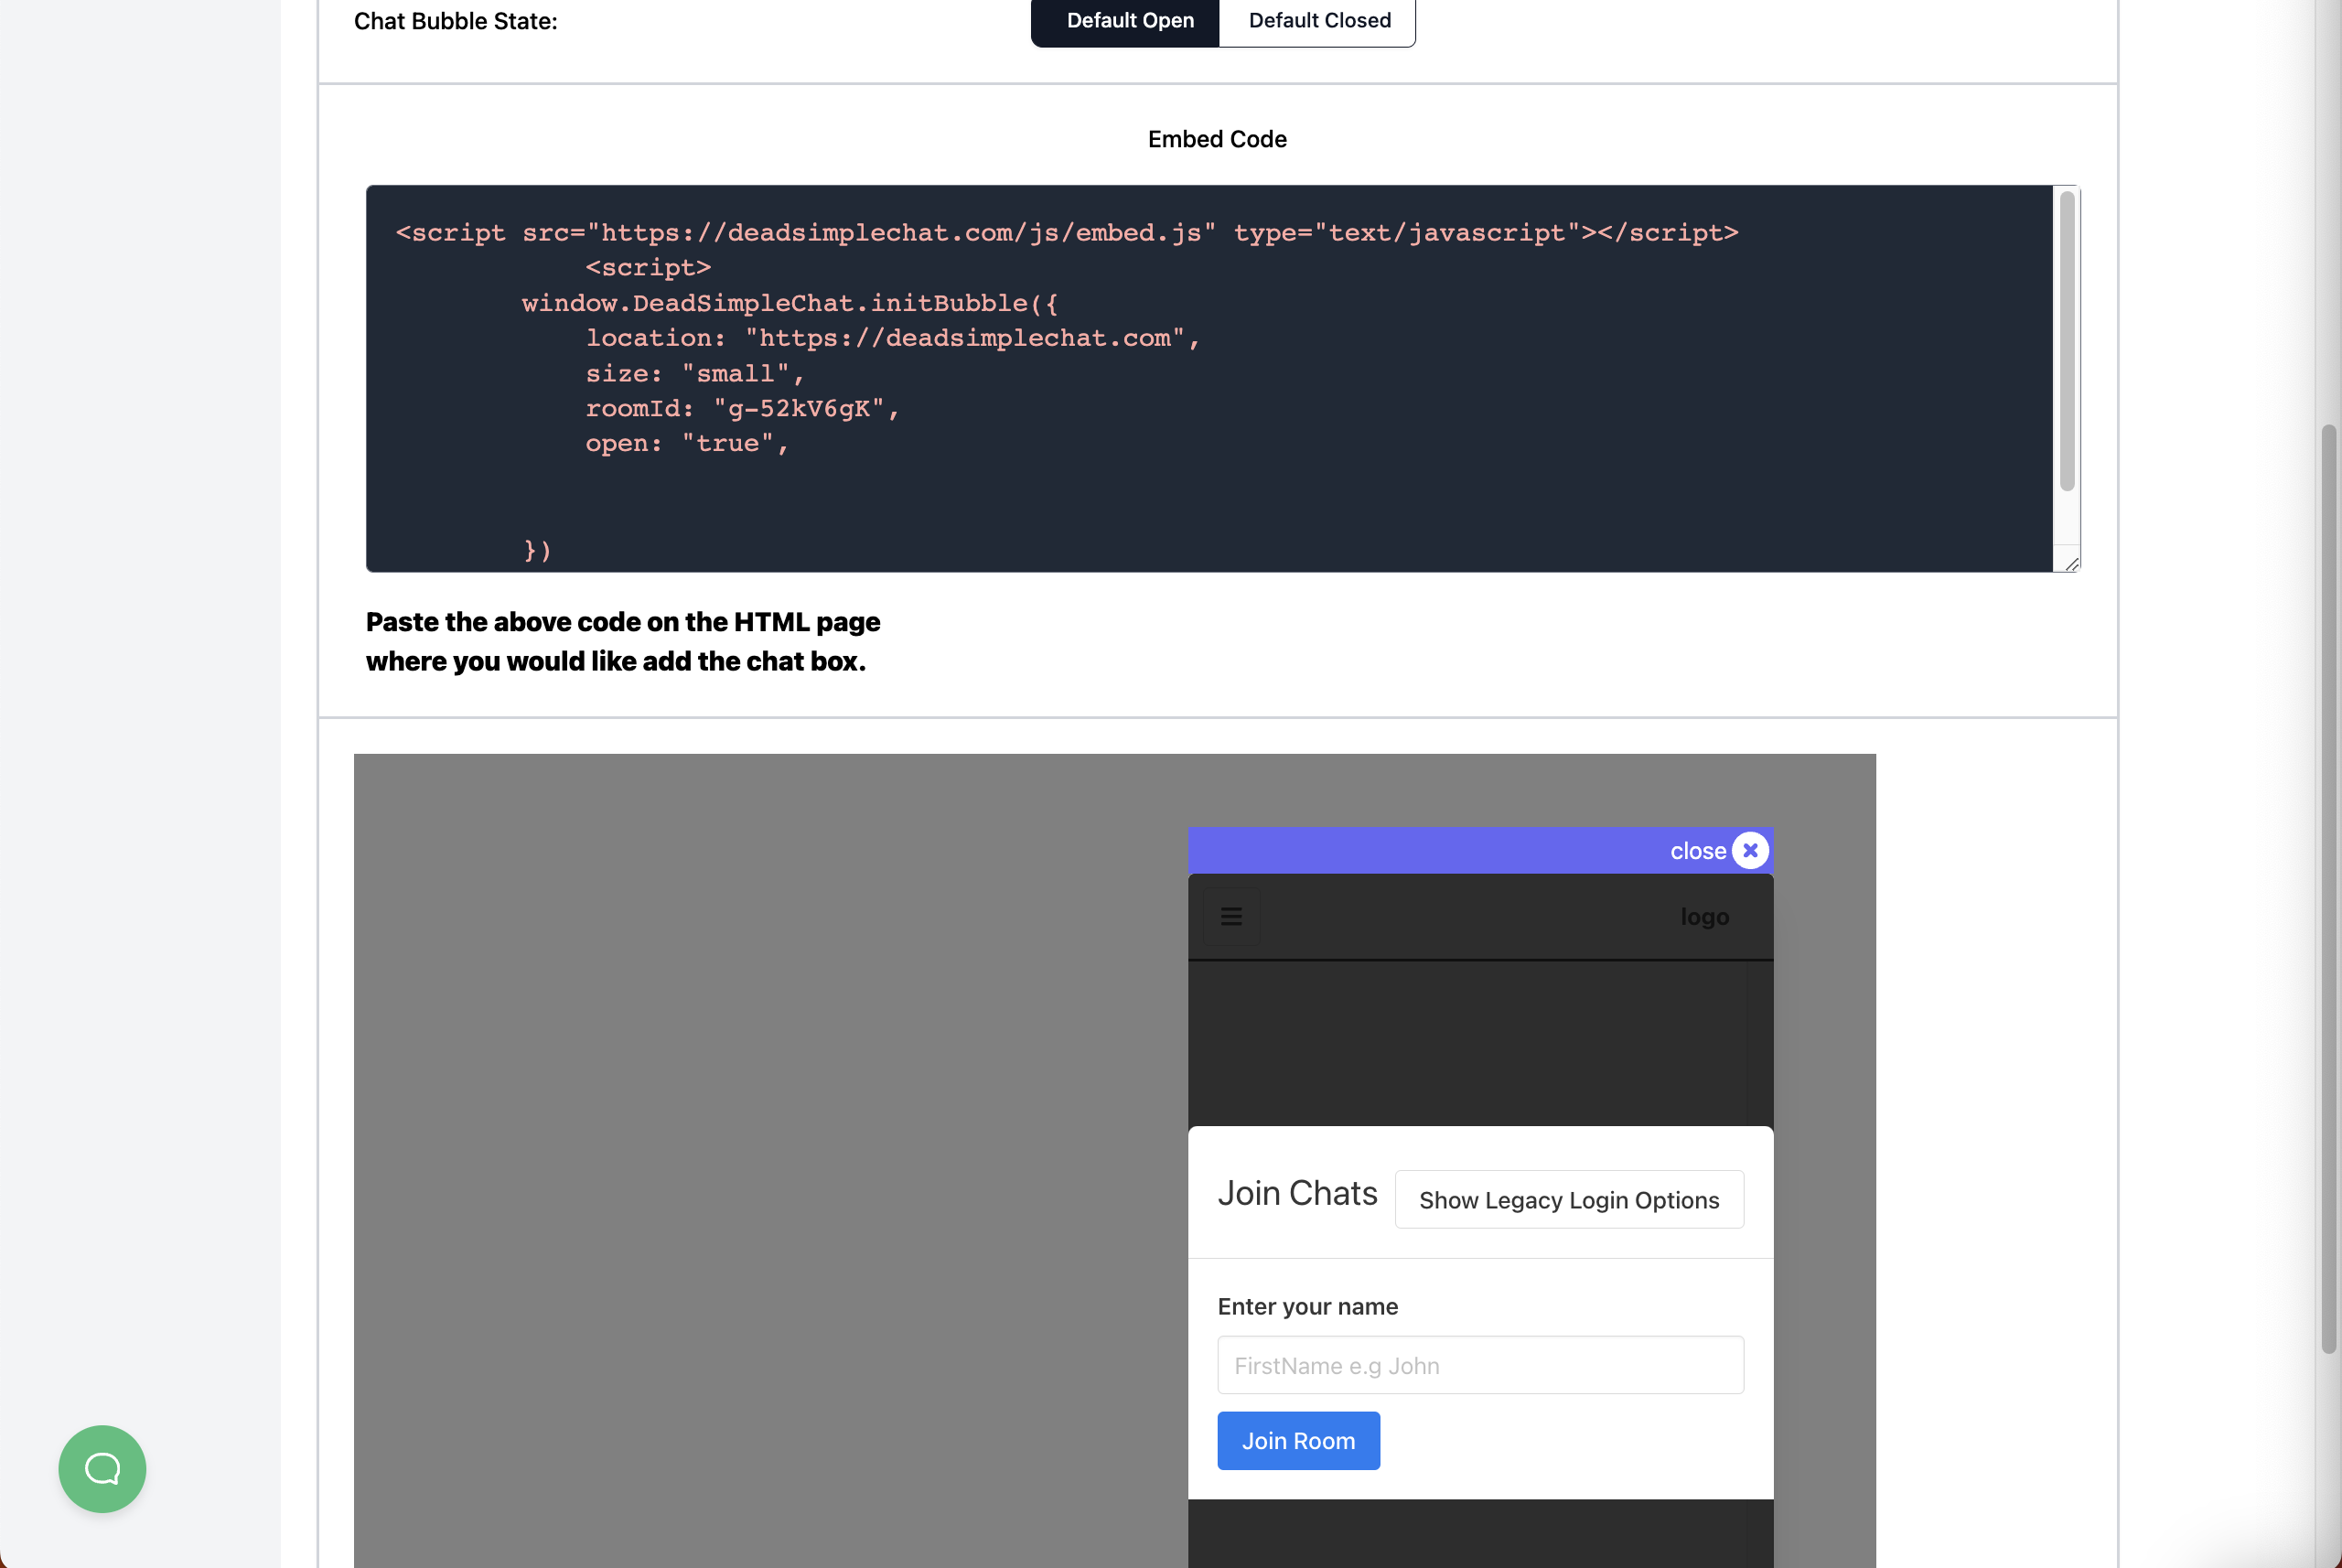
<script src="https://deadsimplechat.com/js/embed.js" type="text/javascript"></script>
<script>
    window.DeadSimpleChat.initBubble({
        location: "https://deadsimplechat.com",
        size: "small",
        roomId: "YOUR_ROOM_ID",
        open: "true"
    })
</script>
Both tags are needed, and in that order — the first one defines window.DeadSimpleChat, the second
one calls it.
Where to put the snippet
Inside <body>, not in <head>. The snippet draws the bubble into the page at the moment it
runs, so it needs a page body to draw into. The end of the body is the natural home, which is also
what most site builders mean by a "footer" or "body end" code slot.
Once per page. A second copy of the snippet on the same page starts a second bubble.
On every page you want it on. Unlike a frame, a bubble is usually meant to follow the visitor around, so it belongs in a site-wide template or a site-wide custom-code slot rather than in the body of a single post.
The options
initBubble takes one object. The dashboard fills in the first four; the rest are yours to add.
| Option | What it does |
|---|---|
roomId | Required. The Room ID of the room to open. Without it the bubble does not start. |
location | Where the chat room is served from. The generated snippet fills this in; leave it as given. |
size | "small", "large" or "custom". It must be one of those three. |
width, height | Required when size is "custom". Quoted strings ending in px, for example "800px". |
open | "true" starts the panel open, "false" starts it closed. This is what Chat Bubble State sets. |
username | Joins the visitor under this name instead of asking. Public rooms only — see Basic SSO. |
uniqueUserIdentifier | Joins the visitor as that user — see SSO Using Unique User Identifier. |
accessToken | Joins the visitor with an access token — see SSO Using Auth Token. |
A bubble that signs in the person already signed in to your own site therefore looks like this, with your server filling in the token:
<script src="https://deadsimplechat.com/js/embed.js" type="text/javascript"></script>
<script>
    window.DeadSimpleChat.initBubble({
        location: "https://deadsimplechat.com",
        size: "small",
        roomId: "YOUR_ROOM_ID",
        open: "false",
        accessToken: "ACCESS_TOKEN_FOR_THIS_PERSON"
    })
</script>
Default Open or Default Closed
Default Closed is the right answer almost every time. The bubble sits in the corner, the page loads at its normal speed, and the chat opens when somebody wants it.
Default Open puts the panel on screen as soon as the page loads. It is for pages where the chat is the point — a live event page, a webinar holding page — and worth thinking twice about elsewhere, because on a phone an open bubble covers the whole screen.
The look of the bubble
The circle, its icon, and the bar across the top of the open panel are all styled from the room's Customize tab, in the Chat Bubble Customization group. See Chat Bubble Color, Icon Color and Header colours in the Appearance Reference.
Signing people in through the embed
By default, whoever opens the page meets the room's join screen and identifies themselves there. What that screen offers depends on the room's permission level, and you can trim it down or take it away entirely — see Configuring the Join Screen.
If your site already knows who the visitor is, you can put the credential into the embed and skip
the join screen. For the frame, it goes on the end of the src:
<iframe src="https://deadsimplechat.com/YOUR_ROOM_ID?accessToken=ACCESS_TOKEN_FOR_THIS_PERSON"
        width="100%" height="600px"></iframe>
For the bubble, it goes in the options object as shown above. Either way the three routes are the
same three the join screen offers — username, uniqueUserIdentifier and accessToken — and which
of them your room accepts is decided by its permission level.
The full treatment of each is in SSO Using Unique User Identifier, SSO Using Auth Token and Basic SSO.
An access token identifies one person. Generate it on your server for the visitor in front of you and write it into the page you send them — do not hard-code one token into a page that many people load, or they will all arrive as the same user.
Embedding somewhere that is not plain HTML
If you control the HTML of your pages, the snippets above are the whole story. If your site is built in something that edits pages for you, the code still works but you need the right place to put it:
The principle in any other builder is the same: find the block, widget or setting that accepts raw HTML, and paste the snippet into it unaltered. Builders that reformat or "clean" what you paste are the ones to watch — if the code comes back changed, look for a dedicated HTML or embed block rather than pasting into a rich-text field.
Related pages
- Chat Room Settings Reference — the Room ID and everything else on the General tab
- Configuring the Join Screen — what a visitor is asked for before they enter
- Chat Room Permission Levels — who is allowed in
- Appearance Reference — colours, fonts and sizes, including the bubble
- Hide Elements Reference — paring the room back to fit a narrow embed
- JavaScript SDK Quick Start — driving an embedded frame from your own code
- Contact support