Quick Start
This page takes you from a new account to a working chat room on your site. It is the orientation map for the rest of the Support Hub: each step is short, and points at the page that covers that subject properly.
You do not need to write any code to finish it. The only thing you paste anywhere is the embed snippet at step 5.
This page is for setting a room up in the dashboard.
The JavaScript Chat SDK Quick Start is for the other half — controlling a room you have already embedded from your own JavaScript, so you can send messages, listen for events, log users in and style the room per visitor. Do this page first; the SDK needs a room ID and an embedded room, and both come out of step 5.
The shape of it
| Step | Where | What you get |
|---|---|---|
| 1 | Create Chat Room page | A room, and its Room ID |
| 2 | Room → General | Who can join, and how the room behaves |
| 3 | Room → Customize | Colours, fonts, and a shorter interface |
| 4 | Room → Translate/Change Text | The wording people see |
| 5 | Room → Embed Info | The snippet that puts the room on your page |
| 6 | Room → Members, and the room itself | People, and someone to moderate them |
Steps 2 to 4 are optional — a room created at step 1 already works. Come back to them once it is on your page and you can see what you are changing.
Step 1: Create the room
Sign in at the Dead Simple Chat dashboard. Click Create Chat room — the button is on the Dashboard, and again at the top of the Chat Rooms page.
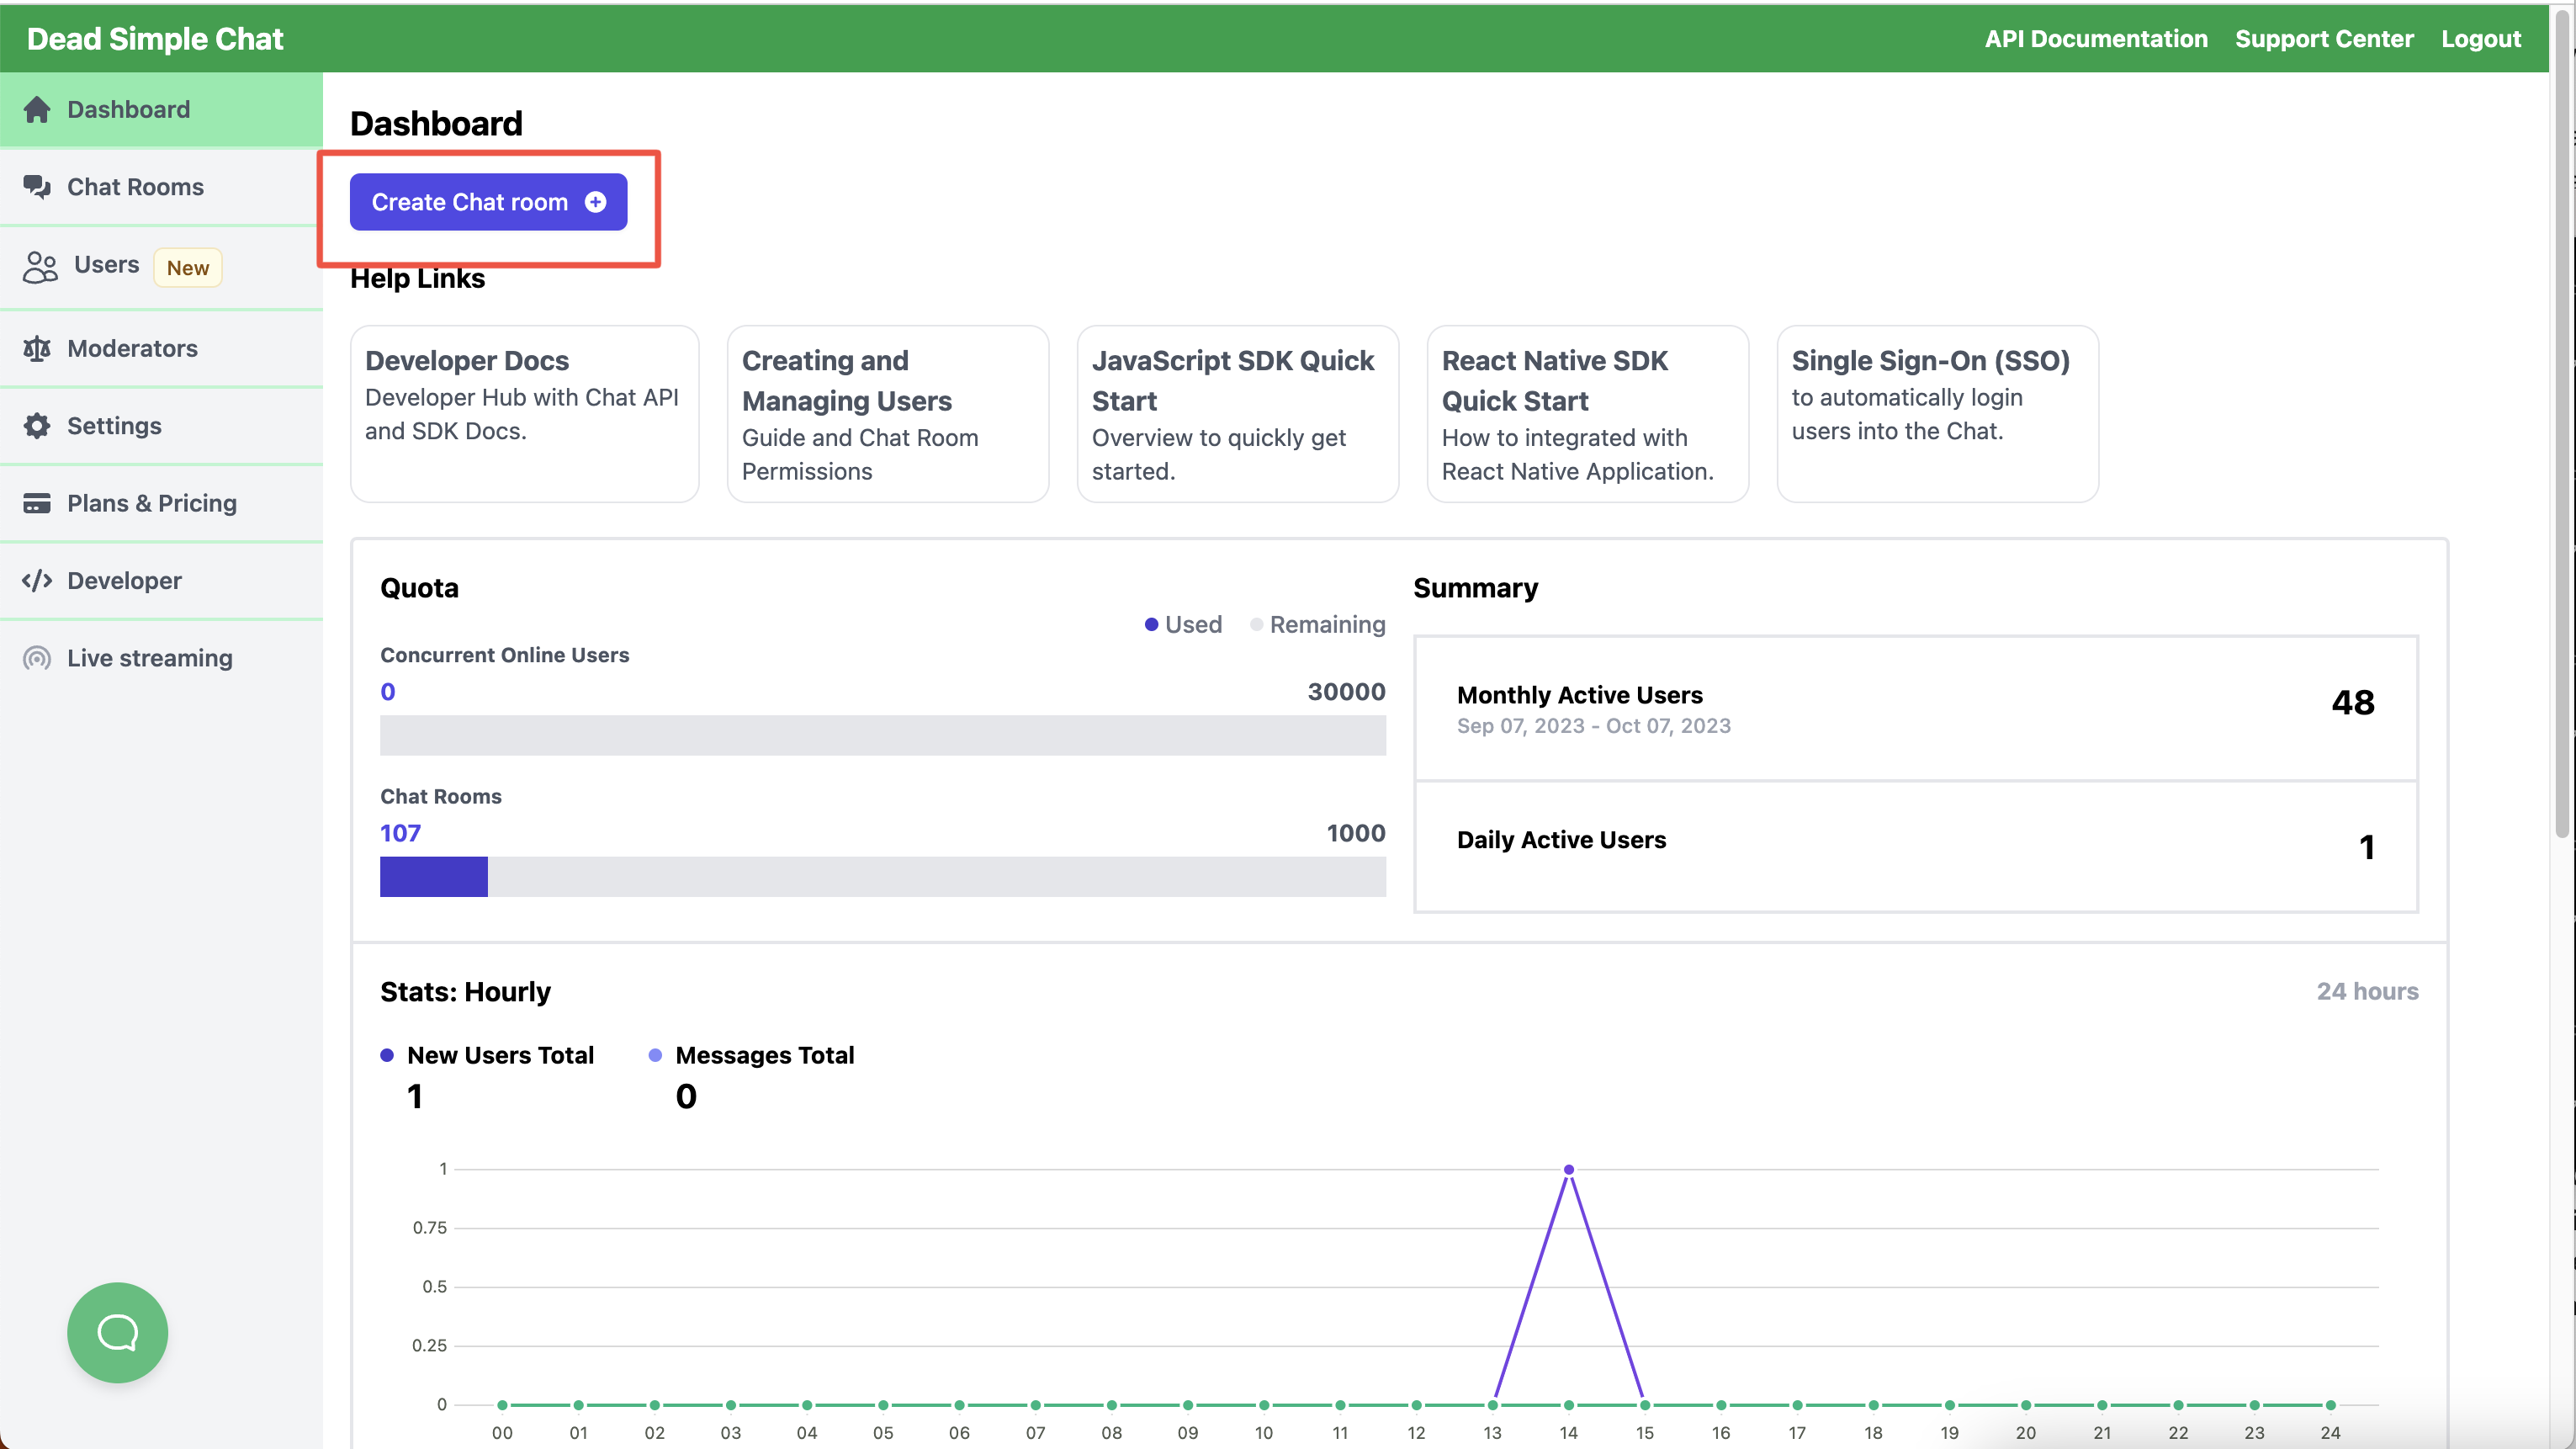 The Create Chat room button. The Chat Rooms page has the same button, plus counts of the rooms you have and the rooms you have left.
The Create Chat Room page asks for three things, and only three:
- Name — required. It identifies the room in your dashboard. It is also shown to people in the room if you switch on channels at step 2, where it labels the main room in the sidebar's channel list. Name it as though people will read it.
- Description — optional, and for your own reference. Nobody in the room sees it.
- Logo — optional. A logo uploaded here appears in this room's header and overrides the account-wide logo set under Settings → Branding, for this room only.
Click Save.
Password protection, Q&A / pre-moderation, 1-1 chat, channels, permission levels, file sharing and polls are not on the Create Chat Room page. They appear on the room's General tab, which is exactly where Save drops you — so you lose nothing by creating the room first and configuring it second. That is the intended order, not a detour.
If your plan's room allowance is already used up, saving returns a prompt to upgrade instead of creating the room. The Chat Rooms page shows how many you have left; see pricing for what each plan includes.
Your Room ID
The room you just created has a Room ID — a short string like pfJF-Vmx6. It is at the top of the
General tab, with an Open button beside it that opens the live room in a new tab.
Two things use it constantly, so it is worth knowing where it lives:
- The room's own URL is
https://deadsimplechat.com/<your-room-id>. That link is the whole product if you do not want to embed anything — send it to people and they are in the room. - The SDK and the REST API both address rooms by it.
Step 2: Set the room up
You are now on the room's General tab, and the rest of the settings are below the Name and Description card.
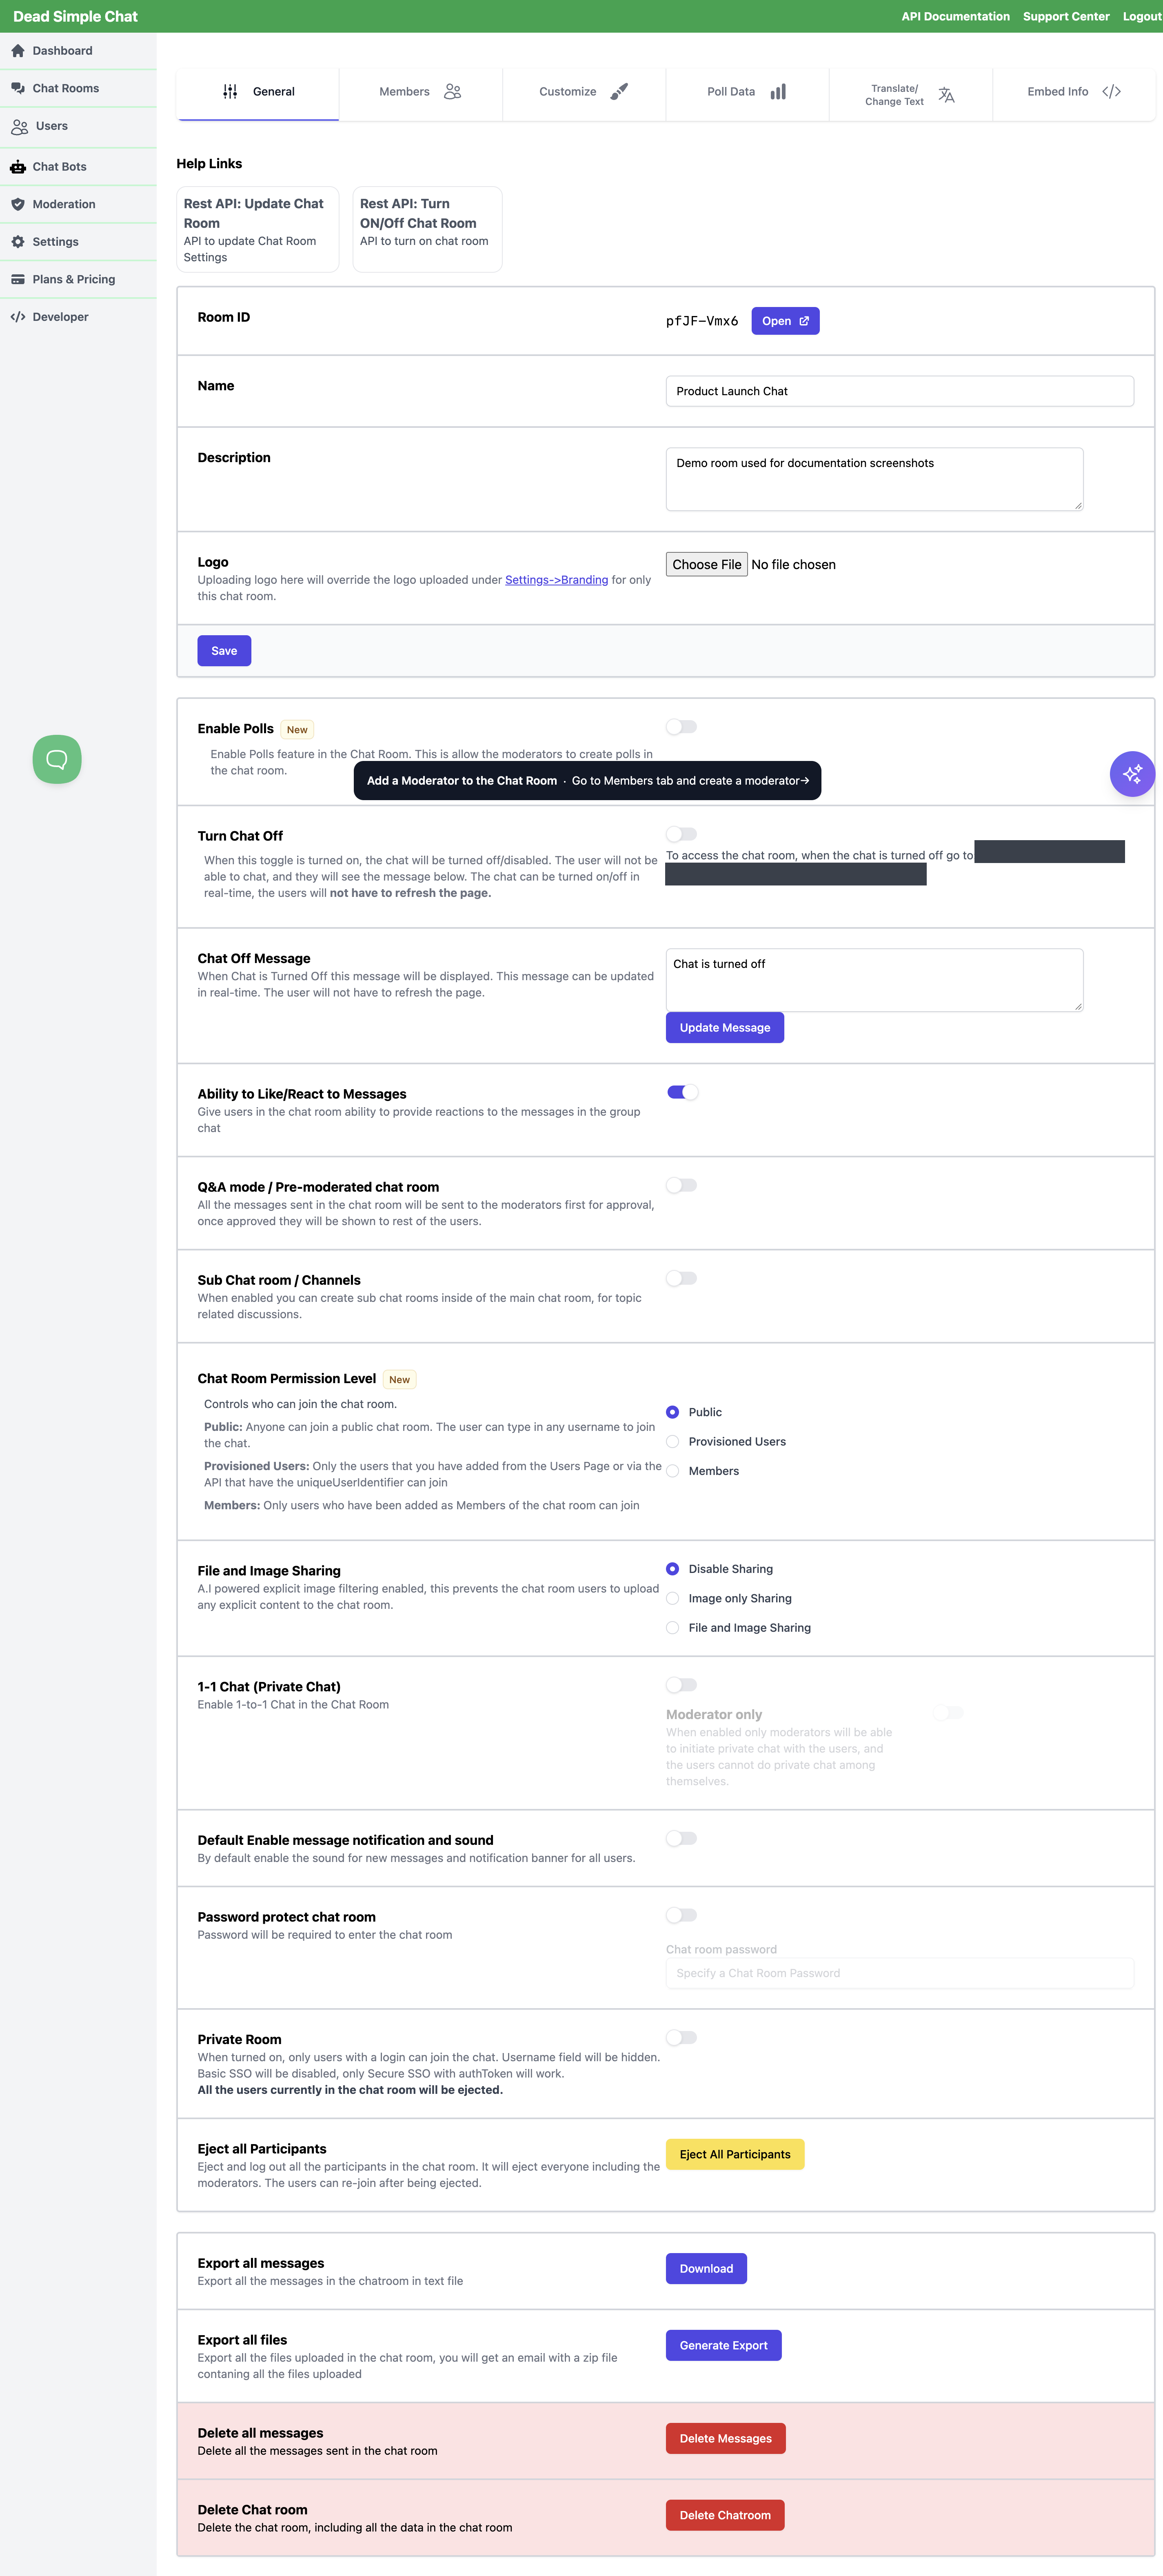 The General tab. Name, Description and Logo at the top — the card you filled in at step 1 — and every other setting below it.
The tabs across the top are the room: General, Members, Customize, Poll Data, Translate/Change Text and Embed Info, plus Channels/Sub-Rooms once you switch channels on.
Three decisions are worth making now, because they change what everything else means:
Who is allowed in. Chat Room Permission Level is the first thing checked when somebody opens the room. Public lets anyone in by typing a username; Provisioned Users limits it to people who exist in your account; Members limits it to people you have added to that one room. This decides both what the join screen offers and which credentials the room will accept — see Chat Room Permission Levels.
Whether messages appear immediately. Q&A mode / Pre-moderated chat room holds every message for a moderator to approve before anyone else sees it. Useful for a public livestream, needlessly slow for a team room.
Whether the room has rooms inside it. Sub Chat room / Channels splits one room into topics. Switching it on adds a Channels/Sub-Rooms tab where you create and name them.
Everything else on the tab — reactions, file and image sharing, 1-1 chat, notification defaults, password protection, private rooms, turning the chat off, exporting and deleting messages — is covered field by field, with its default and its REST API field, in the Chat Room Settings Reference.
Everything below the Save button saves the moment you change it — there is no second Save button and no confirmation. The one exception is Chat Off Message, which has its own Update Message button. A few controls are not on every plan; where one is not, an upgrade prompt appears over it instead — see pricing.
Two ready-made paths through this tab, if one matches what you are building:
Step 3: Make it look like yours
Open the Customize tab.
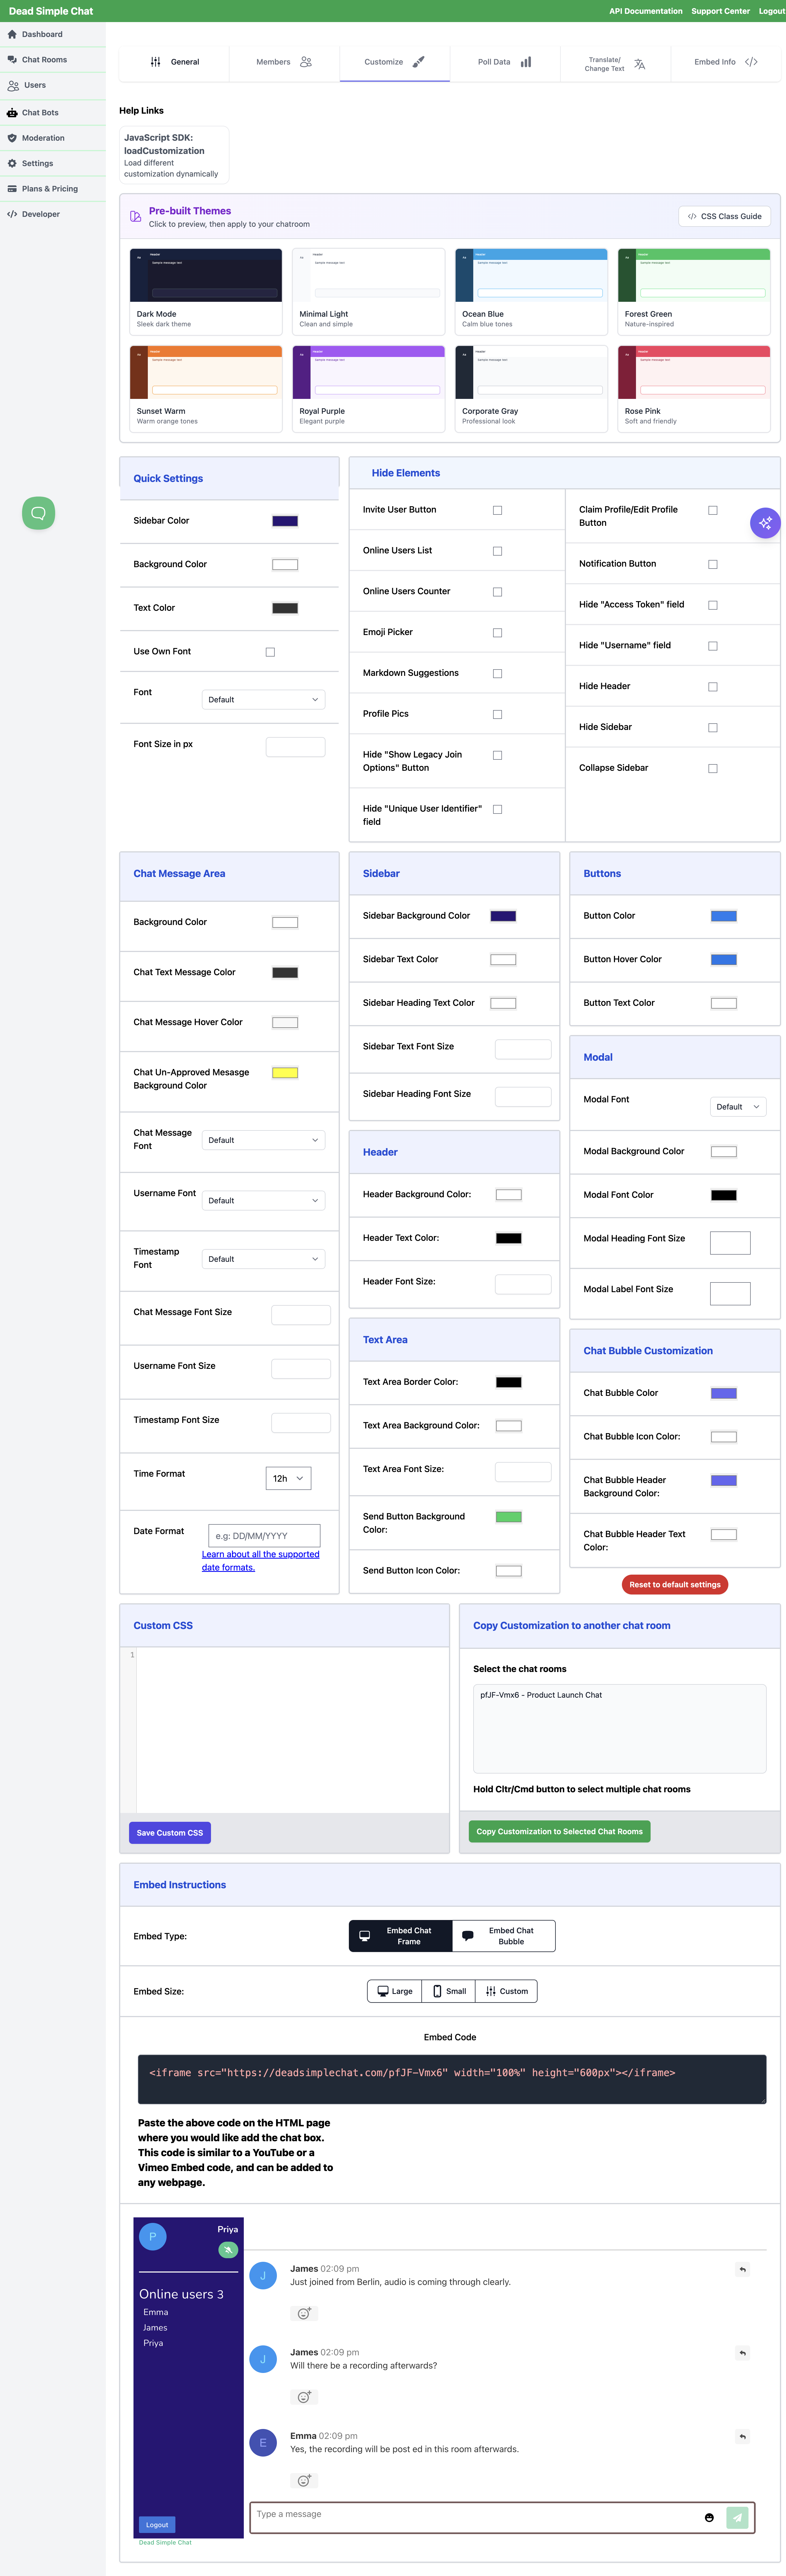 The Customize tab: pre-built themes, Quick Settings and Hide Elements at the top, the detailed panels below, and a live preview of the room at the bottom.
Four things are worth knowing before you start clicking:
- There is a live preview at the bottom of the tab. Scroll down and you are looking at the actual room. Changes save themselves about a second after you stop editing, and the preview reloads — there is no Save button for appearance fields. The Custom CSS box is the exception and has its own Save Custom CSS button.
- Start with a theme or with Quick Settings. Pre-built Themes previews a complete colour set and applies it on Apply Theme. Quick Settings — sidebar colour, background, text colour, font, font size — fans out into the detailed fields below it. Set these first and adjust individual fields afterwards; going the other way round overwrites your detailed work.
- Hide Elements is a separate panel from colours. It takes things out of the interface altogether: the online users list, the emoji picker, profile pictures, the header, the sidebar, individual join-modal fields. It is how you get a full room down to something that fits a narrow embed.
- You do not have to do it twice. Copy Customization to another chat room pushes the whole set to your other rooms in one go.
Field-by-field detail, including the loadCustomization key for each one:
Appearance Reference and
Hide Elements Reference.
Step 4: Change the wording
Open the Translate/Change Text tab if you want the room in another language, or if a label is not quite the phrase your users would use — "Set a username" reading Enter your name, say.
Quick Language Select fills every field with a supplied language in one go, and you can override any individual string on top of that, or on its own, in English. Full detail: Translate and Relabel.
Step 5: Put it on your page
Open the Embed Info tab. It generates the snippet for you; there is nothing to write.
Three controls decide what the snippet says:
- Embed Type — Embed Chat Frame puts the room inline in your page, as a block of it. Embed Chat Bubble puts a floating launcher in the corner instead, which opens over the page.
- Embed Size — Large (full width, 600px tall), Small (400px by 600px), or Custom,
which reveals Enter Width and Enter Height boxes with a
px/rem/%unit each. Use%for a room that stretches with your layout,pxfor a fixed one. - Chat Bubble State — for the bubble only: whether it starts Default Open or Default Closed.
Below them is the Embed Code box, and below that a live preview of what you have configured.
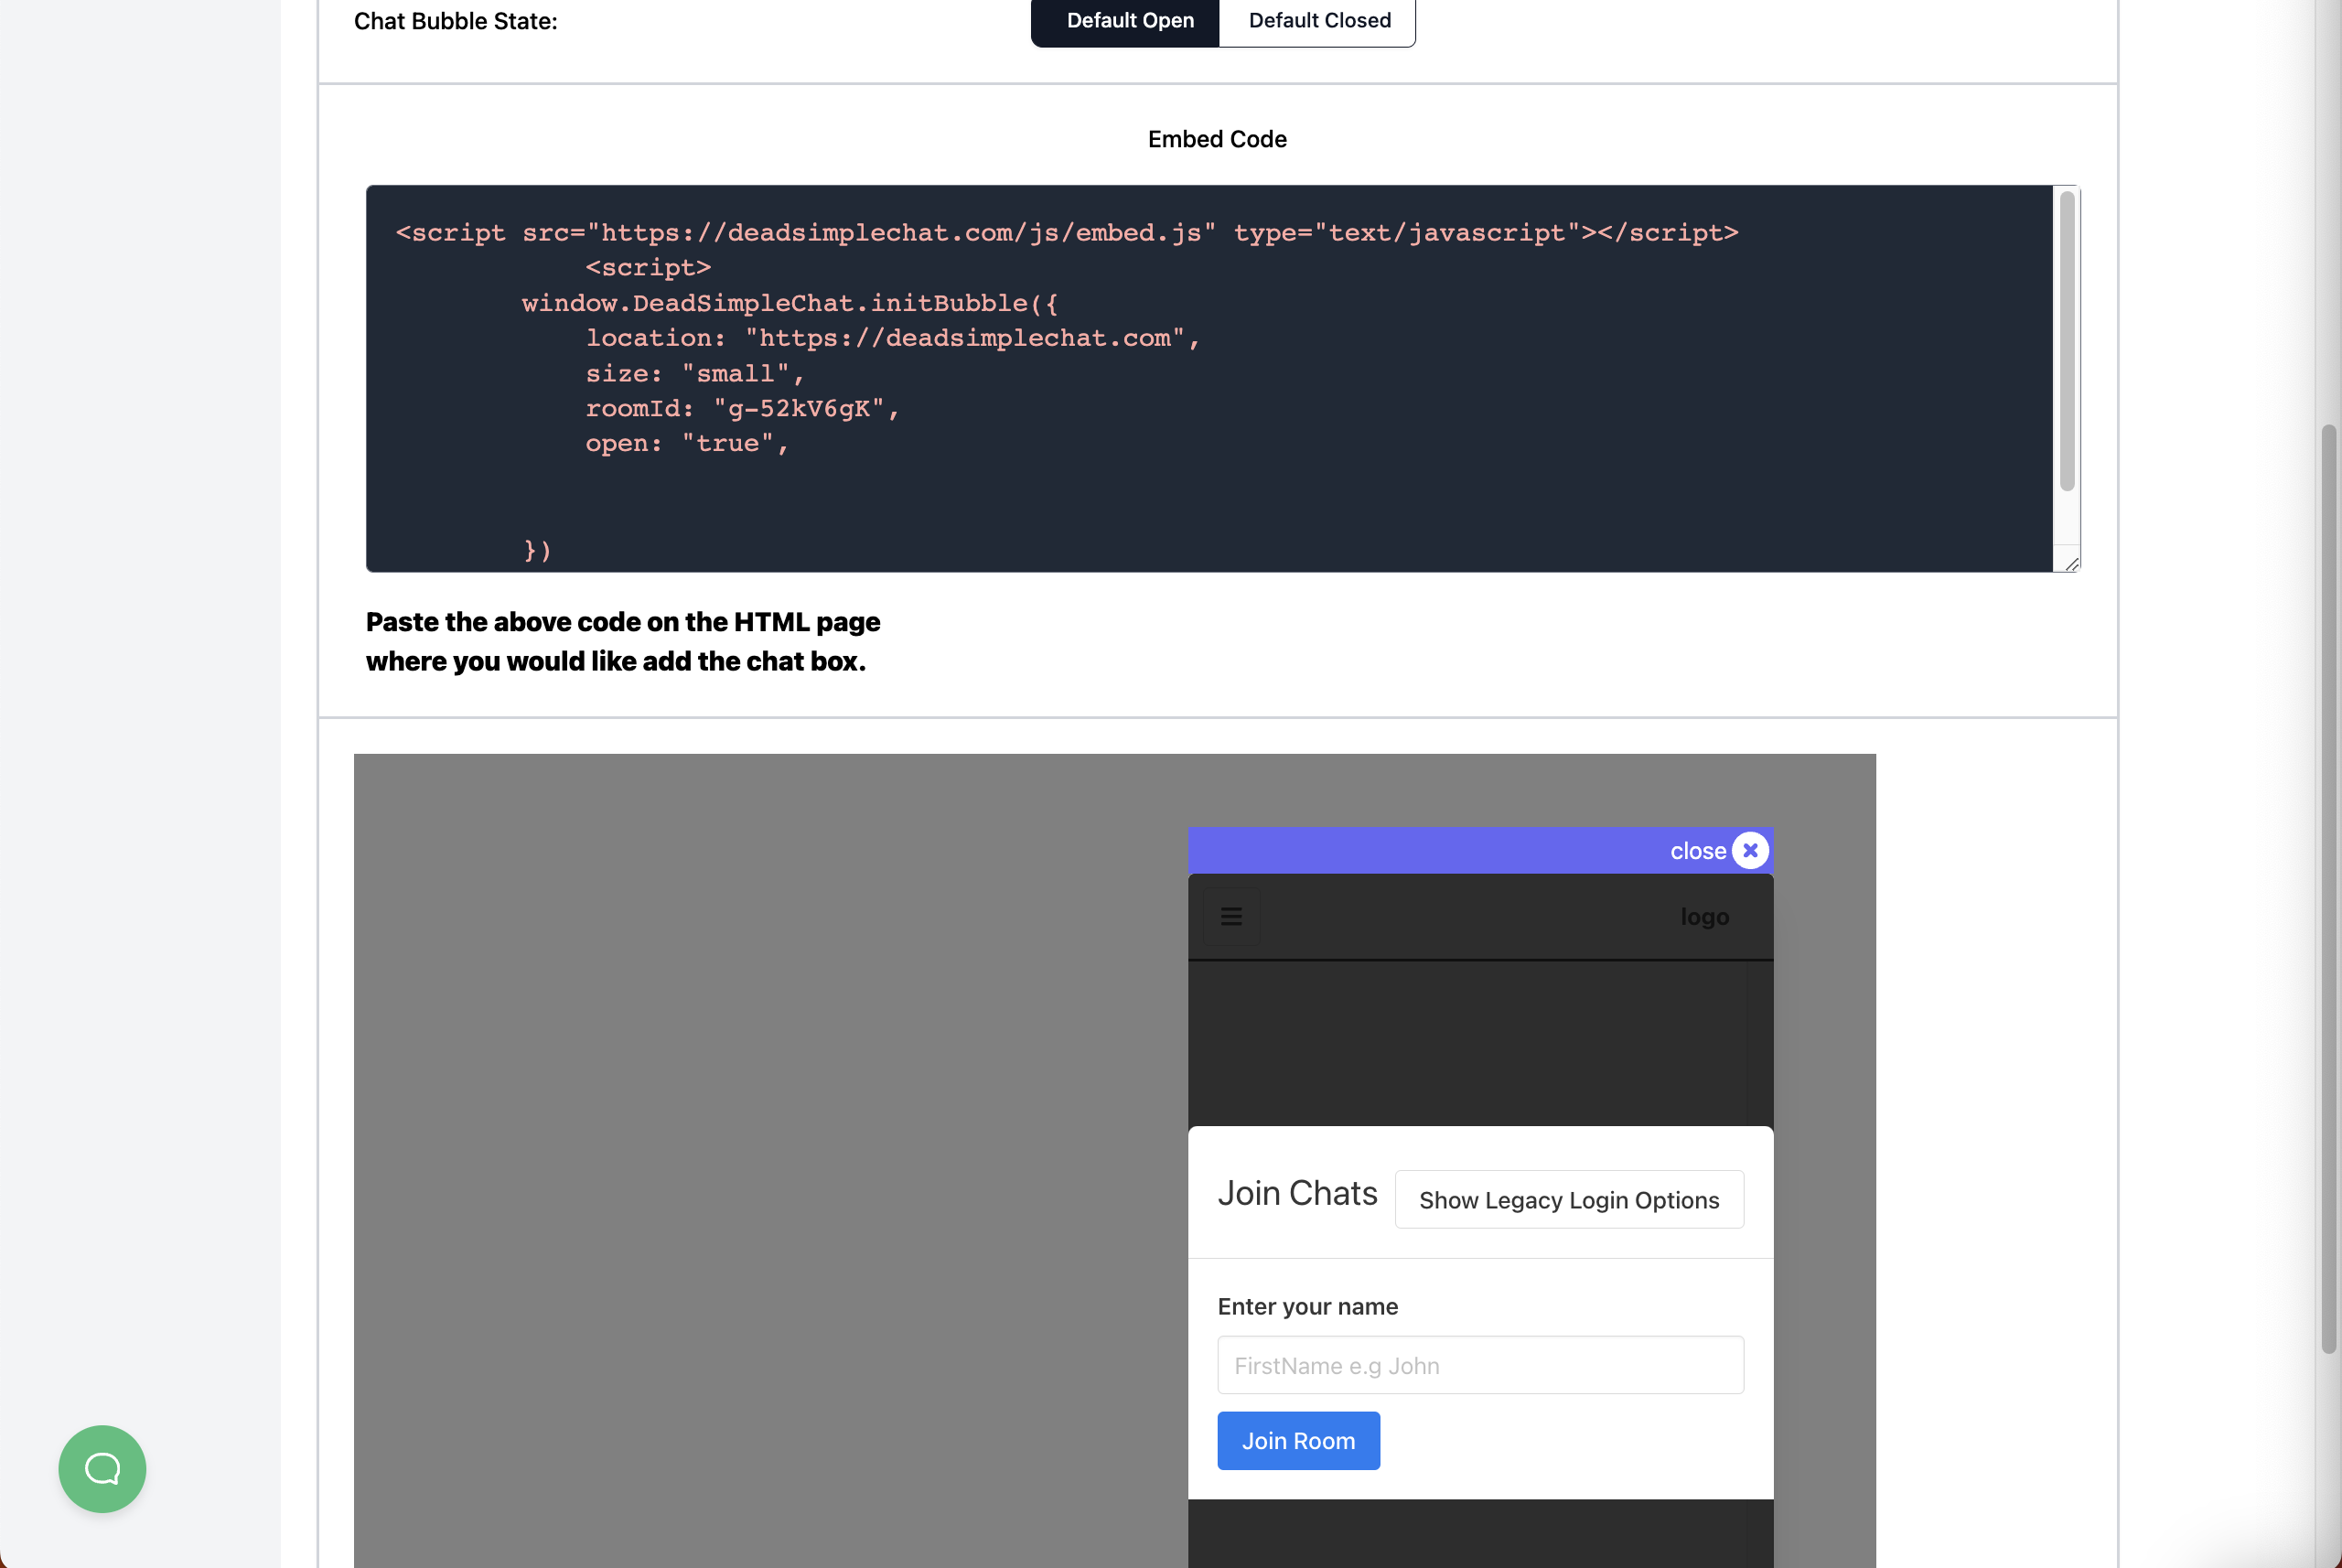 The chat bubble variant: the generated snippet, and the live preview of the bubble below it.
Copy the code and paste it into your page's HTML where you want the chat to appear. The frame
version is an ordinary <iframe>, no different from embedding a video, so any CMS that has an
"embed" or "custom HTML" block will take it.
Embedding Chat on Your Website covers the choice between frame and bubble properly, along with sizing and what to do on a site that is not plain HTML. Embedding Chat in WordPress is the step-by-step for WordPress.
The same Embed Instructions controls and the same live preview sit at the bottom of the Customize tab, so you can size the room while you are styling it without switching tabs.
Step 6: Bring people in — and give someone the keys
Getting people in depends on the permission level you set at step 2. A Public room asks for a username and lets them in. Provisioned Users and Members rooms expect a user you have created; see Creating and Managing Users for provisioning them, and Chat Room Permission Levels for what a refused join looks like.
If people already sign in to your own site, do not make them sign in twice — Single Sign-On logs them straight into the chat with the identity they already have.
Making someone a moderator is the step most easily forgotten, and several features do nothing without one. Only moderators can approve messages in a pre-moderated room, delete messages, ban people and create polls. Add one from the room's Members tab — Creating Moderators covers that and the other routes.
Moderating can then happen in two places: inside the room, or from Dashboard → Moderation, which lets you watch messages and participants and act on them without joining the room yourself. See the Moderation Dashboard.
Two account-wide settings are worth a look once a room is live, both under Settings:
- Profanity Filter — switch on the supplied list of bad words, and add your own. Paste a whole comma-separated list into the box and click Save Word List; they are added in bulk, and each one can be removed individually afterwards.
- Branding — your brand name and logo in the header of every room on the account.
A faster route: describe what you want
Steps 2 to 5 all have a round button in the bottom-right corner that opens the AI Configuration Assistant. Describe the room you want — "dark theme, hide the sidebar, hold messages for approval" — and it proposes the matching settings for you to review before anything is applied. It reaches the same settings you can always change by hand, so it is a shortcut rather than a separate way of working.
Where to go next
| If you want to | Read |
|---|---|
| Know what every General-tab setting does | Chat Room Settings Reference |
| Control who can join | Chat Room Permission Levels |
| Change colours, fonts and sizes | Appearance Reference |
| Remove parts of the interface | Hide Elements Reference |
| Put the room on your site, in depth | Embedding Chat on Your Website |
| Do it in WordPress | Embedding Chat in WordPress |
| Translate the room, or reword a label | Translate and Relabel |
| Add users, members and moderators | Creating and Managing Users, Creating Moderators |
| Moderate without joining the room | Moderation Dashboard |
| Run polls | Polls |
| Set a room up by describing it | AI Configuration Assistant |
| Drive the room from your own JavaScript | JavaScript Chat SDK Quick Start |
| Create and manage rooms from your backend | Create Chat Room, Update Chat Room |
| Get notified when things happen in a room | Webhooks |
| Log your existing users straight in | Single Sign-On |
| Put an automated participant in a room | What are bots? |
If you get stuck
Contact support — tell them your Room ID and what you were doing, and they can look at the room itself.